At one of Gracen’s recent Strong Start classes, Teacher Sonika had a painting station set up that used cookie cutters in place of paintbrushes or fingers. Gracen really enjoyed dipping the different shaped cookie cutters into the paints and then onto her paper, so today we decided to try the same activity at home.
Grae chose to use our alphabet cutters, so to have a manageable number of cutters to work with, we picked out just the letters in her name. We lined the tray of her beautiful easel (a special Christmas present from her Uncle Gary) with foil, mixed up some paint in colours of her choosing, and pulled down some paper for her to stamp.
She knew exactly what do to, and got to work dipping and stamping her letters right away.
She worked on the bottom half of her art piece for a while, then requested a chair so she could stamp the top half of her paper too.
This is her masterpiece once declared finished.
The other bonus? Clean up was a breeze. I filled a sink full of warm, soapy water, Grae walked each cutter to the kitchen and plopped them in, I crumpled up the foil, and we left the painting on the easel to dry.
Gracen and I may have just stumbled upon the best. play dough. recipe. ever. today while combining my old go-to with a few other ideas we found around the net…. Now I know I said similar things about this recipe, but this new one involves no cooking (win!) and smells delish (double win!)
We did have to make a trip to the grocery store beforehand, as a couple of the ingredients are not things we regularly keep on hand, but it was well worth the trip. This is by far the softest, squishiest, smoothest, nicest feeling {and smelling} play dough I’ve ever come across.
{this post contains affiliate links}
Now before I share the recipe, I want to say that there are LOTS of factors at play when making play dough at home. It seems like it should be a simple enough task {and I promise that it is}, but there a few things to consider and I want to be sure that your play dough turns out well. Believe it or not, things like the elevation at which you live, the weather / humidity where you are, and how you measure your flour can all affect whether your dough turns out too sticky, too dry, or just right.
For the purpose of this recipe, know that I measure flour by scooping a heaping amount of flour into my stainless steel measuring up and pressing it down into the cup on the inside of the bag. Thus, my flour is fairly packed down in the measuring cup.
Also know that if your finished play dough turns out too wet, you can save it by adding a little bit of extra flour, bit by bit (just go slow here – you can overdo it quickly!) and kneading it in. At the opposite side of the spectrum, if your dough seems too dry or tough, you can add moisture and soften it up by adding tiny bits of one of the wet ingredients (boiling water, oil, or glycerine) at a time, again being careful not to overdo it.
The BEST Scented No-Cook Play Dough
1 cup of all-purpose flour (packed down into the measuring cup)
3/4 cup of boiling water (measured in a dry measuring cup – this is important as wet and dry measures aren’t the same and using a wet measure will likely make your play dough too sticky)
*If using Kool-Aid or Frosting Creations, additional food colouring is not needed. You can also skip Kool-Aid / Frosting Creations all together and use the gel colouring for a coloured but unscented dough. Or leave out all three for a unscented, natural coloured dough.
Place all of the ingredients, save the boiling water, in a bowl and whisk well. Measure the water using your dry measuring set and add it to the bowl. Give the mixture a quick mix with a wooden spoon, banging off it off every once and a while. At this point, the mixture may seem too wet and sticky to make good play dough… Do not fret! Leave the semi-mixed dough on the counter to cool for 5 or so minutes. Afterwards, dump the mixture out onto the countertop and knead really well. You’ll know you’re done when the dough is fully cooled, soft and squishy, and the super smooth.
Enjoy!
FIY: Kool-Aid is a powdered drink mix that you add sugar and water to make ‘juice’ and Frosting Creation Flavour Mix is a powder used to flavour store-bought icing. Both can be used in this recipe to scent AND colour the play dough, but they can easily be left out for a natural, unscented dough or replaced with food colouring for a coloured, but unscented dough.
FIY #2: Non-edible glycerine is readily available in the first aid section of most grocery stores and edible glycerine is available where cake making supplies are sold.
FIY#3: This play dough will last for months if stored at room temperature in an air-tight container or bag. Do not refrigerate or store near a heat source or on top of the fridge.
FIY #4: When making this play dough, we use dry measuring cups only – even when measuring the boiling water.
After stumbling upon this post from The Imagination Tree a little while ago, I knew we had to try making rain sticks of our own. We had a few really heavy duty cardboard tubes already on hand (two from rolled art paper and one from our Stuck on You parcel – review to come soon!) and since we’ve recently been collecting and making instruments for Gracen’s collection, it was the perfect project.
To get started, we collected a bunch of things from around the house… An assortment of pantry goods (beans, rice, and popcorn seeds to be exact), a hammer and some small nails, these duct tape sheets Grae picked out on our most recent States trip, some fluorescent dot stickers for decorating, and the cardboard tubes of course. (We also got out a Sharpie, a pair of scissors, and a small tin can out part way through the project.)
Here’s a better look at just how sturdy our tubes were. Like mentioned on Imagination Tree, ordinary paper towel and toilet paper rolls are not thick enough and won’t work for this project. Basically, you want your tube to be sturdy enough to withstand nails being pounded into it, and sturdy enough to hold the nails in afterwards.
Although this next part was a little too tricky for Grae to do on her own, she sure enjoyed helping. Using flat-headed nails that were almost as long as the diameter of the tube, we pounded them into the cardboard roll at random intervals. What worked best for us was hammering the nails in together using a hand-on-hand technique or having Grae hammer nails that I’d already put halfway through.
Here’s what the inside of our tube looked like once we’d finished with the hammering job. Of course, the more nails you add, the slower the beans or seeds will move through the tube, meaning a longer ‘rainfall’.
Next, we traced the end of our tube onto the backside of a duct tape sheet together two times and cut the circles out.
Then, using a small tin can, we traced and cut out two larger circles too.
In order to seal off the end of the tube without having our seeds stick to the duct tape, we placed the smaller circle in the centre of larger circle (sticky sides together).
Then carefully placed and sealed the larger duct tape circle over one end of the tube.
Next, my little helper chose her filling (popcorn seeds) and added a few handfuls to the tube. (She wanted the tube to stand on its own without falling over and was having no luck, so she quickly went and retrieved this mason jar from the kitchen… Of course, being her mama, I thought this was quite brilliant.)
With our seeds added, we created another double-layered duct tape circle and sealed off the second side.
At this point, you could really decorate the outside of the rain stick with anything, provided you ensure the nails are covered and cannot be removed by curious little fingers. We decided to use our duct tape sheets since they secure the nails and look pretty all at once. The bonus was that they were also the perfect width to fit the length our small tubes, so all we had to do was cut them in half to avoid wrapping around the tube more than once.
I positioned the tube onto the duct tape paper and Miss G gave it a good roll.
And there you have it – a fluorescent pink and leopard print duct tape rain stick!
Of course, nothing in this house is complete without being plastered with stickers, so on went a bunch of fluorescent dots.
7 times out of 10, if you ask Gracen what she’d like to do, she’ll answer “Bike ride!” or “Park!” Guaranteed, the other 3 times you’ll get a very enthusiastic “Paint!” So that’s just what we did today. With G on my lap, we browsed my Toddler Activities Pinterest board looking for a fun and new painting method to try. There were many options – wellie boot painting, muffin tin painting, fizzy sidewalk painting, salad spinner painting, bubble painting, and more – but the pin she selected? This homemade puffy paint recipe.
Though we stuck to the recipe fairly closely, we used a slightly different method to make it. Here’s what we gathered to get started… Water, salt, self-raising flour, food colouring, a zip-close bag, an ice cube tray, and some paint brushes.
I of course had the help of this monkey too. (I asked her to do something funny and this was her immediate reaction… Good to have a solid go-to funny face on deck for moments just like these.)
Though you really don’t need it, we used a mason jar to hold our bag upright and open for us (a cup would work just as well) so that Grae could add ingredients without having to hold the bag open at the same time. First, she added the salt and flour to the bag.
Then we zipped it closed and she gave it a good shake.
Next, we added the water…
Zipped it closed again {making sure all of the air was out first}, and she smushed everything together until it formed a goopy paste (this was her favourite part).
Next, we cut the corner off of the bag.
With just a tiny bit of help, Grae squeezed the mixture out of the bag and into our ice cube tray.
Then she added several drops of food colouring to each compartment.
Using our paintbrushes, we stirred the colouring into the paste.
Then it was time to paint!
Although most posts about homemade puffy paint instruct you to microwave your artwork, we rarely use ours and I really didn’t want Grae sitting in front of the microwave peering in while each of her pieces ‘baked’. Instead, we popped ours into the oven for a few minutes on the lowest setting, and it seemed to work just as well (putting them in the sun to dry would probably work too and may give the paint more of an opportunity to rise also).
The result? Fully dry, yet slightly squishy paint blobs that can easily be hung or added to a art portfolio without crumbling apart.
Want to try for yourself? Here’s our recipe…
Homemade Puffy Paint
2 1/2 tablespoons of self-raising flour
2 1/2 tablespoons of salt
3 tablespoons of water (you can add more or less depending on your desired consistency, just be sure to not make it too thin, otherwise it won’t ‘puff’ well)
food colouring
1 zip-close bag
1 muffin tin or ice cube tray
Place the flour and salt into the bag, zip closed, and shake well. Add the water, zip close, and smush around until the mixture forms a smooth paste. Cut the tip off of one corner of the bag and squeeze the paste into your muffin tin or ice cube tray. Add food colouring and blend. Create your puffy paint masterpiece making sure to lay the paint on thick. Bake your artwork in a 150 degree oven for 2 to 4 minutes.
We’re hanging on to every last bit of summer we can around here, and have spent the last two days at the beach. Today, I packed along with us a few simple materials to try out a very cool beach project I saw long ago on Honest to Nod. It went surprisingly well for our first attempt, and we’ll definitely be trying it again before the summer’s vanished completely. Here’s how Miss G and I made our very own sand casts…
First of all, we retrieved a few buckets of ocean water and created a little plot of firm, mouldable sand. You could easily do this project near the shoreline where you normally find perfect sandcastle sand, but since the tide was high and the shoreline was littered with seaweed and shells, we opted for this method instead. (You can also do this project at home by mixing play sand water in a baking pan or shallow dish of some sort.)
Next, using the bottoms of our sand buckets and a plastic cup, we made several wells in the sand approximately 1 to 2 inches deep. (You can also use drift wood, feet, hands, and beach toys to make wells of different shapes and sizes.)
Then, using shells we collected around the beach, as well as a few glass stones we brought from home, we created designs and patterns in the bottoms of the wells. One thing we did learn about this is that in order to show up well in the finished product, the decorations need to be pushed down quite firmly into the sand – otherwise they just get completely buried in plaster. (At this stage, you can also use your finger or a stick to draw designs in the wells. Just remember that if you choose to write something, you need to write it backwards so that it faces the correct way on the cast.)
Next, using a container from home, a couple of cups of plaster of paris powder (readily available at art supply and hardware stores), some ocean water, and a piece of drift wood, we mixed up our plaster according to the directions on the box (2 parts powder, 1 part water).
Then we filled our wells almost to the top. At this point, we experimented with adding a couple of straws to two of the wells in order to have a hanging hole at the end. Turns out, it worked great. The only thing we’ll do differently next time is add the straws before the plaster (much easier when you can see the stones and shells, rather than digging around trying to avoid them ☺).
Easiest step? Playing and eating snacks while waiting for the plaster to set.
After about 30 minutes, I gently poked the plaster to find out that they were dry and hard, so I gently scooped up one of the casts, along with some of the sand below it. Sure enough, it was fully solid. Grae helped me scoop up all of the casts and place them gently in a bucket.
Next, we took the casts down to the ocean for a quick bath to remove the excess sand.
Here’s what we ended up with.
These two are Grae’s favourites… The octopus was made with the bottom of one of her Melissa & Doug nesting pails and ‘happy face guy’ was made with glass stones and a chunk of a shell.
Grae and I are hosting a messy play date this week and this just may have to be one of our outdoor crafts for the day. Fun, simple, and the perfect way to hang on to summer long after it’s gone.
What does an afternoon outdoors, a big blanket, a toddler, and a mama attempting to read the newspaper equal? Impromptu newspaper collages… Bust out the scissors and the glue!
♥
Photos edited with Instagram. Find me under jkossowan.
After our awesome magic milk paint experiment today, Gracen and I took advantage of the overwhelming amount of apple pears our tree has this year and did something that reminds me of making homemade gift wrap as a child… Apple stamping.
Needing to dedicate a day (or an afternoon at the very least) to picking the ridiculous amount fruit our tree is currently carrying, much of our backyard currently looks like this. Sadly, once they’ve fallen to the cement pad, most of the apples are left badly bruised, a little mushy, and not all that great for eating purposes.
So today, while we were picking them up and putting them in the compost, we saved a few of the better ones to use for stamping purposes. Grae picked two “baby” apples and one “biiiiiiig” apple for the project, and then we collected a roll of art paper, some paint, and a knife (for Mama’s use only of course).
I chopped the apples both vertically and horizontally, trying to get rid of the really yucky parts and keep the more decent parts all at once. As you can see, some of these are still pretty yucky, but that doesn’t really matter when you’re just using them for stamping.
Grae got started right away – dunking and stamping, dunking and stamping, again and again.
Stamping of this sort often has better results when the paint it brushed onto the object, but since dunking the apples into the paint is much easier, and let’s face it – more fun, we just went with that technique. Grae didn’t seem to mind one bit.
The end result {besides a toddler with multicoloured hands}? A beautiful masterpiece that could be hung and displayed or used to wrap a fall gift.
Today, Gracen and I tried something I’ve had on my {mental} ‘list’ for a very long time now… Magic milk painting! And I’m very happy to say, it was every bit as cool as I thought it would be. I’m not sure where I saw it first (it was a long time ago), but I found this postvia Pinterest, we followed the instructions, and the activity was a huge hit.
Here’s what we used… Homogenized milk (I’ve read it works better than lower fat milks), food colouring, dish soap, toothpicks, and a plate (all things we already had on hand – bonus).
My happy little scientist / artist decided to enjoy the beautiful afternoon and took our things outside. With a thin layer of milk covering the bottom of the plate, Grae added drops of food colouring in various places around the dish.
Then, for the magic… With her toothpick dipped in dish soap, Grae began touching the food colouring drops. The soap causes the colouring to radiate away from the toothpick, creating beautiful circles and swirls of colour around the plate.
The more you dip, the more the colours move and blend. I must say, it’s absolutely mesmerizing to watch.
The coolest part is that the colours continue to dance and mix long after you touch them with the toothpick, so you don’t have to constantly be adding more soap to enjoy the beautiful effects.
Just take a look…
Eventually, the milk becomes quite muddled and the colours no longer ‘dance’ as well. At that point, it’s time to fetch a fresh dish of milk and start again.
We tried 3 times, twice with whole milk and once with half & half cream (thinking that the higher fat content might make the results even better), and I must say, the whole milk worked best. The cream did work well and made the colours move a little more slowly (which is a good thing if you want the activity to last longer), but at the same time, the slower effects did seem to take away (just a tiny bit) from the magic of it all.
Both Gracen and I enjoyed this activity so much that we’ll definitely be doing it again soon. And although dairy products past their due date freak me right out (I know, I know…), it would be great to pull out when you have milk that’s gone a day or two past its best before date.
So today, Grae and I gathered up our materials… White glue, table salt, food colouring diluted with water, black card stock, and an old baking pan.
The first step was creating a design out of glue. After a quick demonstration, Grae went to town creating squiggles, zigzags, and loops.
Here’s her masterpiece.
Working quickly, Grae generously cover the entire design in salt.
When the glue had been fully covered, we carefully shook off the excess salt into a little bowl to save for later.
Next, Gracen used an old medicine dropper to blob drops of the food colouring/water mixture onto the salt. Although the results looked cool, I quickly realized two things. First, the glue/salt lines had to be much thicker in order absorb more of the colour mixture, and second, more of the paper had to be covered in glue/salt in order to up the chances of the dripped colour actually hitting it.
We tried again, this time with Grae and I creating the glue pattern together so I could add pressure to the bottle and ensure the glue lines were good and thick. The immediate finished product looked better, but once dry, it looked much like the first attempt… Faded, clumpy, and flaky.
Though this project. like most, is definitely about the process rather than the project, we tried one more time with another two changes put into play. First, we allowed the glue to dry completely before adding any colour to it, and second, we used the food colouring as is, straight out of the bottle.
Not only did the finished product remain bright and intact even once dry, but the process was way more fun too. Letting the glue dry first allowed the colour drops to move much further along the salt lines… And it was indeed magical!
If you want to try making a raised salt masterpiece with your own toddler, here’s what I’d recommend…
1. Select a thick piece of cardboard or card stock as your background (regular paper is too flimsy and the salt design will crumble when bent) and place it on a large baking pan.
2. Together, create thick glue designs that cover as much of the page as possible.
3. Have your toddler very generously sprinkle salt over the entire page. Shake the salt around to ensure good coverage, then empty the extra salt into a bowl for your next picture.
4. Set aside and let the glue dry fully.
5. Using food colouring straight from the bottle, have your toddler squeeze drops of colouring onto the salt lines. Watch closely as the colour runs along the salt.
This morning, Miss G asked for a marker. I gave her one, she went to her little table, and returned with this paper a moment later and proudly announced, “Happy face!”
Yes, indeed… That’s certainly a happy face. The first one she’s ever done all on her own.
As a mama, I’m always looking for unique ways to showcase Gracen’s artwork without our little house looking like a cluttered mess. One of the places we love to hang multiple pieces is on her bedroom door. So much so, that over time, it’s become her little art gallery of sorts. For the longest while we were just taping things up using masking or scotch tape rolls, then I jumped on the washi tape bandwagon, which took it up a notch, but neither were overly toddler-friendly. I wanted Grae to be able to hang her artwork and switch around the pieces without having to muck around tape or ask for assistance. So today, we put together a little gallery door that she can update and add to all on her own, with just a press of a clothespin. Here’s what we did…
Yesterday, while Grae splashed in the wading pool out back, I painted a handful of regular wooden clothespins. She’d come out, dripping wet, help me with some painting, and jump back into the pool, splashing my table in the process. With a couple of base coats dry, we used the eraser side of pencils, dipped them in white and black paint, and polka dotted our way along each pin. The result was very handmade looking clothespins with a charm all their own.
Today, we took some small 3M poster hanging strips and sliced them vertically using a utility knife and a ruler. (This can be done using scissors, but trust me – use a utility knife. It’s much easier.)
Next, we peeled off the protective paper backings and stuck the strips onto the backs of the clothespins, leaving just the tiniest touch hanging over the top edge (hoping it might make the job easier when we want to remove them one day).
As a last step, I removed the other side of the protective paper and adhered the pins onto the door. I put them on very gently at first, and once I knew my {random} layout would work, pressed them down quite hard to ensure a good stick.
The result was a gallery door where Grae can proudly display her favourite creations without needing much help to do so.
Earlier in the week, Miss G and I put together an adorable little Pinterest-inspired card for her Gido’s (grandpa’s) birthday. (Gido if you’re reading this right now, you shouldn’t be! Back to preparing/enjoying your bike trip!!!) The original post comes from A Day in the Life, and although we stuck to the basic plan, we made a few little changes along the way too. Here’s our version…
First up – materials… A couple of pieces of card stock, some crayons, a pencil, a black Sharpie, a glue stick, and some scissors.
To get started, we traced Grae’s hand onto the card stock in pencil (her favourite part – the girl loves having her hand traced).
Then I folded the card stock in half, and cut out the hand, giving us two identical copies. We did try to ‘team cut’ the hand shape, but it was pretty tricky, so Grae became the recycling collector/depositor for this part instead.
Next, using our black marker and the hand-over-hand technique, we printed “I love you…’ on the front of the left hand.
Then it was time to decorate both hands. Everything is better with colourful baby squiggles, is it not?
Next, we cut two strips of our white card stock, glued them together to form one extra-long strip, and wrote “this much!”, plus a personalized message, along the length before Grae added her special touches to it.
With the decorating complete, we folded up the strip accordion-style…
And attached each side to the palms of the hands using our glue stick.
There’s no doubt that open-ended children’s activities, those without a finished product in mind, are some of the very best kinds. Today I set out a very simple ‘invitation’ in Grae’s room… A piece of card stock, tissue paper squares in a variety of colours, and a glue stick. No instruction, no example, just materials available for her exploration. I wasn’t sure what she’d do with them. Scrunch the paper into balls and adhere it to the paper? Run the glue stick up and down her arms and cover them in tissue as she does with stickers? Make it ‘rain’ tissue paper all over her bedroom? There were many possibilities (some of which this mama like better than others).
So what happened? Upon laying eyes on the station, she gave a little ‘ooh’ and a nod with her head, and quickly plunkered down on her belly. She was immediately drawn to the glue stick and asked if it was “pretty pretty” (chapstick) and motioned putting it on her lips (although we’ve used white glue and craft glue before, a glue stick was a first). I explained that it was glue, to which she removed the lid and started smearing it on her paper. She then carefully started adding tissue paper squares, making sure they laid flat on the page and were spread out.
The end result was a tissue paper collage of sorts, a whole lot of great fine motor practice, and a lovely little conversation about colours and squares (“Circles? Circles, no. Squares, yaaaaa.”)
Not to mention, another beautiful piece of art to add to her scrapbook. ☺
What do you get when you mix a Langley play date with a closet overhaul? Olympic-inspired painting, of course!
Haha! I’d love to say I’m joking, but sadly, I’m not…
Admittedly, I have not watched one single bit of Olympics coverage this time around. Until this morning, that is. Grae and I headed out to Langley to visit my friend Steph and her little man / Gracen’s favourite hug and kiss recipient, Tate. While we were there, Steph had the Olympics playing in the background and I remembered how much I love the Olympics (and how much I’ve been missing out on by not watching).
Fast forward to this afternoon.
Now back at home, I was attempting {for the second day in a row} to reorganize the one and only {catch all} storage closet our teeny tiny house has. I came across the pipe insulation Pinterest told me to use as a wreath form (works terribly, by the way… my advice is to splurge and spend the extra few bucks!) and was feeling badly about just turfing it when I had an idea… We could chop it up and use the pieces as stamps!
So, long story short, with the Olympics on my mind and pipe insulation in my hand, I thought it’d be fun to have Gracen paint something reminiscent of the Olympic rings. Here’s how our project took shape…
First we gathered our pipe insulation, our IKEA MALA paints (which coordinate perfectly with the Olympic ring colours), some card stock, a pair of heavy duty scissors, and a tray.
Next, I chopped up the pipe insulation into pieces approximately 3 inches long.
We gave our paints a good shake, squeezed out a dollop of each, and placed one insulation stamp on each paint blob.
Then my little lady set off to work on her olympic-inspired painting…
This is her first completed masterpiece.
They progressively got more abstract after that…
Here are her four pieces in the order she did them, starting from the top left and moving clockwise. While they certainly don’t look just like the Olympic rings, I’d say they definitely have an Olympic vibe to them, wouldn’t you?
And of course, the most important part – she had fun. Just look at that silly little face!
♥
While I know that pipe insulation isn’t something everyone just has on hand, many other household objects could be substituted… Cannelloni noodles would work. As would paper towel or toilet paper rolls… And heck, if you’re feeling crazy, you could even chop off a little bit of the end of a pool noodle. ☺
When we were on vacation, all of the old-school toys Grandma Charlotte has saved from her boys’ childhood got me thinking about favourites from my own childhood. While it’s not really a toy, one thing I LOVED growing up was the felt boards teachers would use during carpet times in elementary school. You just knew that if you sat down to listen to a story and the teacher reached for her felt board and a bag of felt pieces, it was going to be a good one.
This then got me thinking about all of the cool things Miss G and I could do with a felt board of our own. From matching games, to sorting activities, to building funny faces, and learning about shapes and colours… The options are endless really.
Now, we probably could have bought a pre-made felt board and coordinating pieces, but what fun is that?! Especially when making one of your own is so easy. The best part is that this entire project can be done over the course of a nap time if your little one sleeps for at least an hour.
We picked up this square poster frame from IKEA, grabbed a package of felt from the craft store (you can also buy it on a roll from fabric stores), and gathered up a glue gun (I later changed my mind and used Tacky Glue but I think either would work), a pencil, and some scissors.
To get started, I took the cardboard backing out of the picture frame, lined it up with the corner edges of the felt piece, and traced the other two sides onto the felt in pencil.
Next, I cut the felt square out. (Make sure you’re using really sharp scissors here. Your sanity and straight line with thank you.)
Next, because I chose to use white felt, I took the paper insert that came inside the frame, flipped it over, and glued it onto the cardboard insert to create a white backing for my felt. (You can use your glue gun or Tacky Glue here, but you could just as easily use white glue or a glue stick too.) See the difference? Much better with a little help from the insert.
Next up, I carefully gave my felt piece a quick iron. You don’t have to do this, but I found it made it much easier to mount the felt onto the cardboard when the large creases had been removed. Just be sure to use a low heat and keep your iron moving if you do this step. Then, mount your felt onto the cardboard using thin glue strips in order to avoid ripples and bumps in the felt. Also because felt does have some give and can stretch over time, it’s a good idea to glue the middle as well as the edges (I did the edges and a giant ‘x’ across the centre). Once you’ve got your felt piece placed on the glue, smooth it down from the centre outwards to ensure a good stick.
When your glue has had a chance to dry, place your cardboard backing into the frame and secure it.
Voila! Felt board complete.
With Miss G still sleeping and a little time still on my hands, I decided it would be really fun to have a game of some sort ready to go for when she woke up. I had no idea what I would make, but it needed to be something quick and easy. Thank goodness for Pinterest! I searched “felt board ideas” and got all of these great results. Scrolling through, I was immediately drawn to an ice cream cone colour matching game that I knew would be quick to cut out and super engaging for my little lady who loves matching games and announcing the colours she sees around her.
I just cut out my first cone and ice cream scoop freehand and then used the pieces as a guide for my others, but upon visiting childcareland.com later, I saw that she has a printable template available also.
I cut my circles out using a coin as a guide and glued them onto the cones using a little dot of Tacky Glue. And that was it. After a few minutes drying time, the pieces were ready to be put to use.
I love this felt board set because it can be used when talking about colours, it can be used as a matching game, it can used to learn about rainbow order, and it can be used just for fun (think 8 scoop ice cream cones!)
Here’s the finished product.
Miss G was thrilled to wake up to this little surprise and matched the scoops to the cones again and again, naming the colours as she went along.
Can’t wait to make some other pieces for her soon.

 Grae chose to use our alphabet cutters, so to have a manageable number of cutters to work with, we picked out just the letters in her name. We lined the tray of her beautiful easel (a special Christmas present from her Uncle Gary) with foil, mixed up some paint in colours of her choosing, and pulled down some paper for her to stamp.

 She knew exactly what do to, and got to work dipping and stamping her letters right away.
 She worked on the bottom half of her art piece for a while, then requested a chair so she could stamp the top half of her paper too.
 This is her masterpiece once declared finished.
 The other bonus? Clean up was a breeze. I filled a sink full of warm, soapy water, Grae walked each cutter to the kitchen and plopped them in, I crumpled up the foil, and we left the painting on the easel to dry.


 First of all, we retrieved a few buckets of ocean water and created a little plot of firm, mouldable sand. You could easily do this project near the shoreline where you normally find perfect sandcastle sand, but since the tide was high and the shoreline was littered with seaweed and shells, we opted for this method instead. (You can also do this project at home by mixing play sand water in a baking pan or shallow dish of some sort.)
 Next, using the bottoms of our sand buckets and a plastic cup, we made several wells in the sand approximately 1 to 2 inches deep. (You can also use drift wood, feet, hands, and beach toys to make wells of different shapes and sizes.)
 Then, using shells we collected around the beach, as well as a few glass stones we brought from home, we created designs and patterns in the bottoms of the wells. One thing we did learn about this is that in order to show up well in the finished product, the decorations need to be pushed down quite firmly into the sand – otherwise they just get completely buried in plaster. (At this stage, you can also use your finger or a stick to draw designs in the wells. Just remember that if you choose to write something, you need to write it backwards so that it faces the correct way on the cast.)
  Next, using a container from home, a couple of cups of plaster of paris powder (readily available at art supply and hardware stores), some ocean water, and a piece of drift wood, we mixed up our plaster according to the directions on the box (2 parts powder, 1 part water).
 Then we filled our wells almost to the top. At this point, we experimented with adding a couple of straws to two of the wells in order to have a hanging hole at the end. Turns out, it worked great. The only thing we’ll do differently next time is add the straws before the plaster (much easier when you can see the stones and shells, rather than digging around trying to avoid them ☺).
 Easiest step? Playing and eating snacks while waiting for the plaster to set.
  After about 30 minutes, I gently poked the plaster to find out that they were dry and hard, so I gently scooped up one of the casts, along with some of the sand below it. Sure enough, it was fully solid. Grae helped me scoop up all of the casts and place them gently in a bucket.
 Next, we took the casts down to the ocean for a quick bath to remove the excess sand.
 Here’s what we ended up with.
 These two are Grae’s favourites… The octopus was made with the bottom of one of her
  What does an afternoon outdoors, a big blanket, a toddler, and a mama attempting to read the newspaper equal? Impromptu newspaper collages… Bust out the scissors and the glue!


 The more you dip, the more the colours move and blend. I must say, it’s absolutely mesmerizing to watch.

 So today, Grae and I gathered up our materials… White glue, table salt, food colouring diluted with water, black card stock, and an old baking pan.
 The first step was creating a design out of glue. After a quick demonstration, Grae went to town creating squiggles, zigzags, and loops.
 Here’s her masterpiece.
 Working quickly, Grae generously cover the entire design in salt.
 When the glue had been fully covered, we carefully shook off the excess salt into a little bowl to save for later.
 Next, Gracen used an old medicine dropper to blob drops of the food colouring/water mixture onto the salt. Although the results looked cool, I quickly realized two things. First, the glue/salt lines had to be much thicker in order absorb more of the colour mixture, and second, more of the paper had to be covered in glue/salt in order to up the chances of the dripped colour actually hitting it.

 We tried again, this time with Grae and I creating the glue pattern together so I could add pressure to the bottle and ensure the glue lines were good and thick. The immediate finished product looked better, but once dry, it looked much like the first attempt… Faded, clumpy, and flaky.
 Not only did the finished product remain bright and intact even once dry, but the process was way more fun too. Letting the glue dry first allowed the colour drops to move much further along the salt lines… And it was indeed magical!
 Yes, indeed… That’s certainly a happy face. The first one she’s ever done all on her own.
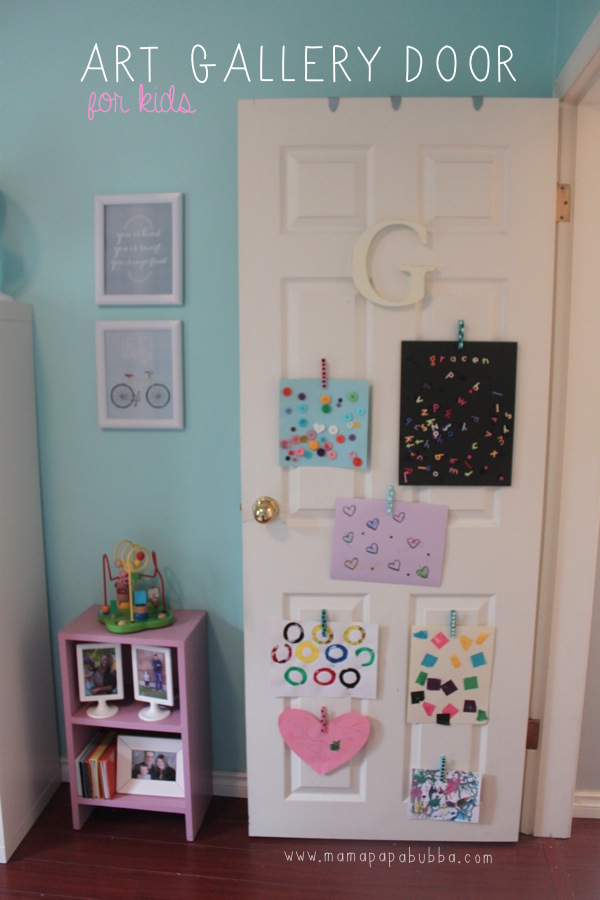


 Not to mention, another beautiful piece of art to add to her scrapbook. ☺


