Here’s a new {Halloween-themed} felt board activity I whipped up for Miss G this afternoon while she napped. It was a super quick project and couldn’t have been more simple to put together.
All you need is some felt (I just use the cheap craft store stuff for felt board activities), a really good pair of scissors, and maybe some fabric glue if you want make your pumpkin stems green like I did.
I often cut out my shapes freehand, but since I wanted 3 distinctly different pumpkin shapes, today I quickly sketched them out first.
Next, I cut out my pumpkin shapes, as well as some green stems for the tops.
Using Aleene’s OK To Wash-It fabric glue, I attached the stems to the pumpkins and set them aside to dry. Of course, you could stitch them on or use regular craft glue for this job instead. Or, another thought…you could not attach them at all and let adding stems to the pumpkins be part of the designing process.
While the glue dried, I worked on cutting out some jack-o-lantern eyes, noses, and mouths. I did this freehand, making up the shapes as I went along. Folding the felt in half in order to make symmetrical noses and mouths / two eyes at once made the job a lot faster and easier.
When Grae woke up, she was super excited to find her new felt board jack-o-lanterns waiting for her and got to playing right away.
She designed and redesigned the jack-o-lanterns again and again, sometimes very cautiously and sometimes more abstractly. She even ended up using eyes as eyebrows and upside-down mouths as moustaches (two things I wouldn’t have thought of!)
♥
For an easy and inexpensive felt board DIY, click here.
Only I would try to amp up the nutritional value of bananas… Haha! I kid. (Kinda.) The truth is, Miss G has been on a two ingredient ice cream kick lately. After asking for it for the third afternoon in a row, I decided it was time to switch things up a little bit. Though we’ve made frozen banana pops before (which Grae loved), I wanted to try something smaller and easier to snack on this time around. So along came the frozen banana bite. With only 3 ingredients, they’re a breeze to make, plus, dare I say they taste like banana cream pie? I do.
Here’s the ingredient lineup… Bananas (ripe, but not overripe), roasted ground flax seed, and cinnamon.
Start off by peeling the bananas and making sure all of the white stringy things are removed.
Chop them into coins (maybe about a half inch thick?) and set them aside.
Next, pour some roasted ground flax seed into a container with a lid (or a zip close bag).
Enthusiastically dump some cinnamon in too.
Put the lid on the container and give it a little shake.
Next, place the banana coins on top of the cinnamon/flax mixture.
Place the lid on the container again and shake until all of the banana coins are well coated.
Next, place the coated banana pieces onto a parchment-lined baking sheet.
Place the tray in the freezer for at least an hour.
Serve them frozen to your excited toddler and watch them disappear. (Without a word of a lie, Gracen gobbled up our entire batch – and that was after a full meal!)
Frozen Banana Bites (that taste like banana cream pie)
2-3 large ripe (but not over ripe) bananas
3 tablespoons of roasted ground flax seed
1/2 teaspoon of cinnamon
Peel the bananas and slice them into coins about a half inch thick, then set aside.
Put flax seed and cinnamon into a container with a lid or zip close bag and shake. Add the banana coins to the flax mixture and shake again. Place the coated banana pieces on a parchment-lined baking sheet and put in the freezer.
After about an hour in the freezer, the banana bites will be frozen, but still a tiny bit soft, making them perfect for serving. If you aren’t serving them right away, transfer the bites into a airtight container. When you’re ready to eat them, you can serve them completely frozen, or let them sit on the counter for 5 to 10 minutes beforehand (my preference).
Looking back on my childhood, some of my favourite times were the ones when we got to play with “the real thing”. Using Dad’s real tools, playing with Mom’s real make-up, creating a store using real pantry items and real money… Those times were the extra special ones.
So today, Gracen and I set up a little tea party using some real things… Real snacks for one, and while I’m not quite ready to let her drink real tea, real water was a substitute she was perfectly happy with.
Sure, her tea pouring skills haven’t yet been perfected and most of our blanket and snacks were covered in little “tea” puddles as a result, but at the end of the day, blankets can be washed and puddles can be wiped up. What matters is that our little lady spent a special afternoon tea-ing with Mama and Sophie and got to practice all kinds of everyday skills by playing with ‘the real thing’.
Today Gracen and I did one of our favourite things… We had a little mama and babe crafternoon. A Halloween crafternoon to be exact!
This is by no means a new idea, and it’s nothing fancy, but it is something I’ve always enjoyed doing with my kindergarten students. It’s fun, messy, and personalized with wee little handprints. Perfect for Halloween cards for grandparents, teachers, or a special friend. Here’s a quick run down of how Gracen created this little masterpiece.
First, start off by drawing a large asterisk on a piece of black construction paper or card stock (we use a hand over hand technique for jobs like this).
Next, connect the tips of the asterisk with concave lines in order to create a web shape.
Then, cut out the web. (This is tricky for little hands. Gracen tried, but our poster board is was so thick that it was next to impossible for her… This may be more of an adult helper sort of job.)
Place a small roll of tape in the centre of your web.
Tape the web down in the centre of a box lid, baking pan, or plastic paper tray.
Next, put some white paint in a small bowl or container and plop a {very scuffed} golf ball, bouncy ball, or large marble inside. (While I find golf balls work best because they’re big and heavy, marbles and bouncy balls make a more solid, web-like lines.)
Shake and swirl the container so that the golf ball is well coated with paint.
Next, gently tip your golf ball out of the container and onto the web.
Swirl and roll the paint-coated ball over the black paper web by tipping the tray back and forth.
When it’s sufficiently spider web-y, remove the paper from the tray and set it aside to dry.
Now for the spider… Gather up some brightly coloured paper, black paint, and a foam brush.
Using a foam brush, paint a good, thick layer of black paint on your little one’s palm and fingers (not the thumb).
Help your little one press their hand on the paper a couple of times to create two spider bodies and half of the needed legs. Allow the prints to dry for a couple of minutes while you wash hands.
Next, rotate the page so that the fingers are pointed downwards.
This time around, paint just the four fingers of your little one’s hand. (I like to use the opposite hand for this part so that the fingers are angled the same way, but that’s just the crazy in me. ☺)
Stamp them on the other side of the palm print in order to complete the spider’s body.
When the paint is dry, attach some googly eyes to the spider’s body using white craft glue.
Then, cut the spiders out, leaving a small border of coloured paper around the edges.
Attach the spider to the web with glue or tape, or if you want the spider to have a little wiggle to it, glue a small pompom in between the web and spider. And voila… All done!
And if handprints are still too tricky for your little one, here’s what we did last year using a footprint instead:
Though still early, our Halloween festivities began this afternoon when our little family of three headed down to the PNE Forum to take in The Great Big Boo!, a family-friendly, non-scary musical. Audience members were asked to dress-up for the show, and since I haven’t yet made this year’s round of costumes, we pulled out last year’s owl costumes and gave them a little bit of extra play time. (FYI: Brad and I were two of a total of FOUR parents dressed up at the show. Yes, we looked a little bit silly.) Gracen was more than happy to sport her little blue owl costume again, and I was even happier that the costume still fit.
We arrived to the Forum, selected aisle seats four rows from the front (score!), settled in, and waited for the show to begin.
The story followed two children, Justin and Zoe, as well as wacky inhabitants of ‘Boo Alley’, on an adventure to save Halloween from Wendella the Witch, who has cast a spell on the street. As soon as the show started, Gracen was captivated. The glowing set, the funny characters, the catchy music, and the fantastic dance numbers made for a combination just perfect for keeping the attention of little ones. Gracen was sold.
Despite the fact that the show is intended to be non-scary and suitable for children of all ages, I’d be fibbing if I said Grae wasn’t a little bit frightened by a few of the characters (mainly Wendela the witch, but also Cranium the Mad Scientist and Vinne the Vampire). It was enough for her to ask to go for an unneeded bathroom break, as well as for her to tell us that she was sleepy and wanted to go home, but then again this is our ultra-sensitive little girl we’re talking about… The one who has been known to burst into big alligator tears during ‘Five Little Ducks’ because she feels so sad for the mama duck who’s lost her ducklings.
Luckily the “scary” parts were broken up by fun, upbeat dances and didn’t last very long. Before we knew it, Priscilla the {very cheerful and not at all scary} Princess was on stage and Gracen was happy to continue watching the show while eating her dinner.
Of course, with the help of her friends, Wendella the Witch eventually discovers the true spirit of Halloween (because we attended the very last show of five, I don’t feel badly about sharing how it ended), and all is right in Boo Alley once again. The cast celebrates with a giant high-energy dance number and at the end, kids are invited to get up and dance alongside the characters.
The show was just over an hour long with a 15 minute intermission included, which was perfect for Gracen. Afterwards, children were invited to visit the cast of characters in a separate area of the arena to trick-or-treat. Grae happily collected a couple of little goodies and then we were on our way.
Overall, I’d highly recommend this show to those thinking about attending next year. The show length was perfect, the intermission was great for bathroom breaks, the aisles were nice and wide so kids could get up and move, and the show itself was fun and engaging.
While you’re waiting for the show to come back next Halloween, check out The Magic of Santa, a theatrical holiday celebration being put on by the same production company in December.
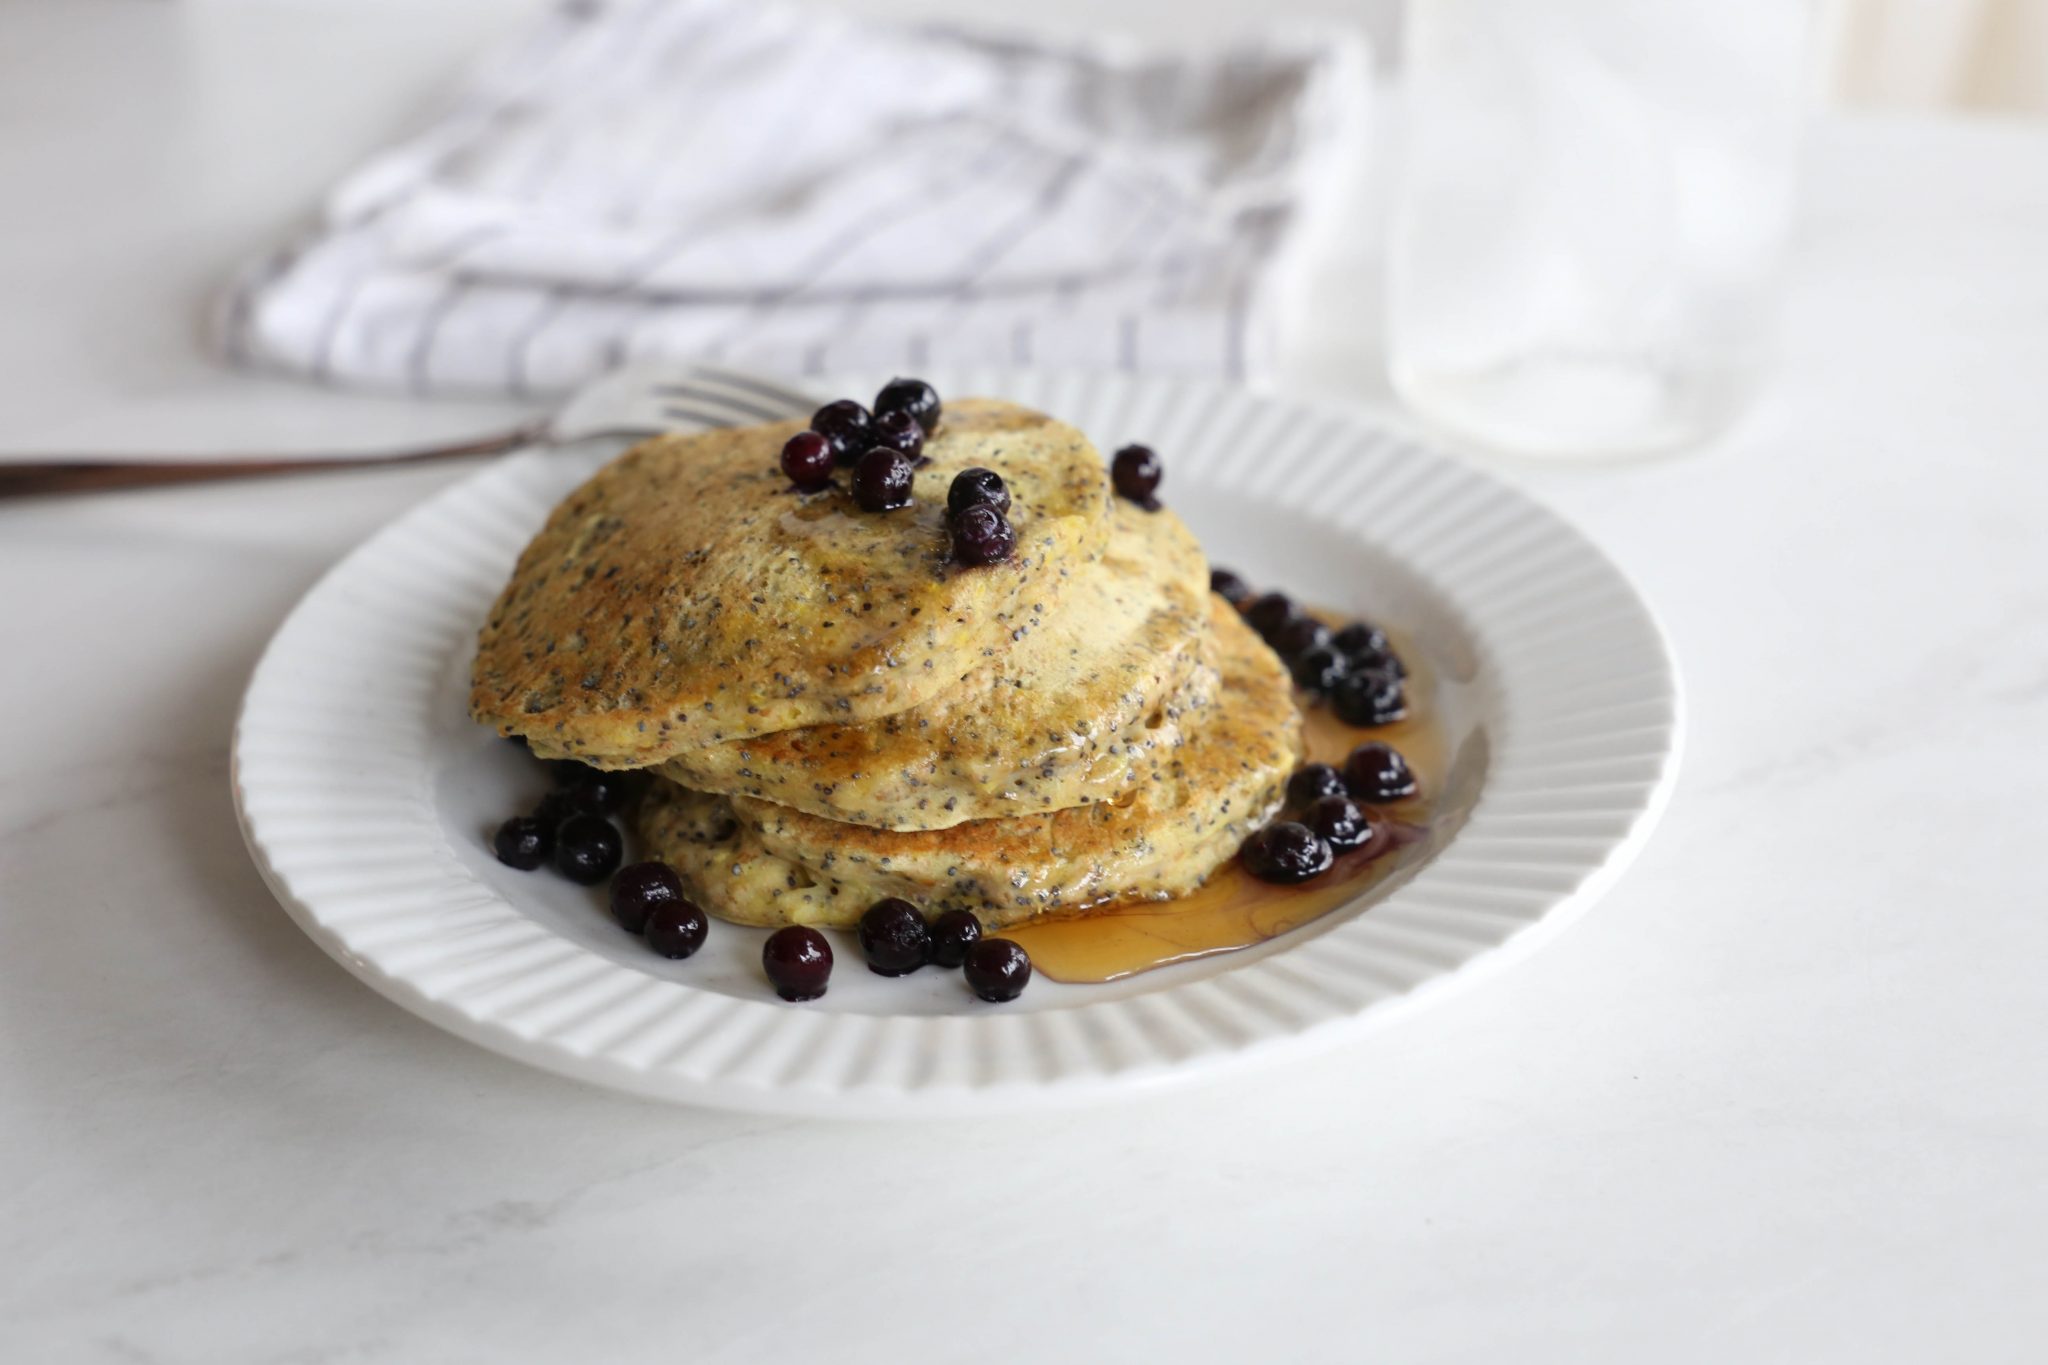
I’ve made these pancakesfor special occasions few times before, and let me tell you, they are delicious. Super healthy, however, they are not. So this morning, my little sous chef and I set out to make a healthier, wholewheat version, sans refined sugar and butter. I’m happy to say, they turned out amazingly well! While not the fluffiest pancakes in the world, they were light, tender, and full of lemony flavour, just the way we like them.
Now, I must admit, I was being a little bit chicken and didn’t go for all wholewheat flour this time around (don’t know what got into me – using white flour is not normally even an option in our house!) Next time, I’d just go all in and use wholewheat flour only. Here’s the version we made this morning…
Wholewheat Lemon Poppy Seed Pancakes
1 1/2 cups of wholewheat flour
3/4 cup of all-purpose flour
1 teaspoon of baking powder
1/2 teaspoon of baking soda
1 teeny tiny pinch of sea salt
1/3 cup of poppy seeds
2 cups of skim milk
2 tablespoons of white vinegar
2 organic egss
1/4 cup of pure maple syrup
1 tablespoon of your favourite oil
1/2 teaspoon of pure vanilla
zest of 4 large lemons
1/2 teaspoon of pure lemon extract (optional)
Pour milk into a measuring cup or bowl. Add vinegar and stir gently. Set aside. (Or just use store bought buttermilk instead.)
Measure out all dry ingredients into a large mixing bowl and mix well.
In a separate bowl, add all of the wet ingredients, including the homemade buttermilk and lemon zest, and mix well.
Add the wet ingredients to the dry ingredients and gently mix until just combined (this is important – do not over mix!)
Cook on a 300 degree griddle, flipping when bubbles begin to form.
Serve with berries and pure maple syrup.
Enjoy!
UPDATE: Since making these the first time, we now always use only wholewheat flour, and the end result is just as delicious. Cutting the pure maple syrup down a little too doesn’t hurt a thing and when in a pinch, chia seeds make for a great poppy seed replacement.
After seeing how Lindsay from The Little Red Horse turned my felt board DIY into an awesome birthday gift (check it out here), I decided to *borrow* her idea and whip up something similar for one of Grae’s little friends whose party we attended this weekend. (Thank you, Lindsay!)
I liked the idea of a creating a colour matching game, but wanted to try something different than ice cream cones this time around… Something a little more October birthday-ish, so cupcakes it was!
All I did was cut out cupcake tops (with a candle attached for gluing purposes), cupcake liners and candles in coordinating colours, and little yellow flames.
Voila! An easy little felt board game that allows munchkins to practice colour matching by pairing up the tops and bottoms of the cupcakes.
Sadly, I didn’t take a photo of the finished product, but the felt board looked exactly like Gracen’s, said “HAPPY BIRTHDAY” across the top, had two of the felt cupcakes in the middle (because the little boy was turning two) and said “JACKSON” (the little boy’s name) across the bottom. We also included the rest of the alphabet, the other cupcakes, and a jack-o-lantern face designing game each in a little bag separately.
Gracen loves her felt board, so she was very proud to give one to her little friend come party time. ☺
This afternoon, Gracen and I had the absolute pleasure of attending a launch event at the Robson Street location of Lush Fresh Handmade Cosmetics.
When we first got the invite, I was really excited for two reasons. First off, because I’ve been a longtime Lush fan and seeing, touching, and trying a brand new product before the general public is always fun, and second, because the event was munchkin-friendly and Gracen was more than welcome to come along!
When we arrived, the Lush team was extremely helpful, sweet, and friendly. They helped us find a spot to park our stroller, offered us all kinds of delicious treats and beverages, and invited Gracen to play with the newest Lush innovation, ‘Fun’. Of course she had already spotted the play table on the way in and was more than ready to sink her little hands into the mouldable material.
As she played, I learned all about Fun. What it is basically, is a mouldable {delicious smelling} soap that can be used in four different ways. First off (and most importantly ☺), it can be played with. It has a texture between play dough and plastercine and can easily be cut, shaped, and rolled. The best part is that since it’s a soap, clean up is a breeze – both when it comes to cleaning your table and cleaning your kid. When used in the bathroom, it can be rubbed and used as a soap (we’ve already used it at the sink for washing hands and in the bathtub as a body bar), lathered and used as a shampoo, or placed under some running water as a bubble bath. So cool, right? I’m pretty sure some pre-bath time “play dough” sessions are in our very near future…
After playing with Fun for a good, long time, Miss G decided it would be a good time to have her face painted. Having seen {and immediately fallen in love with} a stack of pumpkin-shaped soap on the way by, a little jack-o-lantern on her cheek it was.
With a freshly-painted cheek, it was off to explore the rest of the store. There were all kinds of goodies out and Gracen very happily chose a bag of popcorn to munch on while I helped myself to a little bag of goodies at the candy bar. We explored the products, learning about them and trying them out along the way, which was a lot of fun. These were two of our favourites. I really loved the slightly shimmery Bubblebeard bubble wandbecause it made incredible bubbles with just small swishes in a bowlful of water, and Grae really loved the Calacas shower jelly, mostly because it was really fun to poke and squish.
We stopped to see a few other things, mingle with some other mamas and kiddos, and snack on our goodies, but more than anything, Grae wanted to get back to the Fun table to play.
Before heading home for dinner, bath, and bed time, we got to watch a fresh batch of Fun being made, and then play with it immediately afterwards. When fresh made like this, Fun is still pretty soft and sticky compared to the finished product, but Gracen didn’t mind one bit. It made for a great mess and lots of fun swishing it all of in a bowl of warm water afterwards.
To top off a fun-filled afternoon, Lush very generously sent us home with a bag full of goodies that Grae immediately called her ‘present’ and insisted on carrying on her own despite the fact that it was heavy and bulky.
When we got home and opened it, she was thrilled to find several rolls of Fun inside, but even more thrilled to see a Jacko bath fizzer. We chopped him up to spread the excitement up over a few nights, and before long, our pumpkin pie scented little lady was tucked into bed.
♥
Lush’s multipurpose, mouldable FUN soap is available nationwide on November 1st, 2012. It comes in five colours and scents (yellow – marzipan, green – citrus burst, blue – lavender and chamomile, red – fruity orange and mandarin, and pink – ice cream), is 100% vegan, and will be available for for $6.95 each.
In addition, a portion of the sales of FUN will go into the newly created FunD, which will help bring fun back to children living in Fukushima, Japan, an area severely affected by the 2011 earthquake, tsunami, and nuclear disaster.
Five minutes of quiet in our house, and this is the result…
A nearly naked toddler covered in pirate stickers. The best part is that she was absolutely tickled pink with herself about it all and exclaimed “Grae Grae stickery!” again and again.
For one reason or another, I began saving toilet paper rolls a while back. (Don’t ask me why, because I don’t remember. Probably something Pinterest related?) So with a collection of 10 or more paper rolls just sitting around, I decided it was time to do something with them. I don’t know how I came up with the idea for this project actually… Maybe I’ve seen it somewhere before? I don’t think so, but it’s certainly a possibility given my tendency to snoop around the internet in the wee hours of the morning. Either way, I’m probably not the first person in the world to think of using empty toilet paper rolls to create heart-shaped stamps, but since I’ve scoured the web and I can’t find paper roll heart stamps anywhere else on the internet, maybe I’m the first to post about it?
(Disclaimer: While I wouldn’t have my students bring in tp rolls to use for crafts in my classroom, I’m {semi} okay with using rolls from our house in our house. If you’ve read the same article I read as a beginning teacher about tp rolls being covered in fece particles, you can always opt for paper towel rolls, craft paper rolls, or wrapping paper rolls instead. ☺)
To get started, you’ll need two things: paper tubes and some rubber bands.
First, flatten your paper tube and press down along the two creases.
Next, invert one of the creases in order to begin creating a heart shape.
Play with the shape of the heart by squeezing the tube until you’re happy with it.
In order to help the heart keep its shape, wrap an elastic band around the tube once or twice.
Make one heart stamp for each colour of paint you intend to use.
Lastly, pour out a few dollops of paint (we used crafter’s acrylic) and place one stamp in each paint puddle.
Then set your wee one loose!
We started on the easel, and ended up on the floor using the stamps to make some homemade wrapping paper, but the stamps would also be perfect for making beautiful homemade cards or some art to hang in your little one’s room.
This morning, Miss G and I started our day cuddling and reading books in our master bed as we always do. Brad was already at work and I went to the washroom for a minute and returned to find Gracen typing away in the email app on my phone. I gave her a little ‘what are you up to?’ look, and she immediately responded with…
“Grae Grae missin’ Papa. Grae Grae send ‘im (him) one of deez (these).”
°°°
Later on in the morning, while on a quick trip to the mall, we stopped at the washroom. I asked her if she needed to go pee and she said…
No, thank you. Gracen just perfect. No pee.
(“Just perfect?! Where does she get this stuff?”)
°°°
After discovering that my debit card was not in my wallet as we went to pay for something, we headed home {a tad bit annoyed}. I must have been a little quiet in the car because Miss G piped up from the back with…
“Mama’s debit card at home. Mama upset ’bout dat.”
To say that Brad is a Patriots fan would be an understatement. A huge understatement. So when they come from New England to play in Seattle once every four years, we go. Simple as that. Last time, we were living in Kuwait and managed to swing a stop in Seattle on the way home for Christmas vacation… And this time we got to take our little girl to her first ever football game.
Being that the game started at 1:00 and we needed to arrive at noon, I knew it wouldn’t be an easy outing for Miss G. With her normal lunch time being just before noon and her usual nap time being between noon and 1:00, we were pushing it to say the least. Since Grae was born, we’ve always put her sleep ahead of outings and events, so skipping a nap or sleeping while out and about just aren’t things she’s used to. But…. If you can’t delay nap time for a live Patriots game, then what can you delay one for then, right? ☺
We came armed with the Ergo, a yummy lunch, tons of special treats (roasted cashews, apple chips, just fruit fruit snacks, and wholewheat bunny crackers), a pair of Baby Banz Earmuffs, and a few little activities to keep her busy and hoped for the best.
It was an awesome game, and despite the fact that the Pats were ahead by quite a bit for most of it, it was one of those games where you just knew anything could happen.
Despite the great game, Grae was more interested in eating, climbing on and off chairs, watching the neighbouring fans, and the ‘dancing pink ladies’ (the cheerleaders with pink boots) than anything else. She did fairly well considering the circumstances, but I’d be lying if I said it was easy to wrangle an overtired, squirmy two year old without a seat of her own for a three hour game during her normal nap time. All I have to say is thank goodness for Grandma Charlotte’s purse full of goodies during the last quarter… A package of Band-Aids quickly became our best friend.
Sadly, the Patriots weren’t playing their best, and in the {crazy} last minute and a half of play, the Seahawks got control of the ball, scored a touchdown, and won the game by one point. Ugh. Not what we were hoping for, but what can you do?
On the plus side, Grae fell asleep almost immediately once we started walking out of the stadium and caught up on a few much needed moments of sleep.
Next time we attend a Patriots game, Gracen will be in Grade One… How crazy is that?!
Tonight, for the first time ever without being prompted or having me say it first, Gracen said three little words that instantly melted my heart into a pile of mush.
We were {very slowly} making our way home from Seattle, Papa and Uncle Brett in the front of the vehicle, and she and I in the back, when she took my face in her hands, looked me square in the eyes, and said…
This morning we headed downtown to the quintessential Seattle destination… Pike Place Market. I’ve always loved strolling slowly through the market and out onto the nearby streets, and I knew Gracen would too. Live music, flowers, fresh treats, and flying fish… What’s not to love?
Here’s our morning in photos…
Topping the favourites list? Watching fresh fish fly through the air to slippery-handed market visitors was without a doubt her favourite, and coming in a close second? Devouring the roasted nuts she was more than willing to be strapped into her stroller in order to eat.
Zoos are one of those things I love and really dislike all at the same time. (Well, unless we’re talking about the Kuwait zoo, that is… Sadly, that one would have to fall into the category of ‘really dislike’ more than anything else… Animals from all over the world all kept in dry, desert-esque habitats with school children harassing them and visitors feeding them ice cream and popcorn is just not my idea of animal-friendly.) So when I found out that we were staying outside of downtown Seattle this weekend, very close to the Woodland Park Zoo, I had mixed emotions about going. On one hand, I knew Gracen would love visiting. She’s a true animal lover and it would be a chance to see many of the animals in person for the very first time. On the other hand, I knew that leaving feeling terribly for animals kept in small, non-natural confines was a real possibility (I obviously hadn’t done much looking into the Woodland Park Zoo beforehand).
I have to say, I was very pleasantly surprised. The Woodland Park Zoo is the least zoo-ish zoo I’ve ever visited. And I mean that in the very best way possible.
Because it spans 92 acres, its {more than} 1000 animals have tons of space to live and roam as they would in their true habitats. And the best part? There are no tiny plexiglass confines or cages in sight. In fact, most of the animals live in fields and forests so giant that visitors can only see small parts of them (though many can be accessed from several sides and have designated viewing areas). It’s hard to describe, but it felt as though we were visitors to the animals’ environment, rather than them being the visitors in our environment. It was peaceful. And beautiful.
And we had a wonderful time.
Here’s our morning in {a ridiculous number of} photos (try to ignore the fog and smudgy fingerprinted glass)…


 ♥
♥ Only I would try to amp up the nutritional value of bananas… Haha! I kid. (Kinda.) The truth is, Miss G has been on a
  Here’s the ingredient lineup… Bananas (ripe, but not overripe), roasted ground flax seed, and cinnamon.
  Start off by peeling the bananas and making sure all of the white stringy things are removed.
 Chop them into coins (maybe about a half inch thick?) and set them aside.
 Next, pour some roasted ground flax seed into a container with a lid (or a zip close bag).
 Enthusiastically dump some cinnamon in too.
 Put the lid on the container and give it a little shake.

 Place the lid on the container again and shake until all of the banana coins are well coated.
 Next, place the coated banana pieces onto a parchment-lined baking sheet.
 Place the tray in the freezer for at least an hour.
 Serve them frozen to your excited toddler and watch them disappear. (Without a word of a lie, Gracen gobbled up our entire batch – and that was after a full meal!)


 Sure, her tea pouring skills haven’t yet been perfected and most of our blanket and snacks were covered in little “tea” puddles as a result, but at the end of the day, blankets can be washed and puddles can be wiped up. What matters is that our little lady spent a special afternoon tea-ing with Mama and Sophie and got to practice all kinds of everyday skills by playing with ‘the real thing’.


 Though still early, our Halloween festivities began this afternoon when our little family of three headed down to the PNE Forum to take in
  We arrived to the Forum, selected aisle seats four rows from the front (score!), settled in, and waited for the show to begin.
 Despite the fact that the show is intended to be non-scary and suitable for children of all ages, I’d be fibbing if I said Grae wasn’t a little bit frightened by a few of the characters (mainly Wendela the witch, but also Cranium the Mad Scientist and Vinne the Vampire). It was enough for her to ask to go for an unneeded bathroom break, as well as for her to tell us that she was sleepy and wanted to go home, but then again this is our ultra-sensitive little girl we’re talking about… The one who has been known to burst into big alligator tears during ‘Five Little Ducks’ because she feels so sad for the mama duck who’s lost her ducklings.
 Luckily the “scary” parts were broken up by fun, upbeat dances and didn’t last very long. Before we knew it, Priscilla the {very cheerful and not at all scary} Princess was on stage and Gracen was happy to continue watching the show while eating her dinner.
 Of course, with the help of her friends, Wendella the Witch eventually discovers the true spirit of Halloween (because we attended the very last show of five, I don’t feel badly about sharing how it ended), and all is right in Boo Alley once again. The cast celebrates with a giant high-energy dance number and at the end, kids are invited to get up and dance alongside the characters.
 The show was just over an hour long with a 15 minute intermission included, which was perfect for Gracen. Afterwards, children were invited to visit the cast of characters in a separate area of the arena to trick-or-treat. Grae happily collected a couple of little goodies and then we were on our way.
 Overall, I’d highly recommend this show to those thinking about attending next year. The show length was perfect, the intermission was great for bathroom breaks, the aisles were nice and wide so kids could get up and move, and the show itself was fun and engaging.


 A nearly naked toddler covered in pirate stickers. The best part is that she was absolutely tickled pink with herself about it all and exclaimed “Grae Grae stickery!” again and again.
 Then she retrieved her


 Being that the game started at 1:00 and we needed to arrive at noon, I knew it wouldn’t be an easy outing for Miss G. With her normal lunch time being just before noon and her usual nap time being between noon and 1:00, we were pushing it to say the least. Since Grae was born, we’ve always put her sleep ahead of outings and events, so skipping a nap or sleeping while out and about just aren’t things she’s used to. But…. If you can’t delay nap time for a live Patriots game, then what can you delay one for then, right? ☺
 We came armed with the Ergo, a yummy lunch, tons of special treats (roasted cashews, apple chips, just fruit fruit snacks, and wholewheat bunny crackers), a pair of


 It was an awesome game, and despite the fact that the Pats were ahead by quite a bit for most of it, it was one of those games where you just knew anything could happen.
 Despite the great game, Grae was more interested in eating, climbing on and off chairs, watching the neighbouring fans, and the ‘dancing pink ladies’ (the cheerleaders with pink boots) than anything else. She did fairly well considering the circumstances, but I’d be lying if I said it was easy to wrangle an overtired, squirmy two year old without a seat of her own for a three hour game during her normal nap time. All I have to say is thank goodness for Grandma Charlotte’s purse full of goodies during the last quarter… A package of Band-Aids quickly became our best friend.
 Sadly, the Patriots weren’t playing their best, and in the {crazy} last minute and a half of play, the Seahawks got control of the ball, scored a touchdown, and won the game by one point. Ugh. Not what we were hoping for, but what can you do?
 On the plus side, Grae fell asleep almost immediately once we started walking out of the stadium and caught up on a few much needed moments of sleep.


