
You know what I’m really good at? I’m really good at doing different kinds of creative projects and activities with the kids, photographing them, and then never ever getting around to sharing them here. Like REALLY good. I’ve got hundreds of projects photographed and waiting to be written up from years previous… There just aren’t enough hours in the day. {Sidenote: Can you believe that for the first 5 years of Miss G’s life, I published a blog post every nearly every single day?! SOOO wild. Though most of those years were during a time when blogging meant sharing photos and words… There was no need to worry about SEO, pinnable images, amazon links, or getting people to your site via social media, so I guess it makes sense that I’m lucky to get a couple of post up a week nowadays.} Anyways, my goal is to make time to share some of those projects from years past and the first is this easy DIY no-sew parrot costume.
 {this post contains affiliate links}
I mean, how cute is this little parrot of mine?? This was actually Sam’s very first Halloween costume and because it’s actually a parrot cape, he was able to wear it while being worn in the Ergo, which I absolutely loved. I just popped him in the carrier and then put the hood on his head, flattened the cape out over the Ergo like you would a blanket, and loosely tied the ribbon around his little neck. It was perfect. (I wish I had a photo, but unfortunately I do not.)

How did our littlest bubba become a parrot for Halloween? Well, it all started with this pirate princess costume for Miss G… Her first ever purchased costume. She fell in love with it while shopping at Costco and I’ve always said that I’ll make her costumes for as long as she’s happy to have me make them, so… As much as it sort of killed me to buy one after years of getting to make something from scratch, a store-bought costume it was.

And of course every little pirate princess needs a parrot, right? {One that was happy to let his mama make his costume, thankfully.}

Everything required for this little getup? An old red cape we had in our dress up station {though you can find these inexpensively on Amazon, dollar stores sometimes have them, and you could most certainly thrift one}, craft store felt, and a glue gun. Oh, and some scissors and cardboard.
Here’s a detailed list:
- an inexpensive red cape
- felt in red, yellow, green, blue, white, and black (dollar stores are a great place for this)
- sharp scissors
- a hot glue gun and plenty of hot glue sticks
- a small piece of cardboard (to make a tracer)
Alright, first things first, you’ll want to make sure your cape fits your little one well. If it’s a little too long or if the hood is a little too big, just trim along the edges. (This was a Gracen sized cape that I trimmed down quite a bit.) Perfection is not required here, as you’re going to cover the majority of the cape in felt feathers, so just keep the lines as straight as you can while working freehand.
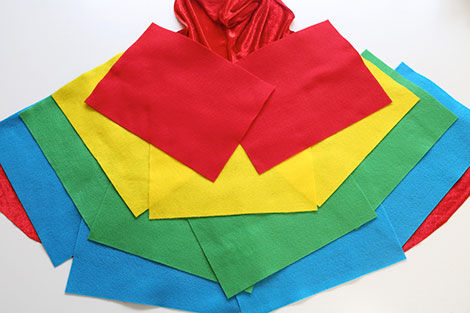
With that out of the way, lay the cape out face down so you can get a rough idea of how many layers of felt feathers you’ll need in order to cover the body. Start with the bottom blue layer and lay out the felt pieces so they cover the bottom edge of the cape. Keeping in mind that the feathers will be approximately half of the width of a felt sheet in length, lay the green felt sheets above the blue ones. (Cutting the felt sheets in half lengthwise from the get go would work perfectly too, especially if you’ve purchased just what you’ll need for this project.) Repeat the process with the yellow and the red sheets, covering all the way up to where the hood connects to the body of the cape.
I decided to do one layer of blue, green and yellow feathers, plus two layers of red feathers up at the top. I also figured out that I’d need to cut out two full felt sheets worth of blue and green feathers, about one and a half sheets worth of yellow feathers, and one full sheet worth of red feathers.
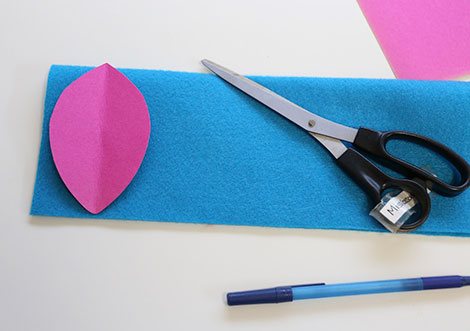
With your approximations in mind, it’s time to create a feather tracer. You’ll want it to be about half the width of your felt sheets high, but how you shape it is up to you. I went with a simple leaf-like shape and simply sketched it on my cardboard scrap and cut it out.
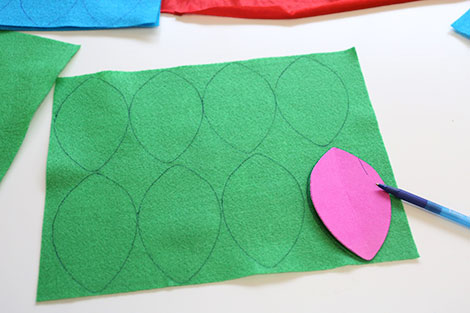
With that, it’s time to start tracing and cutting out your required feathers. This makes for a perfect in-front-of-the-television task, so turn on your favourite show and get to work! With some good TV on, you’ll have all the feathers you need before you know it.
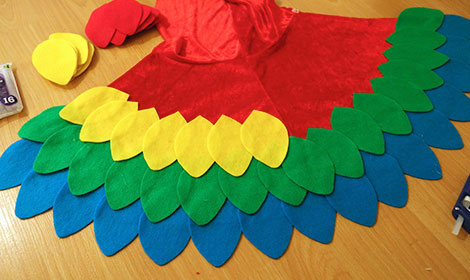
When all of your feathers are cut out, fire up your glue gun and let it get nice and hot. Once it’s ready to go, place a small dab of glue at the top of a blue feather and press it onto the cape so that it covers both the side and bottom edge of the fabric. Continue adding blue feathers along the bottom of the cape, making sure to overlap them just enough so that the red doesn’t show through. When your blue row is complete, move up to the green row, once again overlapping the feathers in such a way that allows the cape to be fully covered. Continue this process until the body of the cape is fully covered.
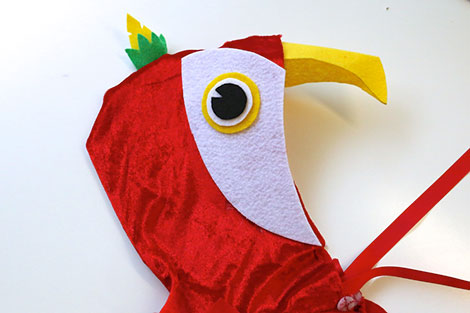
Alright, time for the final bit: the parrot’s head! Admittedly, this part requires the most creativity, but I promise that it’s not much. The thing is, even if the head turned out horribly (which it won’t) there will be no question your little one is a parrot given all of the lovely coloured feathers on the cape, so not to worry. First up, add a few little feathers to the top of the parrots head by sandwiching a taller felt feather between two shorter ones and hot gluing them to the seam on the top of the hood.
Next up, you’ll want to cut out the two sort of fang shaped pieces for around the eyes. Trace the edge of the hood to get the one side of the shape, do a curved line along the top, and then close in the shape with another curved line. Once you have the first piece done, simply trace it and cut out another one for the other side and attach both with thin strips of hot glue.
Next, create the parrot’s eyeballs by cutting out two yellow circles, two slightly smaller white circles, and then two slightly smaller black ones. Stack them up attaching each layer with hot glue and then attach one to either side of the hood.
Lastly, fold a piece of yellow felt in half. With the fold along the top, sketch a long thin beak shape that comes down into a point. Cut both layers of the folded felt out at once and hot glue the tip together for a 3D effect before gluing the other end of the beak just inside the front of the hood.
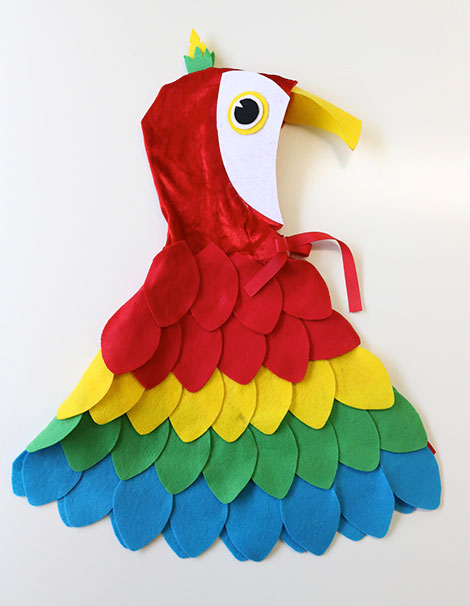
That’s it! You now have a homemade parrot costume that will be absolutely adorable on your little one!

Don’t they make the sweetest little pair?

Are you following us on social media?
Find us on: Facebook | Instagram | Pinterest | Twitter
We’d love to have you!
