Last Christmas, I made the kids each one of these DIY LEGO kits and I’m so glad I did. They were a super easy project and they’ve been so great for taking along on our travels and vacations. We don’t use them in transit (too many small pieces to be used in a car or on a plane for me), but they’re perfect for down times once at our destination {usually in an airbnb}.
I wish I would have taken proper step-by-step photos of the process, but truly they’re not even needed – it’s so easy.
Of course if you’re making just one kit, you could get away with a single carry kit, a smaller base plate, and a smaller LEGO brick box. Or if you have a different carry case already on hand, you could easily use that and just refer to this material list and the following instructions as a basic guide. Whatever works! In the past, we’ve even made the most basic portable LEGO kits using old-school metal lunch kits.
Now to make the LEGO kit! Here’s what you’re going to do:
1. Start by measuring the inside of your carry case’s lid.
2. Measure out a piece of baseplate that will fit nicely inside the carry case’s lid and mark your cut points with a pencil. For this particular case, I made my base plate 16 centimetres by 23 centimetres.
3. Using regular scissors, carefully and slowly cut your baseplate down to size.
4. Using your scissors or a sanding block, round the edges of the baseplate piece so there at no sharp / pointy corners.
5. Apply several mounting squares to the bottom side of your baseplate and press them down firmly to ensure they’re well adhered.
6. Peel the sticker backings off of the mounting squares, position the baseplate inside the carry case’s lid, and press it down firmly. I like to take a few minutes and really ensure a good stick here.
7. Place the dividers into the carry case to make sections for the different LEGO colours. I chose to add only two dividers – one between the green and blue sections and one between the orange and red sections.
8. Fill the carry case with LEGO! I chose to separate mine by colour because I’m a total sucker for rainbow anything, but you could do by brick type / size too! Whatever floats your boat.
And that’s it! You’ve got a DIY LEGO kit that’s perfect for taking along on the go.
What I love about this particular carry case is that the clasps are crazy strong, so I don’t worry about them flying open as the kids carry them {and inevitably fling them around – especially in Sam’s case}. Also, I feel like two clasps are always better than just one… Just in case!
The other thing I love? The lids of these particular kits open completely flat, which is so, so helpful when building. (The lids on our metal lunchbox LEGO kits have never opened flat, which can be a little annoying, just fyi.)
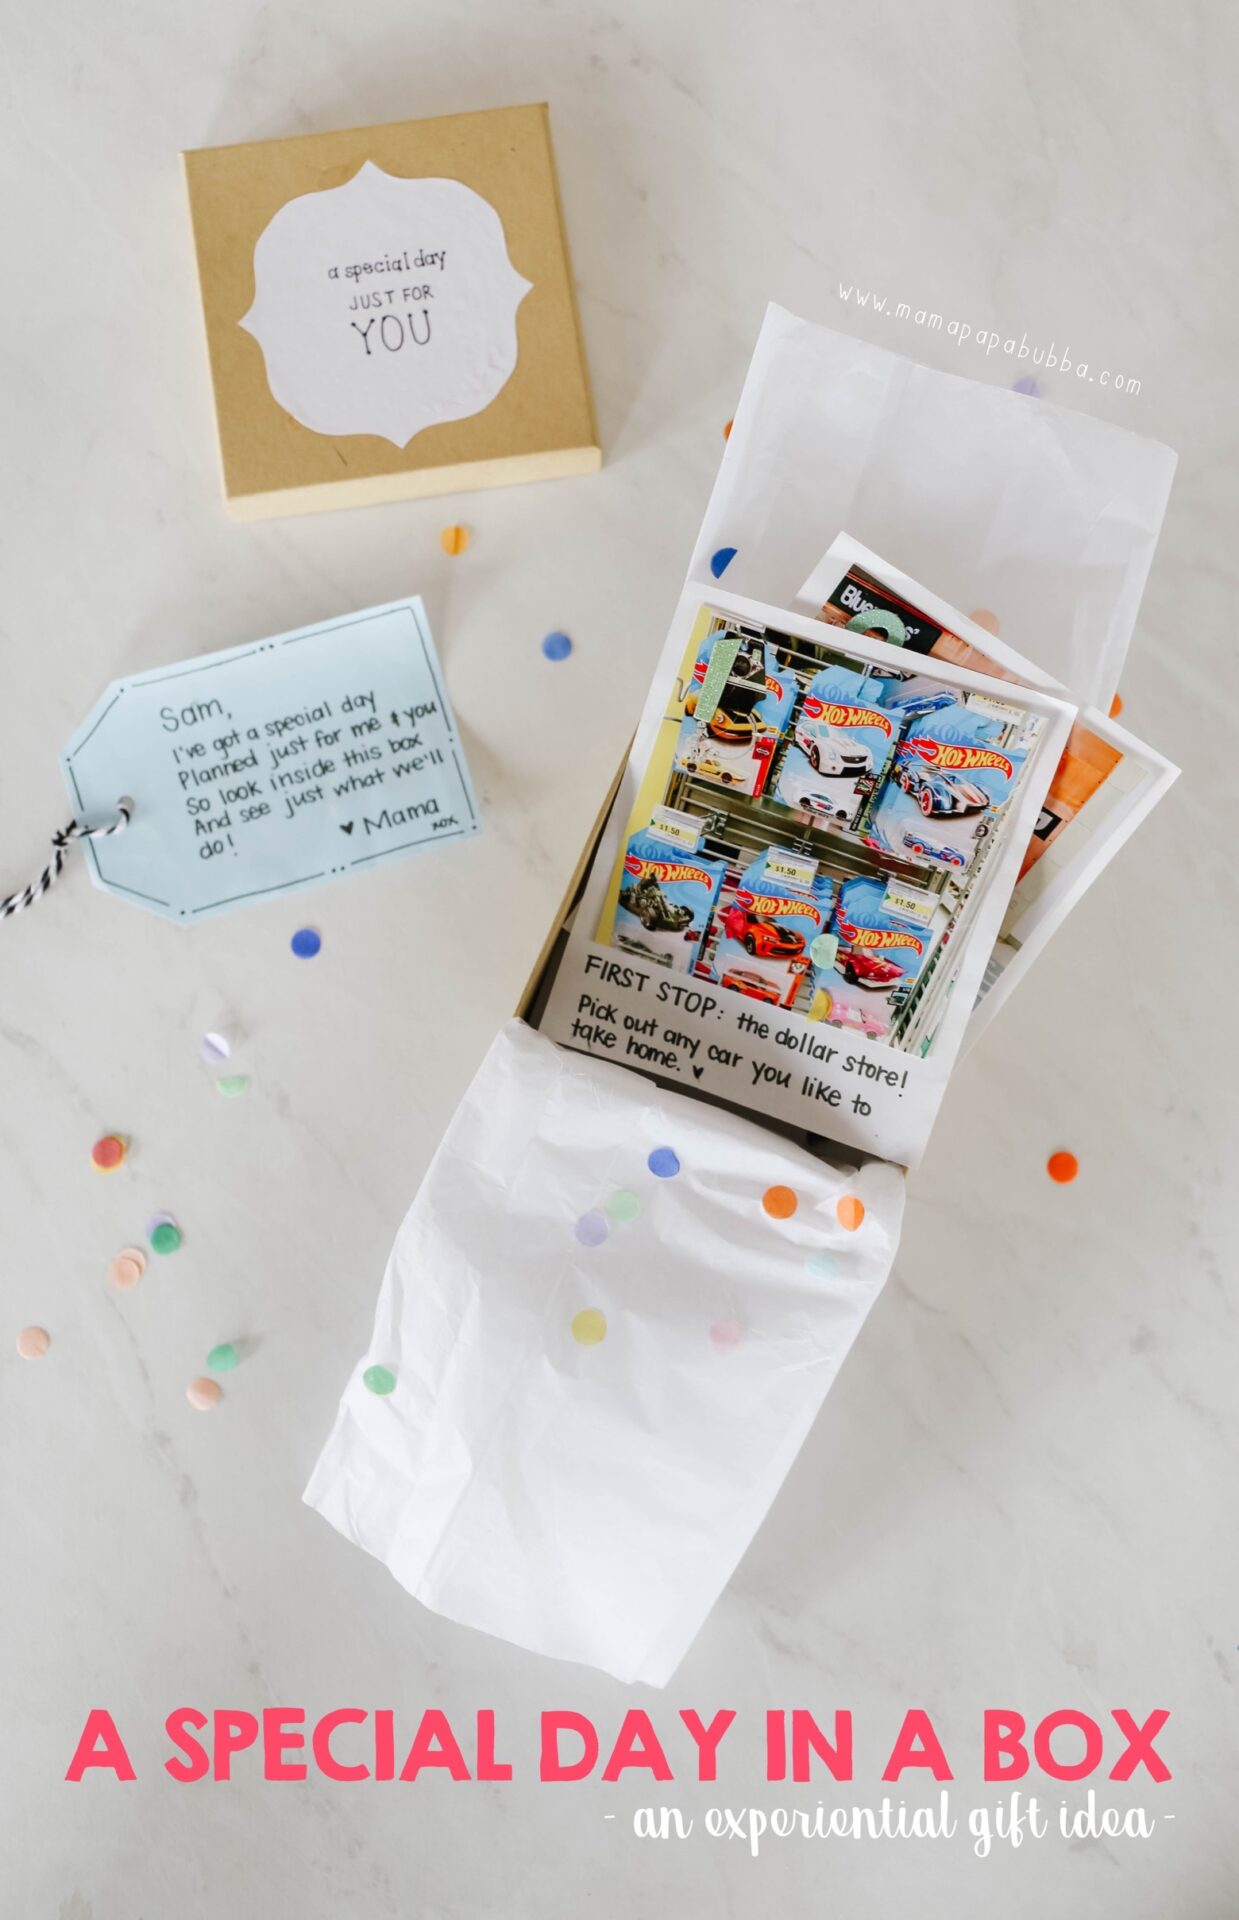
With Christmastime quickly approaching, I’ve been thinking a lot about gifts for the kids… We’ve kept it pretty minimal for the last few years and have just done a really good stocking for each of them, plus their usual book and jammies on Christmas Eve, but at this point, even filling a stocking feels unnecessary. Our kids are truly the luckiest and really just don’t need anything at all. With the help of my friend Crystal {of Otherware}, I’ve come up with an experience gift I’m super excited about and I just know they’re going to LOVE it. I’ll be sure to share it here afterwards, but it’s a lot like this ‘a special day in a box’ gift idea I used earlier this year to plan a special day with each of my kiddos.
Now a little back story first… As much as I’d love to take credit for the idea, Grae was actually gifted an ‘adventure in a box’ by her uncle and his girlfriend a few years ago and I just thought it was the sweetest, most clever gift ever! It was presented in a little box with a beautiful ‘Adventure’ sticker on top and inside were little notes and items that explained the day. BRILLIANT, right?! Firstly, it meant a really special day with two people she loves, and secondly, it completely avoided the addition of STUFF. Something I appreciate beyond measure. {Plus I just really love a good DIY kid’s gift.}
Here’s a peek at how I put together my version of ‘a special day in a box’ for Grae and Sam….
{this post contains affiliate links}
First up, supplies… You’ll definitely want a box (I bought mine at the dollar store) and a photo representing each of the stops on your child’s special day (I snuck out one night after bedtime, quickly went around town and snapped them on my iPhone, and sent them off for printing at London Drugs that same night). Once those things are ready, scour your drawers for items like paper, scissors, fine liners, tape, glue, baker’s twine, tissue paper, card stock, labels – whatever you think you might need to put it all together!
Alright – now to put it all together! First up, create a label for the top of your box. It can say anything you like – I went for ‘a special day just for you’, but ‘let’s go on an adventure’ would be cute too. Whatever floats your boat.
Stick or glue the label on the box and that’s done.
Next up, write a little note to your child explaining the gift… I did this on a tag-shaped piece of paper with a little baker’s twine through the hole at the top and went for rhyming and cheesy and wrote:
Sam,
I’ve got a special day planned just for me and you,
So look in this box and see just what we’ll do!
Love,
Mama
Now to prepare the activity cards… Again, this can look however you like, so feel free to make it your own! I had my photos printed as squares (4×4 if I’m not mistaken), then cut out card stock rectangles that were slightly larger. When I glued the photos onto the card stock, I glued them nearer the top so the finished cards would look similar to polaroids (not that my kids would know what those are – hah!), and wrote a little note at the bottom explaining the stop and what we’d do while there. I finished off the activity card with a number sticker in the top corner just because I had them and I knew they’d provide Sam with some good exposure to numerals {do teachers ever stop thinking like teachers?!}
Here’s a look at what Sam’s special day in a box included, though keep in mind that we live in a small town with very limited options and I gifted these to my kids for Valentine’s Day, so smack dab in the middle of our cold, snowy winter… Had we lived in Vancouver at the time – oh my gosh – the possibilities! Or had it been when the weather was nice? So many outdoor options!
Anyways, with that disclaimer out there, his special day included a stop at the dollar store to pick out a Hotwheels vehicle (his absolute favourite), a trip to the mall to ride those cars you put a dollar into, a stop at the bookstore to browse and select a book, and a visit to his favourite cafe to have a warm drink, play with the trains, and enjoy a baked good.
Now I will say this… As much as I maybe felt like some of these options were a bit lame and more focused on STUFF than I would have liked them to be, Sam thought each stop was absolutely incredible and was nothing short of STOKED throughout our adventure. I actually don’t think the activities matter a ton. Of course you want them to be things your child enjoys, but I think it’s more about the time together and the fact that this is a dedicated ‘special day’ than anything else. I could have told him that we were going to the park right by our house that we go to all the time and my guess is that he would have been thrilled with that too.
And here’s a peek at what Grae’s ‘special day in a box’ included… You can actually pop over to CBC Parents to read my ‘Build an Adventure Day in a Box’ post all about G’s day.
Alright, time to finish off the gift! I lined my box with a strip of tissue paper, then set the activity cards in, making sure they were in the correct order with the last stop in the bottom of the box and the first stop on the top.
Then I wrapped the activity cards up in the excess tissue paper, put my little note on top, closed up the box, and that was that… A special day in a box ready for gifting.
I feel like we’re re-entering a time of play dough kits and I won’t lie – I’m oh so excited about it! When Miss G was a toddler, we had a minimum of four different play dough kits on our shelf at all times, we swapped them out for new ones each season, and they were played with EVERY. SINGLE. DAY. They were also our go-to gift for her little friends for several years… We’d just come up with a theme based on what the little birthday person loved and run with it! There are truly too many to remember, but we’ve done a mermaid play dough kit, a dinosaur play dough kit, a construction site play dough kit, a Star Wars play dough kit, and a Frozen themed play dough kit to name a few. And this time around? For the little friend who loves everything sparkly? We decided to try something new – a unicorn play dough kit!
Seriously – play dough kits like this where everything is neatly stored in one container are the BEST for quiet time, independent play while mama has to get something done, sick days, or even as a ready-to-go activity for when friends come over. The kits we make hold plenty of dough for multiple kids, plus the tools and loose parts add interest and expand upon what can be done with the dough. And it’s all just sitting there ready to go when the mood strikes!
{this post contains affiliate links}
Here’s exactly what you’ll need to recreate this unicorn play dough kit:
a unicorn figurine (we included this one by PAPO and it’s truly beautiful, but it’s also too big to fit inside the kit… this smaller one or this smaller one – or both – by Schliech would also be great options)
Now, to create this kit, we made a recipe per colour, but 4 full batches is a tad much for the GLIS container, so I simply kept a little chunk of each batch for our kids to play with at home. If you were making two unicorn play dough kits, I think you could probably get away with just doing the 4 separate batches and dividing each colour equally between the 2 boxes.
If you’ve never made our play dough before, here’s a recipe run down…
1 cup of all-purpose flour
1/4 cup of table salt
1 tablespoon of cream of tartar1 tablespoon of vegetable oil
1 tablespoon of glycerine
3/4 cup of boiling water (measured in a dry measuring cup – this is important as wet and dry measures aren’t the same and using a wet measure will likely make your play dough too sticky)
Wilton gel colouring {for colours like these, you’ll only need the smallest amount}
fine iridescent glitter {I made a commitment to quit buying glitter once I learned about how detrimental it is to our environment, but we had this on hand and there are several eco-glitter options now available}
Place all of the ingredients, save the boiling water, in a bowl and whisk well. Measure out the water using your dry measuring set and add the teensiest bit of Wilton gel colouring to it before adding the coloured water to the bowl. Give the mixture a quick mix with a wooden spoon, banging off it off every once and a while. At this point, the mixture may seem too wet and sticky to make good play dough… Do not fret! Leave the semi-mixed dough on the counter to cool for 5 or so minutes. Afterwards, dump the mixture out onto the countertop and knead really well. You’ll know you’re done when the dough is fully cooled, soft and squishy, and the super smooth. And if it’s still a little sticky once completely cooled (your climate and even the slightest bit of extra water can change the texture quite significantly), add flour touch by touch and kneading it until the stickiness is gone.
Next, form your dough into balls and roll them in iridescent glitter. Rolling the glitter on the outside of the dough will give it mega-shine and will make it look extra pretty for gift giving.
Next up, sprinkle the tops of your dough balls with iridescent stars and gently press them down so they stay in place.
Because divided GLIS containers aren’t airtight, you’ll want to place your dough into a big clear zip-close bag before gifting it, but I like the get the doughs shaped and in the container first to see how they’ll fit.
Now because our unicorn was too big to fit in our container (I would have liked to put it in that big compartment on the left), we just tied it to the top of the kit once done, but had we have been able to get our hands on a smaller unicorn, I would have found a spot for it next.
Alright, now onto the loose parts! These little bits and bobs are surprisingly easy to find at craft stores and dollar stores and make such a great addition to play dough kits. For our unicorn play dough kit we went with clear acrylic diamonds, pink acrylic hearts, and small acrylic mirror gems, but you can really do anything that you feel fits the theme. I think little pastel bottle brush trees would have been amazing in this kit, but alas – we live in a small town where these sorts of things aren’t easily found.
To finish off the kit, we added a miniature wooden rolling pin, a mini heart-shaped cookie cutter, a mini star-shaped cookie cutter, and some little pastel-coloured acrylic flowers.
And that was it!
We carefully placed the play dough balls into a plastic bag and then gently set it back into the container.
To finish off our gift, we tied the kit with some twine, added a handwritten tag and the unicorn, and called it good. We don’t even bother to wrap our homemade play kits usually.
If you know me well, you know that my love of gift giving runs deep. Like REAAL deep. {Embarrassing but true? One year in university I took out an additional – *ahem* unnecessary – student line of credit and I’m pretty sure my motivation was largely not wanting to ‘skimp’ on Christmas presents that year. Sooo irresponsible and silly, but that’s how much I loved giving gifts even as a newly minted 20 year old.}
Fast forward a few years and I seem to have passed my love of gift giving on to Miss G {though no silly Christmas shopping loans in her future – hah!} Over the years we’ve put together some really fun and unique gifts for the people she loves and while none of them have been fancy or expensive, they’ve been from the heart and super sweet, which I love.
{this post contains affiliate links}
Here’s several of them – creative gifts kids can make for adults {or at least make with help}…
Hand Shaped Ring Dish – One of my most prized possessions and definitely something I’ll cherish forever. That’s Miss G’s little four year old hand turned into a ring dish and to this day it sits out on my vanity. It’s been through three moves {one of which was from the Middle East to Canada} and a power cleaning mishap {notice the scuffed fingertips and the glue on middle finger} and I still think it’s just beautiful. {This package of clay (CAN) is enough to make at least 3 hands, though you’ll probably get more out of it.}
‘I Love You’ Pillowcase – The simplest gift ever, but I’ve always wanted one for myself. I think it’s especially precious when kiddos are just first starting to print, but special no matter what. {We really like these markers (CAN) for this project.}
Creamsicle Sugar Scrub – Mmmmm… Citrus and vanilla? Yes please! Truly the easiest homemade bath product out there and while you most likely have everything you need to make it already in the house, it still feels luxurious. {This non-alcoholic vanilla (CAN) is our go-to at the moment – smells SO GOOD.}
Family Portrait Embroidery Hoop – Isn’t this the sweetest thing? Definitely kid made, but combination of the white fabric and the natural wood makes it totally hangable, even in the most put together of homes. {In addition to being the best for general kitchen use, dishtowels like these (CAN) are perfection for this project.}
Footprint Butterfly Pot Is there anything cuter than little feet? Nope. Definitely not. Fill this post with a beautiful plant or with soil and a packet of seeds and you’ve got a lovely gift. {This paint set (CAN) looks gorgeous and would be perfect for this project.}
Coconut Oat Milk Bath – Ahhhh… Skin soothing relaxation in a jar. We LOVE this stuff and use it nightly. It’s 2 ingredients and is naturally soothing, moisturizing, anti-fungal, anti-bacterial, and anti-inflammatory among other things, which makes it a perfect for treating skin irritations and eczema. {How perfect are these jars (CAN) for gifting it in?}
Homemade Beef Jerky – Anyone else have a meat lover in a meat-free home? That’s my husband’s situation, so we try to make an exception come his birthday and Father’s Day. Last year we made him this incredibly easy beef jerky and it was gone in no time at all. {These racks (CAN) are perfect for making beef jerky at home.}
Coffee Sugar Scrub – The scent of warm coffee and vanilla filling the air while having a shower? YES PLEASE. This sugar scrub is incredibly easy to make and believe it or not, it’s a great way to put used coffee grounds to good use. {I’m obsessed with these squat little jars (CAN)… Wouldn’t they be perfect for gifting sugar scrubs?}
‘I Love You’ Teacup – If there’s a reoccurring theme here, it has to be simple gifts that people will actually enjoy and use. And this little teacup is just that. How lovely would it be to be reminded that you’re loved with each sip of your evening tea? {We used these markers (CAN) for this project and I’m anxious to see how they hold up as it’s our first time using them.}
Potted Salad Garden – The perfect gift for a gardener or someone who just loves salad {me! me! me!} and it truly keeps on giving! {The style of pot we used for this project wasn’t easy to find, but check your local garden centre.}
Ombre Wooden Beaded Necklace – A kiddo-made necklace that anyone in their right mind would proudly sport while out and about! In fact, I’ll take one in each colour of the rainbow, pretty please. {This set of beads (CAN) includes assorted sizes and will make many necklaces!}
Handprint Memory Box – You know all of the sweet little notes and drawings kids give you that you just can’t bear to recycle? A little memory box like this is perfect place to keep them. {This box (CAN) is affordable and perfect!}
Handprint Baking Soda Clay Keepsakes – Another one of my favourite projects ever. Clearly I have a thing for handprints {and I absolutely love that the clay allows the little hand creases to be seen}, but wouldn’t this make such a special gift for a grandparent? {We made ours around Christmastime and went for golden glitter, but I’ve had my eye on this glitter set (CAN) for ages and would happily take a handprint keepsake in each colour.}
Family Portrait Mug – I mean how sweet is this?! A kiddo-drawn family portrait on your mug?? Plus, kid-drawn people are the very best. Miss G made this as Brad’s work mug and that little family portrait lasted for just over 3 years until we finally put it into the dishwasher not long ago. {Back then we used these special Sharpies (CAN).}
Painted Wooden Bead Necklace with DIY T-Shirt Cord – I truly adore these necklaces and the best part is that kiddos can fully customize the colours, patterns, and t-shirt cord to what they think their special adult will like best. {This bead set (CAN) is great for this project.}
Potted Flower Pens – Wouldn’t this be the best gift for a teacher or someone who works in an office?! Not only are flower pens the prettiest, but no one is going to walk off with your pen without being noticed when your collection looks like this! {We picked up our faux flowers from the dollar store.}
Fingerprinted Love Tokens – Little heart-shaped tokens with your loved ones fingerprints on them? The sweetest! We actually made this set for Miss G when she was going through a bit of a tough transition (one has Brad’s fingerprints, one has mine, and the other has hers), but wouldn’t a his make a sweet gift for a parent or grandparent? Each child or grandchild could make one heart and the recipient could keep all of the little ones he/she loves most on his/her bedside table or in his/her bag. {This is the clay we used for this project.}
Kid-Drawn Phone Case – For the tech lover! Or anyone who uses a cell phone really. I find sentimental Father’s Day gifts especially tricky for Brad, but this was something that he actually used {at least for several months before switching back to his other case} and I think the little drawing Grae did is the sweetest! {You can find all kinds of clear phone case here (CAN).}
Sweet & Spicy Sriracha Cashews – For the person who is tricky to buy for and loves spicy snacks! These are incredibly easy to make and kiddos can totally help make them. They’re delicious too! {I love baker’s twine and little tags like these (CAN) for homemade gifts.}
Hand-Drawn Tea Towels – Such a sweet and easy gift. Go in with a plan or let your little one’s imagination run wild – you really can’t go wrong here. Plus, who doesn’t need tea towels. {These towels (CAN) are my favourite because not only do they dry really well and not leave little fibres behind, but the fact that they don’t have any stretch makes them much easier to draw on.
Well that’s it… All kinds of gifts that kids can make for adults. What would you add to the list?
While Brad isn’t the type to whip up something crafty with the kids for Mother’s Day, writing for CBC Parents means that Miss G and I often get to create fun gift ideas to share on their site and of course – I directly benefit. ;)
In the past we’ve made an ‘I love you’ pillowcase (the sweetest, simplest thing) and a family portrait mug for Father’s Day, and this little ‘I love you’ teacup gift sort of combines the two.
It’s soooo easy that I’m hoping even those who consider themselves not at all crafty will give it a shot with their kiddos. The best part? {And this isn’t really usual advice from me, but} if you shop at a big box grocery store, pretty much everything you need should be there!
Oh how I love this DIY coconut oat milk bath… It’s so soothing and gentle and believe it or not, it doubles as a cleanser, so no soap required! We use it daily, but it’s our go-to solution for diaper rashes, dry itchy skin, and eczema flare ups too.
One thing both Miss G and I just LOVE doing is creating little favours for her classmates on Halloween, Christmas, and Valentine’s Day. Okay, and maybe on the last day of school too. ☺︎ And while we have given other things {these heart balloon valentines are proof}, our go-to is usually play dough or slime. A) because both are super fun, and B) because they’re something outside of the usual candy / chocolate.
Oh my… Have we ever been dealing with some big emotions lately. Miss G’s always been a spirited kiddo who feels things deeply, but in the last few months it’s been at a whole new level. Especially after school. I’ve been doing my best to to not bombard her with questions immediately after picking her up, to not ask too much of her as soon as we walk in the door, and to make sure she’s got a big snack and glass of water once home, but even then – some days are just extremely emotional for her.
As frustrating and as hard as it can be sometimes, I’m trying to tackle it as we would any other difficult situation – by helping her find strategies to cope and get through it. Things that help her work through her emotions. And so when I came across this anti-anxiety kit created by Sharla of The Chaos and the Clutter, I wondered if something similar would help Miss G in situations when she was feeling anxious, upset, or angry. I asked and she was totally on board, so we began collecting the items for this little calm down kit together.
This summer, just before we left Vancouver for good, we were lucky enough to sneak in a birthday party for one of Miss G’s special little friends. We had been swamped with the move and we were living with next to nothing and sleeping on foams by the time we got around to putting together a gift for the birthday girl if I remember correctly, but we just couldn’t help but put together something special. {Miss G’s totally inherited my love of gift giving.}
If you know me well, you know just how much I love putting together creative gifts for kids. I don’t know what it is… I know I could just pop into a store, buy something fun that’s all ready to go, wrap it, and be done, but putting something special together for a particular kiddo is just so much more fun. I love it.
Last fall, Miss G went through a huge ‘inventing’ stage. She loved nothing more than putting random bits and bobs together to create these elaborate structures and objects… It was SO cool to watch her imagination come to life. Since she was constantly rifling through our craft drawers and recycling bins to find what she needed {and often wanted help locating specific things}, I asked her if she’d like to help put together a DIY Inventing Kit – a collection of items that she could have organized and in one spot whenever the urge to invent struck – and of course she did! The result was this awesome kit full of colourful recyclables, materials, and adhesives, plus a couple of inspirational books.
Oh, the awesomeness that is the annual ‘cousins’ birthday’… A few years back, my sister-in-law and I came up with a plan that allowed us to celebrate all of our kiddos’ birthdays in person, despite living in different provinces {or on different sides of the world}. With all 5 of our kiddos having birthdays between July and November, we simply decided we’d do ONE celebration the one time we were guaranteed to be together each year – August long weekend in the Okanagan – and make it an official celebration of everyone! And that’s what we’ve done ever since. It’s super low-key… We sing a big ‘happy birthday’ song that includes everyone’s names, each cousin opens a special gift, and then we play or hang out or get on with whatever else we had planned. It’s something we look forward to each year!
Last year, Miss G’s very first year of school, was a doozy. Beyond having just left her home, friends, and most of her possessions in the Middle East to start over here in Canada, Miss G was also becoming a big sister after 5 years of being an only child and starting school for the very first time. When we got settled in Vancouver, we decided that we’d give traditional public school a try, despite the fact that we’d long decided that we’d homeschool if we were to stay in Kuwait. I had gotten excited about the possibility of homeschooling and wasn’t 100% sure about the decision, but after meeting what quite possibly might have been the greatest principal / office administrator combo EVER, we were hopeful it would be a great year. Our cautious and sensitive girl was even excited about Kindergarten!
I try really hard not to be that person who is constantly complaining about the weather {because who are we kidding – we have it so good here in Vancouver}, but let me tell you… I am SO ready for spring. Not that cold, grey, rainy everyday version of spring either. I’m ready for full-on sunshiny spring with blossoming trees, the buzzing of bees, warm temperatures, and rainy days only here and there. I’ve been willing it to come our way for weeks if I’m being honest. And with all of that wishful thinking, I was reminded of the amazing play dough fairy gardens Miss G and I did last year.
We had such a lovely time spreading kindness and love with the help of our Kindness Elves throughout the month of December and Miss G was definitely sad to see them go after they left her one final note on Christmas night. They did say that they’d be back at some point, but we didn’t know when that would be…