Mama.Papa.Bubba. -
Menu
Skip to content
  • SHOP
  • preemie
  • baby
  • play
  • craft
  • learn
  • cook
  • DIY
  • kuwait
  • vancouver
  • contact
  • about

Category Archives: child’s play

Soft, Squishy Gluten Free Play Dough

12 / 5 / 1912 / 5 / 19

Oh my goodness, guys.  If I could only count the number of times I’ve been asked lately, “Do you have a gluten free play dough recipe??”  I’ve lost track.  I actually do have a tried, tested, and true gluten free play dough recipe – my baby play dough recipe!  But it’s not a traditional play dough you’d keep on your shelf for days on end, so naturally I had to give creating one a try.  Now here’s the thing… We’re not gluten free, nor do we have anyone in our day-to-day that’s gluten free, so I’ve never had to learn to properly use gluten free flours. That being said, I used our usual go-to play dough recipe as a jumping off point and I’m actually very pleased with how this gluten free version turned out.  It’s soft, it’s squishy, it’s sort of heavy like my usual play dough is, and I actually really like it.  And I’m a bit picky.

Soft Squishy Gluten Free Play Dough | Mama.Papa.Bubba.

Now a few things to know…

  • I’ve only tested this recipe with this one particular flour – Bob’s Red Mill Gluten Free All-Purpose Baking Flour (CAN).  You can certainly trying using a different brand / type of gluten free flour, but I can’t guarantee it’ll work.  I did try creating a recipe with Bob’s Red Mill Gluten Free 1-to-1 Baking Flour, but I liked the All-Purpose Baking Flour better for this purpose.
  • With all of the gluten free play dough recipes I tested, I noticed that the finished doughs had a tiny bit of surface stickiness that our traditional play dough just doesn’t have.  It’s not a ton of stickiness and it doesn’t make the dough any less fun to play with, but a couple of things to note…  First off, when making and playing with this dough, make sure that your hands and work surface are completely dry.  Just a tiny bit of extra moisture can add to that stickiness.  Secondly, if you’re finding your dough a little too sticky at any point, add a little bit of cornstarch (probably no more than a teaspoon at a time) to your hands, your work surface, and/or the surface of your dough.
  • Lastly, I’m not quite sure how this dough will last long term just yet.  While our regular play dough recipe lasts for months on end, I only made the dough a few days ago, so it’s too early to tell just yet.  So far so good, though.  I just checked on it and it’s as though we just made it. You’ll want to store this dough just as you would our regular play dough – in an air-tight bag or container at room temperature away from heat sources (so no top of the fridge).
Soft Squishy Gluten Free Play Dough | Mama.Papa.Bubba.{this post contains affiliate links}

Okay, disclaimers out of the way…  Let’s get on with it, shall we?  Here’s what you’ll need:

Bob’s Red Mill Gluten Free All-Purpose Baking Flour (CAN)

table salt

cream of tartar (CAN)

vegetable oil

glycerine (CAN)

liquid food colouring (CAN)

boiling water

cornstarch

Soft Squishy Gluten Free Play Dough | Mama.Papa.Bubba.

And this is what your finished dough will look like… Pretty, right?

Soft Squishy Gluten Free Play Dough | Mama.Papa.Bubba.

We went for soft, pastel-y colours this time around and only used a tiny bit of food dye, but if vibrant colours are what you’re after, you can do that too.  Just follow the instructions in my recipe at the bottom of this post carefully.

Soft Squishy Gluten Free Play Dough | Mama.Papa.Bubba.

One other thing to note? This dough does have a mild “smell” to it…  Most likely thanks to the fact that the gluten free flour contains bean flours, I’m guessing. It’s not terrible and I’m sure you could probably add a tiny bit of extract or kiddo-friendly essential oil to eliminate it, but we didn’t and it doesn’t bother us.

Soft Squishy Gluten Free Play Dough | Mama.Papa.Bubba.

Okay, here’s the dough in action.  I love seeing these kind of pictures because I feel like they give me good insight into the texture of the dough (holy #playdoughnerd alert).  Anyways, it squishes…

Soft Squishy Gluten Free Play Dough | Mama.Papa.Bubba.

It cuts…

Soft Squishy Gluten Free Play Dough | Mama.Papa.Bubba.

And it’s really soft.

Soft Squishy Gluten Free Play Dough | Mama.Papa.Bubba.

Here’s the recipe…

Soft & Squishy Gluten Free Play Dough

  • 1 cup of Bob’s Red Mill Gluten Free All-Purpose Baking Flour | CAN (packed down into the measuring cup as much as possible)
  • 1/4 cup of table salt
  • 1 tablespoon of cream of tartar
  • 1 tablespoon of vegetable oil
  • 1 tablespoon of glycerine
  • a couple of drops of liquid food colouring
  • 1/2 cup of boiling water (measured in a dry measuring cup – as in the same type you’d measure flour in)
  • 2(+) tablespoons of cornstarch

Measure out the flour, salt, cream of tartar, vegetable oil, and glycerine into a large mixing bowl.  Give the mixture a really good whisk.

Add your food colouring to the measuring cup you’ll use to measure your water in.  Top the cup up with boiling water. (By adding the food colouring to the water measurement, you prevent adding too much liquid to your play dough – especially in cases where you’re adding a good amount of dye to achieve a more vibrant play dough colour.)

Pour the coloured water into your dry mixture and mix it super well with a wooden spoon, banging it off every once and a while.  You want to incorporate all of the dry mixture into the dough here, which may take a little bit of effort.  You may feel like your dough seems too dry or too wet to become a good play dough here, but don’t worry – trust the process. :)

Leave your semi-mixed dough on the counter to cool for 5 or so minutes.

Afterwards, dump the mixture out onto the countertop and knead it really well.  Probably a picky #playdoughnerd thing, but we have granite counter tops and I much prefer kneading our play dough on a wooden butcher block or cutting board.  At this point your dough will feel too sticky, but not to worry. (I feel like the wooden work surface helps cut the stickiness a little bit, which is part of why I find it helpful.)

Once your dough is well-kneaded and uniform, remove any dough from your hands, give your hands a good wash, and dry them completely.

Now measure out your 2 tablespoons of cornstarch either onto your work surface or directly onto your dough, and knead some more.  You want your play dough to eat this extra cornstarch up.  This should take care of that stickiness, but add an additional tablespoon if you feel like you need it (we tested this recipe 5+ times and 2 was our magic number each time).

Soft Squishy Gluten Free Play Dough | Mama.Papa.Bubba.

And that’s it!  You’ve got gluten free play dough!!

Soft Squishy Gluten Free Play Dough | Mama.Papa.Bubba.

When it’s not in use, keep it in an air-tight container or bag at room temperature (away from heat sources) and hopefully it’ll last a long time.Soft Squishy Gluten Free Play Dough | Mama Papa Bubba

Are you following us on social media?

Find us on: Facebook  |  Instagram  |  Pinterest  |  Twitter

We’d love to have you!

7 Comments

Little Blue Truck Play Dough Kit

8 / 22 / 198 / 22 / 19

Little Blue Truck Play Dough Kit tall | Mama Papa Bubba

Two of my favourite things?  Kid’s books and play dough kits…  So a book-inspired play dough kit??  Oh my gosh…  A match made in heaven!!  We made this Little Blue Truck play dough kit last year when all of the Little Blue Truck books were on heavy rotation in our house and it was such a hit.

Little Blue Truck Play Dough Kit | Mama.Papa.Bubba.{this post contains affiliate links}

For the purpose of the kit, we decided to use the original Little Blue Truck as our inspiration, but they’re all so good {well, with the exception of the spring one – it’s not my favourite if I’m being honest}.  They’re just such fun books to read aloud…  They have great rhythm and rhyme and they have really sweet messages behind them too – win!  I’d highly recommend all of these:

Little Blue Truck

Little Blue Truck Leads the Way

Little Blue Truck’s Halloween

Little Blue Truck’s Christmas

There’s also a new one on the way, Goodnight, Little Blue Truck, that I’m super excited to get my hands on.

Little Blue Truck Play Dough Kit | Mama.Papa.Bubba.

While I wasn’t sure what colours of play dough we’d do for this kit, a few flips through the pages of the book and it was settled.  We’d go with rich, fall colours just like the ones in the illustrations.

Little Blue Truck Play Dough Kit | Mama.Papa.Bubba.

Here’s a look…  We did a deep, brick red, a charcoal grey, a mustardy yellow, a coppery brown, and a mossy green.  Of course you could switch these up and do any colours you and your little one like though!

Little Blue Truck Play Dough Kit | Mama.Papa.Bubba.

To make the play dough, I actually did 5 separate batches of dough (one for each colour) and then split each batch in half to make two kits – one for us to keep and one for us to gift.   Depending on how full I want our kit to be, I usually do two or three batches of play dough, so 5 batches split in half gave us the perfect amount.   You can find our go-to play dough recipe, as well as our tips and tricks to making the perfect play dough, here.  For this particular kit, we skipped the scent and used our favourite Wilton gel colours.

Little Blue Truck Play Dough Kit | Mama.Papa.Bubba.

Here’s how the dough fit into our go-to play dough kit container, the GLIS divided box from Ikea {US | CAN}. (One thing to note is that while these dough balls are not wrapped in anything, the GLIS containers are not airtight, so I do gently place the dough into a large zip-close bag and then back into the container both for gifting and for personal storage.  In an air-tight bag, this play dough will last for months and months, whereas if you just leave them loose in the kit, you’ll notice them drying out and becoming sort of crystal-y fairly quickly.}

Little Blue Truck Play Dough Kit | Mama.Papa.Bubba.

Next, we gathered up our animals and vehicles…  We already had all of the animals in the story in our collection of Schliech and PAPO figurines, so that’s what we went with. You can find them here:

  • goat
  • horse
  • cow
  • pig
  • chicken
  • chicks
  • sheep
  • duck (this is a goose, but it looked more like the duck in the book than our duck figure did)
  • toad (ours is a green tree frog by Safari Ltd. that I can’t seem to find on amazon)

These figurines are beautiful quality and while we’ve built our collection slowly over many years, they’re definitely more pricey than others.  If you’re giving this as a gift and you’d like it to be more affordable, I would recommend going with Safari Ltd. or Wild Republic figurines…  Or even the ‘no name’ ones available in big toy stores and dollar stores.  You should be able to find all of the story characters and more, at a fraction of the cost.

{One other thing to note is that while I always use amazon links in my posts as those seem to be the most universally accessible for most, we buy almost all of our figurines from our very favourite toy store in Vancouver, Dilly Dally Kids.  It’s owned and run by a young local family and they’re amazing and the most sweet, helpful people ever.  They also ship all over the place and have really good shipping rates, so I’d highly recommend checking them out.}

Little Blue Truck Play Dough Kit | Mama.Papa.Bubba.

We also happened to have a perfect little CAT dump truck on hand too (we found ours at Winners, but you can also find it here), so the only thing we purchased was a little blue truck from our local teacher store (but this one or this one would be amazing!)

Little Blue Truck Play Dough Kit | Mama.Papa.Bubba.

Weird, but one of my favourite things about putting together play dough kits is figuring out how to best fit everything into the GLIS box…  We went with all of our little animal friends in the big spot on the left and the trucks in the middle spot in the front.

Little Blue Truck Play Dough Kit | Mama.Papa.Bubba.

To finish off the kit, we added some natural wooden matchsticks {to be used as long grass, fence posts, or anything else the kiddos dream up} and a handful of autumnal trees from our Safari Ltd. Tree Toob.

Little Blue Truck Play Dough Kit | Mama.Papa.Bubba.

Here’s the finished kit…  Wouldn’t this make a lovely gift for a special little someone?

Little Blue Truck Play Dough Kit | Mama.Papa.Bubba.

My favourite part about play dough kits is that you set them out and the kids have everything the need to start playing / creating…

Little Blue Truck Play Dough Kit | Mama.Papa.Bubba.

And open-ended play invitations like this tend to appeal to a wide range of ages, which I love.

Little Blue Truck Play Dough Kit | Mama.Papa.Bubba.

One thing I tend to get asked about play dough kits is, “How are they supposed to play with it?” and my answer is always that there is no right way to play – so long as they’re following the basic expectations you’ve set out for play dough play of course. I find that kids don’t really need instructions when it comes to enjoying the combination of play dough, loose parts, and figures…  They have plenty of imagination and the best thing oftentimes is for us to stand back and observe.

Little Blue Truck Play Dough Kit | Mama.Papa.Bubba.

They might create scenes that look similar to the ones in the story…

Little Blue Truck Play Dough Kit | Mama.Papa.Bubba.

They might use the play dough and parts to retell the story…

Little Blue Truck Play Dough Kit | Mama.Papa.Bubba.

Or they might do something completely different – which is 100% okay.

Little Blue Truck Play Dough Kit | Mama.Papa.Bubba.

Either way, they’re most likely flexing their imaginations, hand muscles, and fine motor skills, which are all great things.

Little Blue Truck Play Dough Kit

Are you following us on social media?

Find us on: Facebook  |  Instagram  |  Pinterest  |  Twitter

We’d love to have you!

4 Comments

Backyard Truck Garden

7 / 30 / 19

Backyard Truck Garden | Mama Papa Bubba

It feels like we’ve had a slow start this year, but summer seems to be here in the Okanagan and Sam’s been enjoying his little backyard truck garden again!

Backyard Truck Garden

Here’s what inspired us creating a truck garden… This hilly corner of our yard filled with dirt, rocks, and loads of debris discarded by our big old tree.  Now if we knew that this home was our forever home, we’d probably do something different, but without wanting to invest a whole lot of time, energy, or money, a truck garden turned out to be a fantastic solution.

Of course every yard is going to be different, but I do think the truck garden concept could be adapted to many different spaces, hilled or flat.

Backyard Truck Garden | Mama.Papa.Bubba.

Another fun part of this project?  Other than the little orange pilons and some paint, we only used things we already had on hand to put it together.

Backyard Truck Garden | Mama.Papa.Bubba.

First up were these road bricks…  They started out as regular old bricks left in the yard by the previous home owners, so I painted them grey with a sample of outdoor paint I picked up and then added some little yellow dashes freehand using some acrylic craft paint from the art cupboard.  More than a year later, these have held up super well. What I love about them is that they can be moved and configured how ever Sam likes, and they give him an opportunity to do some heavy lifting.

Backyard Truck Garden | Mama.Papa.Bubba.

The other little upcycle / repurpose project we did was turning some wood and flooring scraps into these road planks.

Backyard Truck Garden | Mama.Papa.Bubba.

I had previously seen this idea on my friend Chelsey’s site, Buggy and Buddy, and when I found a bunch of wood scraps left in one of the sheds, I knew it would be perfect.

Backyard Truck Garden | Mama.Papa.Bubba.

I just painted the boards a charcoal-y black colour using an outdoor paint we already had, then freehanded the white dashes using a small paintbrush, some acrylic craft paint, and an old metre stick as a guide.  And voila – wooden roads and ramps!!

Backyard Truck Garden | Mama.Papa.Bubba.{this post contains affiliate links}

Then we added all of the fun stuff…  Our kids’ garden tool set for raking up branches, creating dirt mounds, etc., a big bin of DIY blocks Brad and his dad made using some 2×4 and 2×8 scraps that were also left in our yard, and Sam’s collection of Green Toys and Wonder Wheels trucks.  All of these have been gifted to him over the years and they’ve seen endless hours of play.  They’re big, sturdy, and made from recycled plastic. These are the ones he has currently:

dump truck

recycling truck

fire engine

tow truck

cement mixer

Backyard Truck Garden | Mama.Papa.Bubba.

I also created a little picnic space at the top of the truck garden using our kids’ picnic table from Ikea and a little black and white striped umbrella, but I didn’t find that it got used a whole lot last summer, so I skipped it this summer and kept those items on our patio below instead.

Backyard Truck Garden | Mama.Papa.Bubba.

It was a cute little set up though!

Backyard Truck Garden | Mama.Papa.Bubba.

Possibly the biggest hit of the space?  This little sit-on excavator we got during a campaign I did with Canadian Tire.  Sam just LOVES it and could spend ages scooping up loose dirt and moving it to a different space or filling a bucket.

Backyard Truck Garden | Mama.Papa.Bubba.

I can’t tell you how much play this little space has seen!

Backyard Truck Garden | Mama.Papa.Bubba.

Here’s a look at the whole thing…  It’s certainly not the prettiest thing, but it’s such a great spot for playing in the dirt, getting filthy, and enjoying trucks.

Backyard Truck Garden | Mama.Papa.Bubba.

One final addition that’s also been a favourite?  These PVC pipe ramps!  While this wasn’t something I felt comfortable taking on myself, I took advantage of my brother being in town and he helped me pick up the largest piece of PVC pipe Home Depot carried and then cut it in half vertically.  We sanded the edges and created these ramps that smaller cars can ZOOM down!

Easy Inexpensive Backyard Truck Garden | Mama Papa Bubba

Are you following us on social media?  

Find us on: Facebook  |  Instagram  |  Pinterest  |  Twitter


We’d love to have you!

5 Comments

Icy Blizzard Car Rescue

3 / 7 / 194 / 15 / 19

Icy Blizzard Car Rescue Activity | Mama Papa Bubba

YOU GUYS…  It’s March 6th and currently?  It’s snowing.  SNOWING!!  I can’t even.  And so, when you don’t have the power to change the weather, you may as well enjoy it, right?  Except for that it’s cold and miserable….  So we brought the blizzard inside. {Just enough to fill a small bin – my kind of blizzard.  Hah!}   Mixed Sam’s very favourite thing (vehicles, obviously) and created an icy blizzard car rescue that he absolutely loved.

Here’s how I did it…

Icy Blizzard Car Rescue | Mama.Papa.Bubba.{this post contains affiliate links}

First of all, I picked out a few Hot Wheels / Matchbox vehicles from Sam’s collection and placed them into a small bin with just a couple of centimetres of water and two drops of aqua liquid watercolours (one of my very favourite art supplies – they’re super vibrant and super washable).  Then I popped the bin into the freezer, arranged the vehicles as I wanted them, and let it all freeze over night.

Icy Blizzard Car Rescue | Mama.Papa.Bubba.

When it was time to play, I sprinkled some snow on top in order to add to the whole blizzard feel, but if you don’t have snow you could certainly skip this step.

Icy Blizzard Car Rescue | Mama.Papa.Bubba.

Next up, I set out a few ‘tools’ to assist in the rescue…

  •  toy tow truck and snow plow for added imaginary play possibilities
  • some jars of warm water coloured with liquid food colouring (you could use liquid watercolours to ensure washability) paired with our bulk pipettes and our Learning Resources zig-zag dropper to help melt the ice
  • a little wooden hammer for breaking / chipping away at the ice
  • some coloured salt (just regular table salt and a couple of drops of liquid food colouring shaken in a reusable bag until uniform in colour), also for melting ice

Icy Blizzard Car Rescue | Mama.Papa.Bubba.

Here’s the finished play invitation!

NOW…  I just purchased this  FLISAT table from Ikea {even though we really didn’t need it} and although I’m already so, so in love with it, you certainly do not need a fancy sensory table to set this, or any other sensory play invitation, up.  A smaller bin inside a larger bin would work perfectly, as would a blizzard bin with a tray of tools next to it.

Icy Blizzard Car Rescue | Mama.Papa.Bubba.

When I told Sam that the vehicles were stuck in an icy blizzard and needed to be rescued, he was thrilled.

Icy Blizzard Car Rescue | Mama.Papa.Bubba.

I briefly ran through the tools with him and he was off!

Icy Blizzard Car Rescue | Mama.Papa.Bubba.

I feel like ice rescue activities like this one {and this frozen ocean animal rescue and this frozen ocean mermaid excavation} are great for helping kiddos develop grit, patience, and perseverance because they take a good amount of time and effort.

Icy Blizzard Car Rescue | Mama.Papa.Bubba.

While Sam immediately went for the warm water and salt, he soon moved onto trying the wooden hammer.

Icy Blizzard Car Rescue | Mama.Papa.Bubba.

What I didn’t anticipate is that he would create his own warm salt water mixture in hopes of that being the winning solution…  Clever little nugget!

Icy Blizzard Car Rescue | Mama.Papa.Bubba.

It took some time {and maybe a tiny bit of assistance from Sister – she just can’t help herself!}, but he eventually got a truck loose.

Icy Blizzard Car Rescue | Mama.Papa.Bubba.

Of course Miss Chloe was right in on the action as she always is.

Icy Blizzard Car Rescue | Mama.Papa.Bubba.

One thing I should mention is that the combination of cold and salt can sometimes bother little ones’ hands.  Miss G’s never minded – even after ages of play – but after dunking his hands in water and then into the salt, Sam told me that his hands felt ‘hot’.  A couple of things you can do to if your little one seems to have sensitive hands: a) let them play with gloves on or b) have a bowl of clean, warm water and a small towel nearby.

Icy Blizzard Car Rescue | Mama.Papa.Bubba.

Of course as time passes, the vehicles become easier to rescue…

Icy Blizzard Car Rescue | Mama.Papa.Bubba.

And then it gets REALLY exciting!

Icy Blizzard Car Rescue | Mama.Papa.Bubba.

This will definitely be done again in our house.

Icy Blizzard Car Rescue | Mama Papa Bubba

Are you following us on social media?

Find us on: Facebook  |  Instagram  |  Pinterest  |  Twitter

We’d love to have you!

4 Comments

Spa Bath for Kids

1 / 31 / 192 / 5 / 19

Spa Bath for Kids | Mama Papa Bubba

You know those times when your kiddo needs a little something extra special just for them?  Like time alone that doesn’t feel like forced time alone?  Well this spa bath for kids has become one of our go-tos in those situations and is exactly that… Time alone that feels special {maybe even a little bit luxurious} and not at all forced.  It’s the perfect really chill, relaxing way to end the day and such a good mood booster for us too.

Spa Bath for Kids | Mama.Papa.Bubba.{this post contains affiliate links}

The set-up is really simple and can really be anything you want it to be depending on what your child loves and what you have in the house.

Spa Bath for Kids | Mama.Papa.Bubba.

I always fill the tub up with a good amount of water and set out a towel, a washcloth, and a little ‘welcome to the spa’ of some sort. {Nothing fancy, obviously…  This one is a piece of scrap paper from the junk drawer written with blue pen, but I often just write ‘welcome to the spa’ right on the tub with washable marker like I do for all of the little things I put out next.}

Spa Bath for Kids | Mama.Papa.Bubba.

Alright – the little spa goodies… These are put in plastic containers (ancient apple sauce container collection for the win!) and I label each one by using a washable marker directly on the ledge of our bathtub.  You can play around with different types of markers {washable obviously!} to see which ones work best on your surface, but regular old washable Crayola markers tend to be my go-to as they go on alright and wipe right off without any effort at all.

Spa Bath for Kids | Mama.Papa.Bubba.

What you include is totally up to you, but I always go with the same 5 labels… ‘wash’, ‘scrub’, ‘soak’, ‘sip’, and ‘snack’.

Spa Bath for Kids | Mama.Papa.Bubba.

‘Wash’ is almost one of two things…  A couple of pumps of Moon Baby (or go to wash for both kids) or castile soap from our foaming soap dispenser (just put castile soap and some water in a foam dispenser that we always have on hand). BUT – how fun would it be to put out a chunk of our awesome DIY squishy soap?!

‘Scrub’ is almost always a big squeeze of the maple brown sugar scrub from Back to Earth that I love, but we’ve also done our homemade lemon vanilla sugar scrub and our funfetti sugar scrub when we’ve had them, and both are super fun and delicious smelling too.

‘Soak’ is usually a locally made bath bomb or some of our beloved coconut oat milk bath that Miss G can just pop into the tub when she’s ready.

Spa Bath for Kids | Mama.Papa.Bubba.

‘Sip’ is usually fruit water (plain water with frozen fruit instead of ice cubes) with a paper straw to make it fancy…

And ‘snack’ is usually some type of cut up fresh fruit.

Spa Bath for Kids | Mama.Papa.Bubba.

And that’s basically it!

Spa Bath for Kids | Mama.Papa.Bubba.

When everything is ready I usually put on a calming Spotify playlist, dim the lights, and invite my little guest to enjoy some time at the spa.

Spa Bath for Kids | Mama.Papa.Bubba.

She enjoys some time on her own and when she comes out afterwards…  You can just tell –  she feels sooooo good.  Also, Mr. Sam had his very first taste of the spa bath the other night, soaked it right up, and then asked for another one midday the next day – hah!

Calming Spa Bath for Kids | Mama Papa Bubba

Are you following us on social media?

Find us on: Facebook  |  Instagram  |  Pinterest  |  Twitter

We’d love to have you!

1 Comment

Muddy Monster Truck Derby Sensory Bin

1 / 22 / 191 / 22 / 19

Muddy Monster Truck Derby Sensory Bin | Mama Papa Bubba

Okay, so before you see this awesome muddy monster truck derby sensory bin and think it’s all fun and games over here all day every day, here’s what you need to know…  This morning Sam came along for the school run in undies, a t-shirt, and a sweater.  In minus four degree {celsius} weather.  No pants.  No socks. No boots. And no jacket.  Let alone a toque or mittens.  Thank goodness we do the whole car blanket thing and he at least had that once in, but you guys – this morning was a doooozy.  We got home, I moped a bit, he continued to shout and whine and throw things, and I made a cup of coffee and gulped the whole thing back in bed with the door closed.  Then we hugged it out, agreed to start our morning over, cleaned up, and put this sensory bin full of mud and monster trucks together.

Thank fricken goodness sensory play and calm music have the power to turn a day around.

Muddy Monster Truck Sensory Bin | Mama.Papa.Bubba.{this post contains affiliate links}

Here’s what we used to put this taste-safe, scented, amazing-feeling sensory bin together…

  • one of our go-to Sterilite sensory bins (any shallow bin will work)
  • cornstarch from our play cupboard (when it comes to cooking with it, I always use an organic version)
  • cocoa powder
  • a couple of small toy monster trucks

and later on, these Green Toys cars too.

Muddy Monster Truck Sensory Bin | Mama.Papa.Bubba.

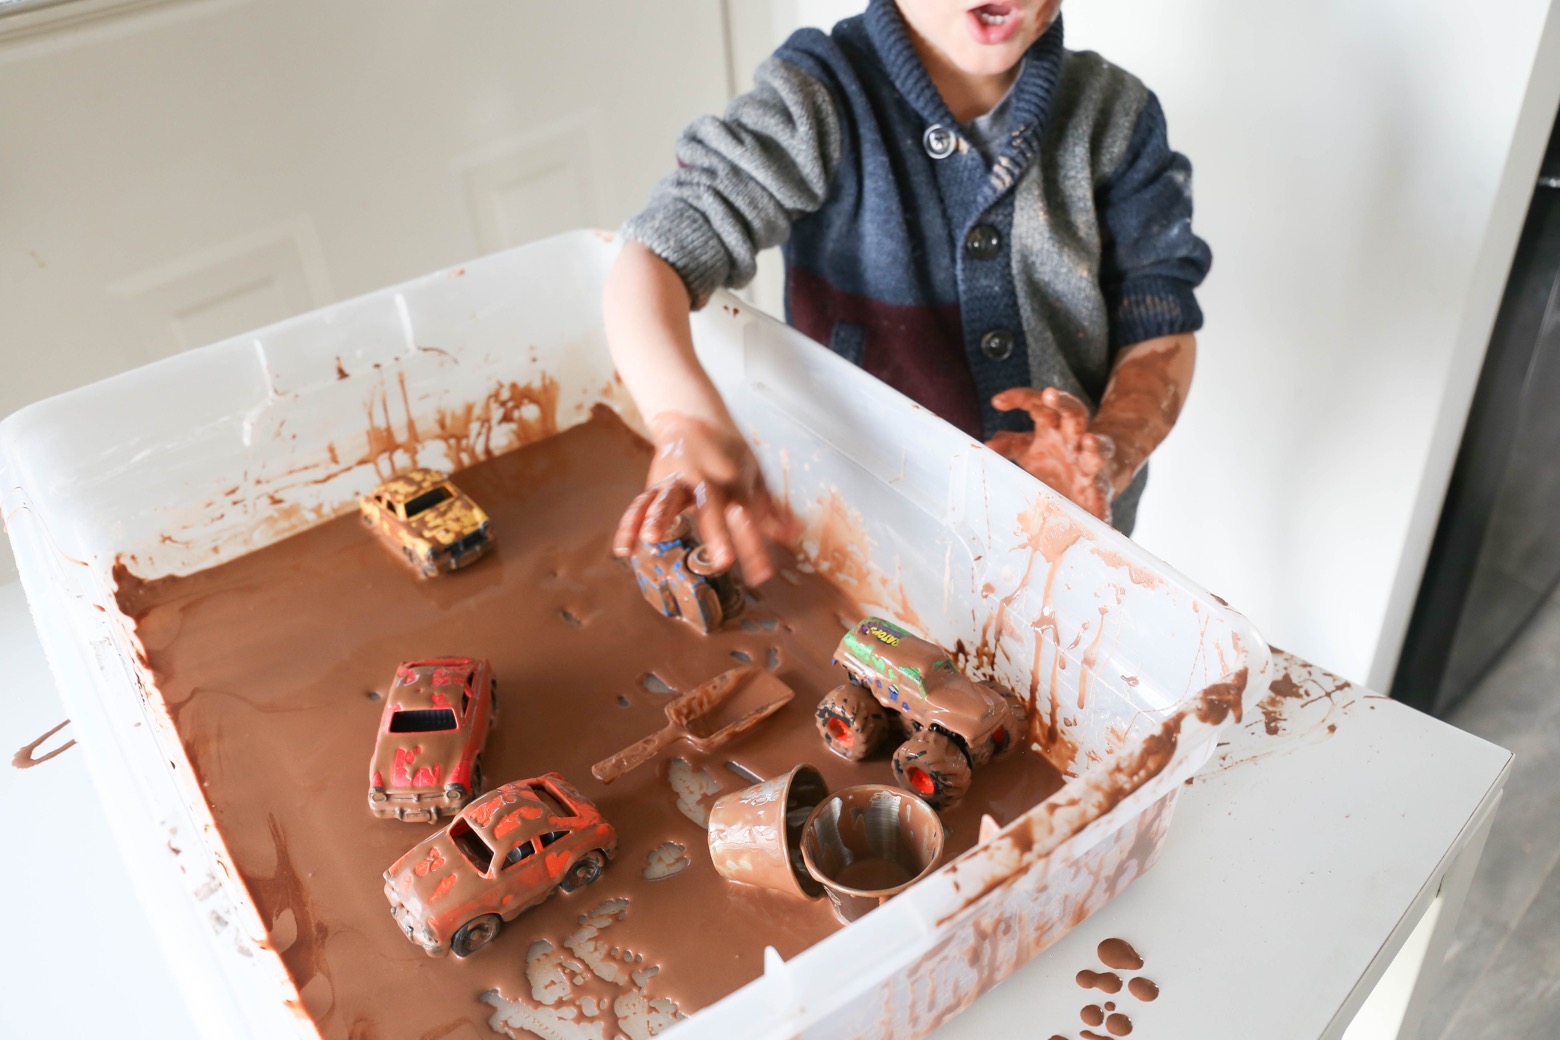
If you haven’t guessed yet, our ‘mud’ for our monster truck derby sensory play is CHOCOLATE oobleck!!

Muddy Monster Truck Sensory Bin | Mama.Papa.Bubba.

We didn’t even bother mixing this up in a separate bowl!  Sam just dumped the cornstarch and cocoa powder straight into our bin…

Muddy Monster Truck Sensory Bin | Mama.Papa.Bubba.

Then whisked it up…

Muddy Monster Truck Sensory Bin | Mama.Papa.Bubba.

And mixed with a wooden spoon as I gradually added water.

Muddy Monster Truck Sensory Bin | Mama.Papa.Bubba.

You can play with the amounts of each ingredient to create thicker or thinner oobleck, but here’s our recipe…

CHOCOLATEY OOBLECK
  • 2 cups of cornstarch
  • 1/2 cup of cocoa
  • 2 cups of water

Whisk the cornstarch and cocoa together well.  Add the water and stir with a wooden spoon {or better yet – your hands!} until the oobleck has a uniform in texture.

Muddy Monster Truck Sensory Bin | Mama.Papa.Bubba.

I gave the chocolate oobleck one last mix before Sam very enthusiastically popped his monster trucks in.

{It goes without saying that Chloe was in on the fun in approximately 2 minutes flat.  Seriously – this kitty of ours loves sensory play just as much as Grae and Sam do!}

Muddy Monster Truck Sensory Bin | Mama.Papa.Bubba.

It obviously depends on the size of your bin, but our layer of oobleck was thin enough to leave very visible monster truck tracks and Sam noticed right away.

Muddy Monster Truck Sensory Bin | Mama.Papa.Bubba.

Muddy Monster Truck Sensory Bin | Mama.Papa.Bubba.

He also realized how insanely neat oobleck is to touch and hold and squish.

Muddy Monster Truck Sensory Bin | Mama.Papa.Bubba.

As for the mess?  With activities like this one, I just remind him to keep his hands in or over the bin.  The truth is that the oobleck mud dries up on surfaces and is a cinch to wipe up, but I still don’t want it all over the kitchen obviously.

Muddy Monster Truck Sensory Bin | Mama.Papa.Bubba.

Part way through his play Sam asked for something for the monster trucks to drive over, so that’s when I offered him a few little Green Toys cars.  We lined them up just like you’d see at a monster truck show and after getting a thorough drizzling of mud, the monster trucks began driving and jumping over them.

Muddy Monster Truck Sensory Bin | Mama.Papa.Bubba.

Muddy Monster Truck Sensory Bin | Mama.Papa.Bubba.

Although this addition was initiated by Sam, starting simple and adding things in here and there during play is one of my go-to methods for extending play activities.

 Muddy Monster Truck Derby Sensory Bin | Mama.Papa.Bubba.
Muddy Monster Truck Sensory Bin | Mama.Papa.Bubba.

Also his request?  ‘A tool and a bucket’, plus later on, a ramp which I chopped from an almond milk carton.  This was during a full one-hour play session and though I have a feeling that it would have lasted significantly longer, we had to put it on pause for nap time.  With the promise that he could continue later on in the afternoon, of course.

Muddy Monster Truck Derby Sensory Play | Mama Papa Bubba

Are you following us on social media?

Find us on: Facebook  |  Instagram  |  Pinterest  |  Twitter

We’d love to have you!

2 Comments

Decorate a Window Snowman Activity

1 / 10 / 191 / 10 / 19

Decorate a Window Snowman | Mama Papa Bubba
I took it down a couple of weeks ago already, but Sam loved his little decorate a window Christmas tree SO much that when it began absolutely dumping snow yesterday, I decided to quickly put up a new window activity for him to enjoy.  This decorate a window snowman activity has already been such a hit and the best part is that it can be decorated, taken apart, and redecorated over and over again.

First up, a little peek at the Christmas tree version…  This was SO simple to put together and I’ve already stored the foam circles and star away for next year, so it’ll be extra easy to set-up again then.  You can read the IG post details here.

Window Snowman Activity{this post contains affiliate links}

If you’re new to these foam window cling sort of activities, they’re really easy.  We’ve been doing them since Miss G was teeny tiny, and though we first started out using coloured acetate sheets, we quickly switched over to craft foam as it’s super inexpensive and easy to find.  I love these types of activities for many reasons, but a big one is that the required materials are so minimal.  You really only need craft foam (this can be purchased at craft and dollar stores), scissors, and a small spray bottle that’s manageable for your little one’s hands (we like this style and they’re also readily available at dollar stores).  This particular window snowman activity also uses some patterned white and clear cellophane (found at the dollar store also) and sticky tape, but if you’re brave enough to try it, you could skip the cellophane and use a black permanent marker on the window to make a snowman outline instead.  I’ve heard that it comes off without an issue with a cotton pad and rubbing alcohol and I have tested out small spots with success myself, but try it at your own risk (and definitely do a test spot first!)

Window Snowman Activity

I stuck with the safe bet this time around and used cellophane to create our snowman…  To do this I just folded a length of cellophane in half vertically, then used bowls as a guide when drawing a half snowman shape using permanent marker.  I do find that cutting patterned cellophane is much easier with really sharp scissors, so be sure to use your best pair when cutting out your snow person.

Window Snowman Activity

Next, place it up on the window at your child’s height.  It’ll stick up there all on it’s own, but I added some little tape rolls just to be sure it stayed put while Sam was playing.

Window Snowman Activity

Next up, cut several snowman ‘accessories’ out of your craft foam.  I just did this step on the fly, but you can draw on the foam sheets with pencil first if it’s easier.  What you include is up to you…  I did a couple of different hats, a few carrots, a couple of twigs, then a bunch of buttons and pebbles.

Window Snowman Activity

Now I’m not nearly good enough with photography to capture both the cellophane snowman on the sunny window and the foam pieces set out on the table in the dark corner, but this was the basic set-up…

Window Snowman Activity

Window Snowman Activity

I love putting little play invitations like this one out for the kids to discover and use on their own time.  Sam was immediately intrigued by the table full of foam goodies, but when he saw the snowman on the window?  He was thrilled.

Window Snowman Activity

Having done a similar activity before, he immediately got to work decorating his snow person.

Window Snowman Activity

If you’ve never tried this type of activity before, the process is really neat.  All the foam pieces need in order to stick onto the window is a spritz of water!  So it’s just spray-and-stick for each piece.

Window Snowman Activity

Using a spray bottle is great for developing those little hand muscles and motor skills too, so win-win!

Window Snowman Activity

“Dis snowman same tall as ME!!”

Window Snowman Activity

It’s hard to see, but isn’t his snowman sweet?  The twigs coming out of the bottom of its face are in fact arms and the green circles on the sides are his “funny ears”.  Also, Sam told me that it doesn’t have a a name when he’s wearing the black hat, but when its wearing this red and white one, the snowman’s name is Santa.

Decorate a Window Snowman | Mama Papa Bubba

Are you following us on social media?

Find us on: Facebook  |  Instagram  |  Pinterest  |  Twitter

We’d love to have you!

2 Comments

Simple Fizzy Eruptions

10 / 25 / 18

Simple Fizzy Eruptions | Mama Papa Bubba

Baking soda and vinegar…  It just never ever gets old.  This very simple fizzy eruptions activity has been a hit with so many of our little friends and guests over the years.  And it doesn’t matter if they’ve just turned two or they’re nearly eleven years old – everyone who has come over when I’ve had this set out for a co-op meet-up, play date, or birthday party has pretty much loved it.  I mean what’s not to love about colourful fizzy eruptions that leave your play surface looking just like that of the moon, right?

Simple Fizzy Eruptions | Mama.Papa.Bubba.{this post contains affiliate links}

Here’s the simple-as-can-be set-up…  A plate of baking soda (or soda bicarbonate for our UK friends), several little jars of white vinegar coloured with liquid food colouring, gel food colouring, or liquid watercolours {my personal favourite because of the fact that they’re fully washable}, some pipettes, and a play tray to contain the mess {this one from Ikea is our fave}.

Simple Fizzy Eruptions | Mama.Papa.Bubba.

At nearly 3 years old, Sam has just really nailed down how to successfully use pipettes, but Miss G was using them when she was freshly 2, so it just depends on the kiddo!

That being said, kids who haven’t mastered pipette use can totally still create fizzy eruptions on their own!  Instead of giving them the usual jar / pipette combo, just put the coloured vinegar in old glue bottles, any other squirt bottle with a small opening, or old liquid soap bottles with a pump and let them squeeze or pump the vinegar onto their plate of baking soda.

Simple Fizzy Eruptions | Mama.Papa.Bubba.

If they’re able to use a pipette, it’s as easy as squeeze to collect coloured vinegar…

Simple Fizzy Eruptions | Mama.Papa.Bubba.

Then squeeze to release the coloured vinegar onto the baking soda base and watch the fizzy eruption magic happen!

Simple Fizzy Eruptions | Mama.Papa.Bubba.

When the fizzy foam settles down, you’ll be left with the coolest coloured spots that look just like the moon’s surface {hence why we sometimes call this ‘moon painting’}.

Simple Fizzy Eruptions | Mama.Papa.Bubba.

Now if you really want to take things to the next level {like Sam does ALWAYS}, you may want to try the triple pipette method {patent pending – HAHA!}

Simple Fizzy Eruptions | Mama.Papa.Bubba.

Simply shove all three of your pipettes into a single jar, squeeze up as much vinegar as humanly possible…

Simple Fizzy Eruptions | Mama.Papa.Bubba.

And enthusiastically squeeze them out onto your baking soda in order to create the biggest fizzy eruption possible. The more force the better, really.

Simple Fizzy Eruptions | Mama.Papa.Bubba.

Simple Fizzy Eruptions | Mama.Papa.Bubba.

I mean, just look at how fun it looks!!

Simple Fizzy Eruptions | Mama.Papa.Bubba.

And when you’re nearly done, may as well just dump the rest of the vinegar out, right??  ‘Papa says sam can do it’, I’m told. Hah!

But in all seriousness, when the entire plate is flooded in vinegar like this, most often you can dump off the liquid and use the remaining {wet} baking soda below for round 2.  I mean you may as well get as much bang for your buck as possible, right?  {This is especially important when you live in Kuwait and you’re buying 45 of these tiny 100 gram containers of baking soda at a time.}

Fizzy Eruptions with Baking Soda and Vinegar | Mama Papa Bubba

Are you following us on social media?  

Find us on: Facebook  |  Instagram  |  Pinterest  |  Twitter


We’d love to have you!

6 Comments

Witch’s Brew Play Dough Kit

10 / 15 / 1810 / 19 / 18

Witch s Brew Play Dough Kit | Mama Papa Bubba

Oh how I love putting together play dough kits!  After years and years of them being one of our play staples {as well as our go-to homemade gift}, Miss G sort of moved onto really loving other types of play around the time Sam was born {#sadday}.  Then when Sam was finally ready for it, we stuck with our taste-safe baby play dough and our go-to no-cook play dough for a long while before moving onto full-on play dough kits with loads of fun loose parts included, so it’s been a minute.  Recently we’ve done a really awesome Little Blue Truck play dough kit {which I’ll be sure to share soon} as well as an autumn spice dough with whole spices, but this witch’s brew play dough kit is our newest kit and it’s been oh so much fun.

Witch's Brew Play Dough Kit | Mama.Papa.Bubba.{this post contains affiliate links}

To make it, I started out by making three separate batches of our go-to super squishy, no-cook play dough.  This time around, I skipped the Kool-Aid and Frosting Creation packs and simply made unscented doughs in vibrant Halloween-inspired colours using my favourite Wilton gel colourings.

Witch's Brew Play Dough Kit | Mama.Papa.Bubba.

Then it was off to our Halloween bin downstairs to find some fun loose parts to add to our kit.  Here’s what Sam and I found {all purchased at Dollarama in previous years}…  Some small plastic rats, mini spiders, flies, and ants, some purple bats, and some monster googly eyes.

Witch's Brew Play Dough Kit | Mama.Papa.Bubba.

Of course a play dough kit means a GLIS divided container from Ikea, so we dug one of those out too.  {Seriously one of my very favourite things to buy at Ikea.  So much so that I always keep a few extras on hand for gifts and fun projects.}

Witch's Brew Play Dough Kit | Mama.Papa.Bubba.

Alright, so here’s how we organized our kit!   Our freshly made play dough in one of the big spots {I’d first place this in a big zip-close bag if giving the kit as a gift or storing it for any amount of time as the containers aren’t air-tight}…

Witch's Brew Play Dough Kit | Mama.Papa.Bubba.

Our little creepy loose parts in the small slots in the front…

Witch's Brew Play Dough Kit | Mama.Papa.Bubba.

And some mini ‘cauldrons’ {aka apple sauce containers} and some play kitchen utensils for stirring the brew along the side.

Witch's Brew Play Dough Kit | Mama.Papa.Bubba.

We also tucked our rats in with the cauldrons and utensils as that’s where we had space.

Witch's Brew Play Dough Kit | Mama.Papa.Bubba.

Here’s the finished kit!  Wouldn’t this make a lovely gift when paired with a copy of Room on the Broom?  Especially for a kiddos with a birthday or party around Halloween?  I also love the idea of making these and gifting them to your child’s preschool or Kindergarten class… I mean which teacher wouldn’t appreciate a ready-made sensory activity for her munchkins to enjoy??

Witch's Brew Play Dough Kit | Mama.Papa.Bubba.

The best thing about play dough kits like these?  ANYTHING GOES.

Witch's Brew Play Dough Kit | Mama.Papa.Bubba.

Miss G opted to use one of the big cauldrons we use for Halloween goodies for her witches brew…

Witch's Brew Play Dough Kit | Mama.Papa.Bubba.

And Sam stacked his brew up nice and high and layered creepy crawlies in between.

When they were done, the kiddos removed the little bits and bobs from the play dough, sorted them back into the container {awesome sorting practice for kiddos Sam’s age}, and I popped the play dough into a zip-close bag before putting it back into our divided container and closing it up.

Witch s Brew Play Dough Kit || Mama Papa Bubba

Are you following us on social media?

Find us on: Facebook  |  Instagram  |  Pinterest  |  Twitter

We’d love to have you!

1 Comment

Fall Leaf Bath

10 / 9 / 1810 / 9 / 18

Fall Leaf Bath | Mama Papa Bubba

We’re in full-on fall mode here in the Okanagan and the kids and I have been collecting beautifully coloured leaves since they’ve started falling.  Some have become part of the little nature table below our autumn bucket list, some have become leaf creatures, and tonight, a pile of them become part of a fall leaf bath.

Fall Leaf Bath | Mama.Papa.Bubba.

I actually set this little fall leaf bath up for Sam last fall and it was such a hit that I had to do it again.

Fall Leaf Bath | Mama.Papa.Bubba.

It couldn’t be easier, which I love.  Just give your leaves a good rinse and place them on the surface of a tub of water.

Fall Leaf Bath | Mama.Papa.Bubba.

This time around I also put some up on the wall – a trick Sam discovered last year.  All you have to do is get either the leaf or the wall wet, and so long as the leaf is fairly flat, it’ll magically stick to the wall.

Fall Leaf Bath | Mama.Papa.Bubba.

What he discovered this time around?  That he could stick a leaf onto a leaf!

Fall Leaf Bath | Mama.Papa.Bubba.

While he was playing, we also briefly talked about the different types of leaves in his fall leaf bath…  Well, the ones I knew at least. {#momneedstodosometree/leafresearch}

Fall Leaf Bath | Mama.Papa.Bubba.

And of course there were leaf hats, leaves stuck on legs and bellies, and several rounds of leaf peek-a-boo.

Fall Leaf Bath | Mama.Papa.Bubba.

After Sam was done, it was Miss G’s turn for a bath, and this is what I walked into when she was done…  She had separated the leaves by colour and created a game for me by having one misplaced leaf on each wall that needed finding. : )  Gosh, how I love my girl…

Autumn Leaf Bath | Mama Papa Bubba

Are you following us on social media?

Find us on: Facebook  |  Instagram  |  Pinterest  |  Twitter

We’d love to have you!

Leave a comment

Autumn Spice Play Dough with Whole Spices

9 / 20 / 189 / 20 / 18

Autumn Spice Play Dough with Whole Spices | Mama Papa Bubba

Welp, the first official day of fall is nearly here and I’m doing my best to embrace it despite the fact that the arrival of fall means we’re that much closer to another loonnnnng winter in our small town. A loonnnng winter in our small town that nearly did me in last year.  Now if it were to stay fall for a few months and we got to soak in that crisp fall air mixed with little bursts of sun, the beautiful autumn colours, and sweater weather for a while before transitioning into the snow, freezing cold, parkas, and permanently feeling like a block of ice, I’d totally be down for that.  Come on Mother Nature, work with me here! {Pleeeaaase.}

I usually switch up our play dough and play dough kits each season despite the fact that our go-to homemade play dough can last even longer than that {our black, sparkly play dough that was part of our tinker play dough activity is still going strong!}, so this week Sam and I whipped up the most delicious smelling autumn spice play dough.

Autumn Spice Play Dough with Whole Spices

It’s just our basic no-cook play dough recipe {made without food colouring or flavour packets} with a few of our favourite fall spices added to it, and let me tell you – it smells divine!  {We chose to use cinnamon, nutmeg, and cloves, but if we would have had allspice on hand, I would have added that too!}

To make it, we measure out our dry ingredients plus our vegetable oil and glycerine into a large bowl.

IMG 5348

Then we whisk it up really well.

Autumn Spice Play Dough with Whole Spices

Next, I add the boiling water and immediately mix it {quite vigorously} to get the texture as uniform as possible.  As soon as it’s cool enough to handle, I get my hands in there, bring it all together in a ball…

Autumn Spice Play Dough with Whole Spices

And then dump it out onto a clean, dry countertop.

Autumn Spice Play Dough with Whole Spices

The one question I always get asked about our play dough is how we get such a smooth texture, and it’s all about the kneading!  I knead our play dough for probably a solid 2 or 3 minutes, or until it’s pretty much cool.  I know that there’s a proper way to knead doughs, but when it comes to our play dough recipe, I start with it all in a mass close to me…

Autumn Spice Play Dough with Whole Spices

Then I push it away from me while using a decent amount of pressure to flatten it right out.  Then I pull it back and repeat.  (Many, many times.)  I find that this method works well when the dough is still a little sticky {our recipe tends to feel a little wet until completely cool} and it really works to get rid of any little lumps an bumps that might be hiding in the dough.  By the time it’s completely cool, the dough should be smooth as can be and should no longer be sticky.

Autumn Spice Play Dough with Whole Spices

Can you tell how smooth it is?

Autumn Spice Play Dough with Whole Spices

I’m pretty sure we’ve made some version of this play dough every fall since Miss G was one or two years old, and I love pairing it with natural loose parts.  We often go out on a nature walk and collect conkers, acorns, pinecones, and pretty leaves to pair it with, but another favourite over the years has been whole spices and that’s what we decided to go with this time around.

Autumn Spice Play Dough with Whole Spices

Sam and I popped by our local bulk store and picked up some cinnamon sticks, cardamom pods, whole allspice, whole nutmeg, some anise stars, and some whole cloves – all of which smell amazing and have interesting shapes and textures.  Then I popped everything into one of my favourite divided trays {I got this one in Kuwait at City Star in Egaila} and set it out on the table with a couple of placemats for the kids to discover after school.

Autumn Spice Play Dough with Whole Spices

I love having some sort of invitation to play or create out on the table in the afternoons…  It’s always something that is open-ended and requires very little / no adult help, which means that they can just dive in and play or create independently, which I think is good for all of us, but especially Grae.

IMG 5386

After a long day at school, I really find that she just needs some time to unwind and decompress… Some time when there’s nothing expected of her and nothing she has to do on a timeline – and creating or reading seem to be two really good options for her.

Autumn Spice Play Dough with Whole Spices

I often pick a chilled out, calming playlist on Spotify and play that too, which really sets the mood for some low-key, focused play.

Autumn Spice Play Dough with Whole Spices

Autumn Spice Play Dough with Whole Spices

Of course with play dough and loose parts, there’s really no end goal.  Miss G usually works on some sort of careful creation…

Autumn Spice Play Dough with Whole Spices

While sam loves to burry and poke and dig and hide.

Autumn Spice Play Dough with Whole Spices

Both of which are equally valuable, important ways to play.

Autumn Spice Play Dough | Mama Papa Bubba

Here’s our autumn spice play dough recipe…

Autumn Spice Play Dough

  • 1 cup of all-purpose flour
  • 1/4 cup of  table salt
  • 1 tablespoon of cream of tartar
  • 1 teaspoon of cinnamon
  • 1 teaspoon of nutmeg
  • 1 teaspoon of ground cloves
  • 2 tablespoons of vegetable oil
  • 1 tablespoon of glycerine
  • 3/4 cup of boiling water (measured in a dry measuring cup – this is important as wet and dry measures aren’t the same)

Place all of the ingredients, save the boiling water, in a bowl and whisk well.  Measure the water using your dry measuring set and add it to the bowl.  Give the mixture a quick mix with a wooden spoon, banging off it off every once and a while.  At this point, the mixture may seem too wet and sticky to make good play dough… Do not fret!  Once the dough has cooled just a little, use your hands to carefully bring it into and ball and then dump it out onto the countertop and knead really well.  You’ll know you’re done when the dough is fully cooled, soft and squishy, and no longer sticky

Enjoy!

Are you following us on social media?

Find us on: Facebook  |  Instagram  |  Pinterest  |  Twitter

We’d love to have you!

3 Comments

Easy Paper Tunnels for Little Car Lovers

7 / 9 / 18

Easy Paper Tunnels | Mama Papa Bubba

Sometimes the very simplest things turn out to be the biggest hits, don’t they?  Take these insanely easy paper tunnels for example…  A totally random idea, thrown together on the spot, and yet Sam just loves them. 

Easy Paper Tunnels | Mama.Papa.Bubba.

Do all little car lovers have a ‘thing’?  I once nannied a little car lover who was obsessed with speed bumps.  Like LOVED speed bumps.  And Sam’s thing? Tunnels.  

Easy Paper Tunnels | Mama.Papa.Bubba.

I don’t know what it is about them exactly, but he just freaking looovvvves tunnels.  He’s constantly searching them out for his toy cars and will basically transform anything he can into a tunnel.  Even if it’s your leg – hope you didn’t plan on moving any time soon {hah!}

Easy Paper Tunnels | Mama.Papa.Bubba.

So this afternoon when he woke from a nap talking about a tunnel for his purple concrete mixer, this little paper tunnel idea popped into my mind and it couldn’t be easier.

Easy Paper Tunnels | Mama.Papa.Bubba.{this post contains affiliate links}

Basically you need two things –  washi tape and card stock {I love this stuff from Ikea – it’s super sturdy and the colours are gorgeous}.  Oh, and a hard surface of some sort.  All I did was cut some of the card stock in half and kept some whole, then folded little tabs on each side, and washi taped them to our coffee table to form little rainbow tunnels.

Easy Paper Tunnels | Mama.Papa.Bubba.

Easiest thing EVER.

Easy Paper Tunnels | Mama.Papa.Bubba.

He collected up a bunch of different cars and trucks, placed them in the middle of the table, and then drove them around and through the paper tunnels one-by-one.

Easy Paper Tunnels | Mama.Papa.Bubba.

One thing I really love about this activity besides it being so easy is that while the paper tunnels are fairly crash proof, the fact that they’re just paper taped down onto a table encourages Sam to practice slow, controlled, gentle movements – something that doesn’t always come naturally to him.

IMG 4372

These remain on our coffee table currently and probably will for a while, but when we’re done with them, we’ll just take them off and tuck them away until next time, probably reusing the same paper tunnels several times over.

The Easiest Paper Tunnels for Little Car Lovers | Mama Papa Bubba

Are you following us on social media?  

Find us on: Facebook  |  Instagram  |  Pinterest  |  Twitter


We’d love to have you!

2 Comments

Giant Sticky Collage

5 / 26 / 185 / 28 / 18

Giant Sticky Collage | Mama Papa Bubba

Come August we will have been in our new house for a year, and though we’ve definitely ‘settled in’, our house is still a little stark.  We still have a few key pieces to purchase, but the biggest part of part of it? There’s really nothing on the walls.  I figure it will eventually come together and while I have a few different ideas for this tall bare wall on our landing {instagram wall? low profile book case?}, in the meantime we’ve been using it for all kinds of vertical projects and play.  This giant sticky collage was a total hit with both kids {and that’s no small feat when they’re 5 and a half years apart!} and was added to each day for about a week and a half.

Giant Sticky Collage{this post contains affiliate links}

The best part is that so long as you have these three items – contact paper {CAN}, wide painter’s tape {CAN}, and scissors – you can pretty much make this project happen with random loose items from around the house.  No need to buy anything new!

Now a word on contact paper…  You can find this stuff at office supply shops, but many dollar stores carry it too.  lt’s usually in the kitchen aisle with the other drawer liners and no slip grip rolls.  For this project, we used two full rolls of the clear contact paper that Dollar Tree stocks.

Giant Sticky Collage

Alright, so here’s the trickiest part of this activity…  Getting the contact paper {CAN} up onto the wall.  Not going to lie – it can be a bit frustrating at first.  We’ve been doing contact paper activities since Miss G was wee and I kind of have my method down now, thankfully.

First off – don’t attempt this while you have little ones who desperately want to get to the playing part of the activity around.  Still, even now, I put our contact paper up during nap time or at night when Sam is in bed.  It’s just easier that way.

Second – roll your length of contact paper out on a table and fold back just a couple of inches of the paper backing along the length that you’re going to tape.  This will reveal the sticky side {which of course you’re going to want facing outwards on your wall}.

Third – while still at the table, run a length of painter’s tape along that edge, adhering half of the tape’s width to the contact paper and leaving the other half to adhere to your wall.

Fourth – stick the contact paper up onto the wall, keeping it as straight and flat as possible and then gently peel off the paper backing.

IMG 3343

Now if you’re going to do a GIANT sticky collage wall using two strips of contact paper like we did, prep the second strip of contact paper the same way – the only difference is that the taped edge is going to be the bottom side of the collage wall.  Then, holding the non-taped edge of the contact paper strip {paper backing still on of course}, place it onto the first piece of contact paper so they’re overlapped a couple of inches.  I sort of pat it into place to make sure they’re stuck together well before gently tugging downwards and adhering that bottom strip of tape onto the wall.  The goal is to have it as flat as possible, I never seem to get mine *perfectly* flat and it really doesn’t matter.

Giant Sticky Collage

Last step – add painter’s tape {CAN} along each vertical side to complete your sticky canvas.

Giant Sticky Collage

Now for the fun part… Collecting your loose parts!  Basically anything goes here – no need to buy anything new unless you truly have a house free of any little junky bits / craft supplies.  Most all of our stuff comes from our craft drawers, but also look in your junk drawer.  Things like bits of string, twist ties, bread ties, and scraps of packaging work well!  You can also cut pictures out of your weekly flyers  – they’re basically like stickers when paired with a sticky collage wall and bonus: get the kiddos to cut out their favourites for some added scissor practice!

Here’s what I originally set out with our giant sticky collage:

  • coloured wooden matchsticks {CAN}
  • craft feathers {CAN}
  • flower acrylic gems {CAN}
  • googly eyes {CAN}
  • pompoms (these tend to stick for a short while and then fall off) {CAN}
  • sequins {CAN}

But again, go with whatever you have on hand.

Giant Sticky Collage

Then with the giant sticky collage wall set up and the loose parts collected, I left it for Sam to discover after his nap.  {Of course there’s really no missing something of this size!}

Giant Sticky Collage

He stuck up a couple of little parts {talk about an awesome fine motor skill workout} and was pleased as punch about the whole thing.

Giant Sticky Collage

We had to run off to grab Miss G from school {yup, with Sam in robot jammies}, but as soon as we returned home, it was back to the sticky wall.

Giant Sticky Collage

He was soooo excited to show his big sis!

Giant Sticky Collage

What I love about open-ended invitations like this one is that kids always seem to add their own spin on them given some time and space.  And honestly, most of the time their ideas are better than mine!  After Sam had lost interest and moved onto something else, Miss G asked to bring out our giant ball of multi-coloured yarn and I just think it was such a neat idea.

Giant Sticky Collage

Now here’s my secret to making the interest for invitations to play or create like this one last as long as possible…  Add a few new things each day or two!  So in this case, I’d make sure the landing was tidy (I’ve totally noticed that my kids don’t gravitate to spaces that are scattered and a mess), then I’d add a few new things into the loose parts tray to keep interest high.

Over the course of the week, I added:

  • different types of acrylic gems {CAN}
  • bits of colourful plastic straws
  • foam shapes     {CAN}
  • sushi grass
  • lolly sticks {CAN}
  • and whatever else I found around the house that I thought would be neat

Giant Sticky Collage

This is what our giant sticky collage wall looked like several days in…

Giant Sticky Collage

Sort of chaotically beautiful, isn’t it?

Giant Sticky Collage | Mama Papa Bubba Blog

Are you following us on social media?

Find us on: Facebook  |  Instagram  |  Pinterest  |  Twitter

We’d love to have you!

2 Comments

Mini Racer Wall Ramps

5 / 21 / 185 / 22 / 18

Mini Racer Wall Ramps | Mama Papa Bubba

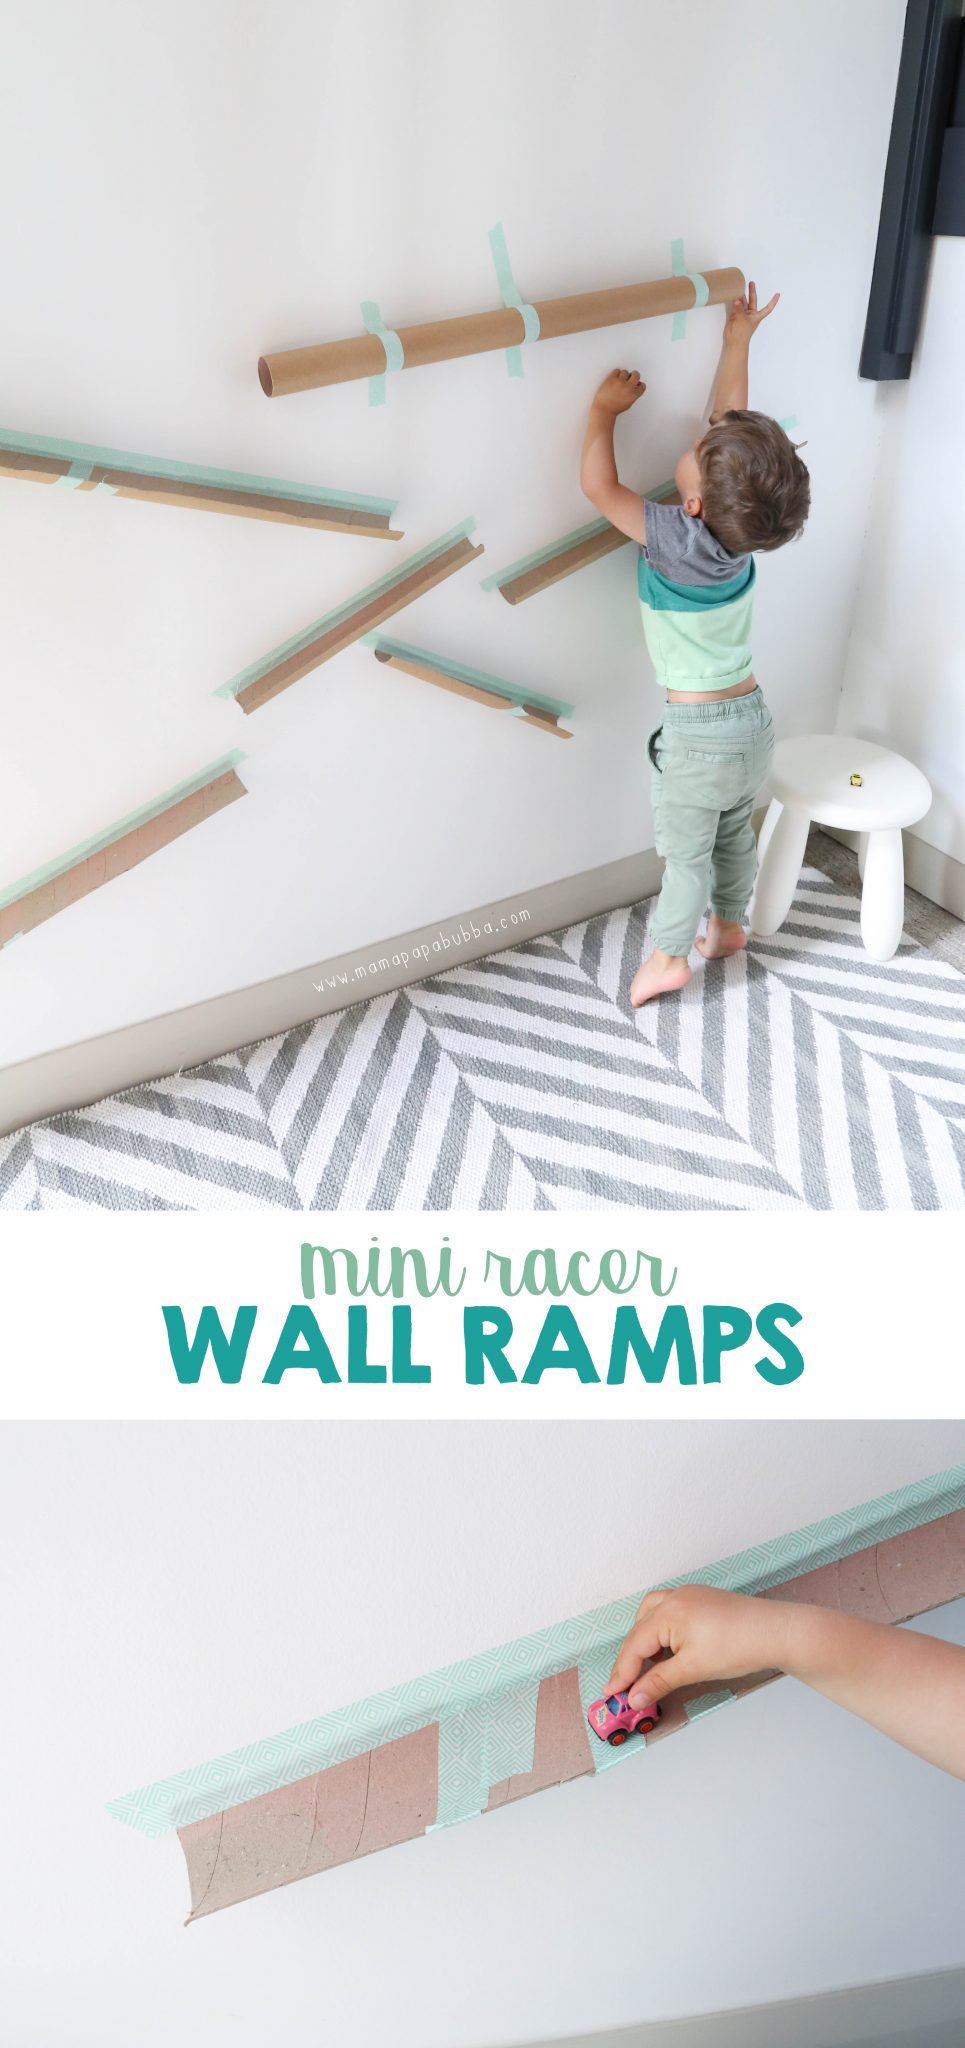
This boy and his cars.  He just loves them.  Throw in a ramp and he’s pleased as punch, so imagine how thrilled he was about these mini racer wall ramps we put up on our landing today! {SOO thrilled.}

IMG 3759{this post contains affiliate links}

It’s incredibly easy, but here’s what we used to create our mini racer wall ramps:

  • several mini racers (anyone else remember these from their childhood?)
  • several cardboard tubes (we repurposed most of ours from our car ramp sensory bin)
  • a roll of painter’s tape (though we used this decorative Scotch masking tape)
  • a pair of scissors

IMG 3762

Now because most all of our paper rolls were the ones we used for our car ramp sensory bin, we didn’t have to cut ours in half lengthwise, but if you do have to do that part, it does take a little bit of effort… Sharp, longer scissors are key in  my opinion.  With your paper tubes cut, it’s as easy as running a long piece of tape down one edge and sticking it to the wall at an angle.

IMG 3761

There’s really no right or wrong way to do this…  You can have the ramps work together or separately – up to you.  I decided to start at the top and got Sam to stand near the wall to judge how high we could go with the first ramp.  I thought it would be fun to make the ramps work together if possible, so with each addition, I got him to send one of his mini racers down and then positioned the next ramp so it would catch the car once it launched off the first.

IMG 3764

Once we had all of the previously cut ramps up, I asked Sam what he’d like to do with our one new paper roll –  cut it and make two new ramps or keep it as is and make one tunnel and he was absolutely certain that one tunnel was the way to go, so we hung it as is.

IMG 3767

And then we were off!

IMG 3768

He’d simply place a mini racer, wheels down, at the top of the tunnel or one of the ramps and then watch it go.

IMG 3766

The transition from one ramp to the next didn’t always work out perfectly, but he didn’t mind one bit.  If a car got stuck sideways or wheels up, he’d go help it and then step back to continue watching it race down.

IMG 3779

Part way through we added a basket to catch the cars that were flying off of the last ramp and crashing into our window, which added a fun element.

IMG 3777

I don’t know how long this will stay up on our wall for, but it’s not going anywhere anytime soon.

Mini Racer Wall Ramps | Mama.Papa.Bubba. Blog

Are you following us on social media?

Find us on: Facebook  |  Instagram  |  Pinterest  |  Twitter

We’d love to have you!

1 Comment

Gardening Sensory Bin

5 / 19 / 18

Gardening Sensory Bin | Mama Papa Bubba Blog

Oh, how I love me a good sensory bin.  When Miss G was a toddler, we were sensory bin QUEENS.  Seriously though.  We probably had a minimum of two sensory bins going on any given day.  She loved them, I loved them, and they come with SO many benefits, so we just ran with it.  

Well, as soon Sam started digging in our freshly planted container garden, I knew exactly what we needed to put together for him – a gardening sensory bin!  A place where he’d be free to dig, fill, plant, and rake to his heart’s content.

Gardening Sensory Bin

So that’s exactly what we did.

Gardening Sensory Bin {this post contains affiliate links}

Here’s what it included:

– potting soil (the plainest, nothing added soil the store had)

– several small pots from the seedlings we’d purchased for our garden

– a kids’ gardening shovel

– some dried beans for seeds

– a mini gardening tool set

– plant tags from our seedlings

– faux tulips

We also used the double bin method that I often use with Sam (my boy who can destroy an entire room in approximately 30 seconds flat).  It’s not a perfect system, but it does help contain the sensory bin filler (in this case, soil) and the extra space can also be used to house materials you want nearby, but not necessarily right in the sensory bin itself.  This is our go-to small sensory bin and this is my beloved jumbo sensory bin.

Gardening Sensory Bin

As I usually do when introducing an open-ended activity, I sort of just sat back and observed from the get-go.

IMG 3632

Now he had spent the last few days helping Grae and I transplant seedlings into containers, but it was the sweetest thing to watch him carefully fill his pot with soil and then stick a flower in the centre.

IMG 3636

Before long, Miss G joined in.  I’m always more than happy to let her enjoy activities I’ve set up with Sam in mind, but I do sometimes like him to get a stab at it first – before seeing how his big sister would interact with the materials.

IMG 3645

Now I don’t know whose idea it was, but once Grae joined in it wasn’t very long before one of our pump pressure water sprayers came into play.  {Side note: I looove these for gardening with kids as I feel like they make it hard to over water or hurt the seedling with a flow that’s too strong.} 

Gardening Sensory Bin

Of course once the water came into play, a whole lot of drinking and showering came along with it – hah!

Just for fun, let’s take a look at the last time I did a gardening sensory bin for Miss G, shall we?  This was back in October of 2014 {so Grae was just over 4 years old} in the courtyard of our apartments in Kuwait.  I took the photos for the purpose of sharing them here on the site, but never got around to it {#storyofmylife}.  Her bin was similar, but included the CUTEST white picket fence and tiny wooden ladybugs.  Also, those lilacs?  Beautiful.  {Still sad that I had to leave so many fun things behind when we moved home.}

IMG 4688

IMG 4691

IMG 4695

IMG 4700

Aw, my sweet baby girl!!

You can also see another gardening sensory bin we did when Miss G was just a year old here.  My gosh – the concentration and determination in that video just kills me!


Are you following us on social media?  

Find us on: Facebook  |  Instagram  |  Pinterest  |  Twitter


We’d love to have you!

2 Comments

Posts navigation

1 2 3 … 18 19 Next Page

find us here

  • Facebook
  • Instagram
  • Pinterest
  • Twitter
  • Email

looking for something?

want our posts to your inbox?

popular posts

  • Make Ten {an easy card game for kids}
    Make Ten {an easy card game for kids}
  • Footprint Butterfly Flower Pot
    Footprint Butterfly Flower Pot
  • Baby Play Dough
    Baby Play Dough
  • Morning Routine Flip Chart
    Morning Routine Flip Chart
  • Hand-Shaped Ring Dish
    Hand-Shaped Ring Dish
  • Homemade Air-Dry Modelling Clay {aka baking soda clay}
    Homemade Air-Dry Modelling Clay {aka baking soda clay}
  • Tape Pull Fine Motor Activity
    Tape Pull Fine Motor Activity
  • EASY Portable Activity Kit for Road Trips
    EASY Portable Activity Kit for Road Trips
  • Sand Play Dough With Loose Parts
    Sand Play Dough With Loose Parts
  • Cookie Cutter Bird Seed Feeders {A Toddler-Friendly Method}
    Cookie Cutter Bird Seed Feeders {A Toddler-Friendly Method}

archives

Site made with ♥ by Angie Makes
Angie Makes Feminine WordPress Themes