Mama.Papa.Bubba. -
Menu
Skip to content
  • SHOP
  • preemie
  • baby
  • play
  • craft
  • learn
  • cook
  • DIY
  • kuwait
  • vancouver
  • contact
  • about

Tag Archives: play dough recipe

Berry Jello Play Dough

2 / 16 / 132 / 20 / 13

Berry Jello Play DoughA couple of days ago, Miss G and I experimented with making a couple of changes to our scented Kool-Aid play dough.  I don’t know if Kool-Aid is just on the way out (surely it should be ☺), but our grocery store only stocks a few colours.  So as an alternative, we decided to give Jell-O crystals a shot.

IMG 5488We followed our original scented play dough recipe *almost* exactly, but added a packet of Jell-O mix instead of Kool-Aid mix.

IMG 5494We also added some fine glitter because…. Well, because Grae said so.  That’s why.

IMG 5493We mixed everything up and added our wet ingredients, going a little bit easier on the water this time.  While we absolutely loved our Kool-Aid play dough and it kept great when somewhere cool, we did notice that it got a bit mucky when stored in a cupboard near one of our heat vents, so hopefully the reduced amount of water will help fix this problem.

IMG 5505The result was a soft, smooth, yummy-smelling play dough that Miss G was just dying to get her hands on.

IMG 5499We made two batches, one raspberry, one strawberry, and added some cookie cutters, a mini rolling pin, and a mini baking pan for a fun creative table set-up.

IMG 5505

{No-Cook} Berry Jell-O Play Dough

  • 1 cup of all-purpose flour
  • 1/4 cup of  table salt
  • 1 packet of Jell-O (we used the sugar kind)
  • 1 tablespoon of cream of tartar
  • 1 teaspoon of glitter (if desired)
  • 1 tablespoon of vegetable oil
  • 1 tablespoon of glycerine (optional and readily available in the first aid section of most grocery stores)
  • 3/4 of a cup of boiling water

Place all dry ingredients in a bowl and mix well.  Add wet ingredients, saving the boiling water for last.  Add the water and give the mixture a few quick mixes, banging off your whisk every once and a while.  Leave the semi-mixed dough on the counter to cool.  Once cooled for about 10 minutes, dump the mixture onto the counter and knead really well.  Knead for about 3 minutes, or until the dough smooth and well-blended.

Enjoy!

♥ 

For extra fun, like us on Facebook here and find us on Instagram here. 

 
1 Comment

Play Dough Gingerbread People

12 / 24 / 1211 / 24 / 13

Play Dough Gingerbread People

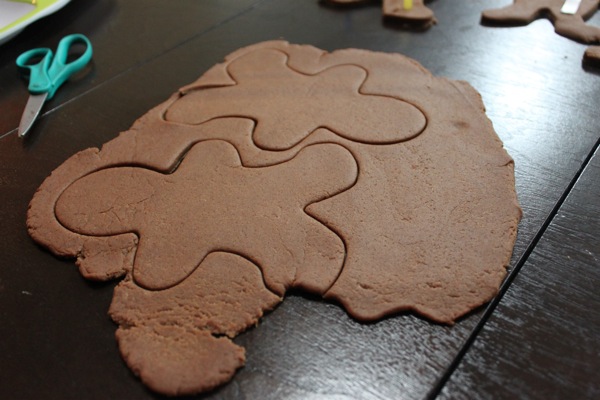
After decorating gingerbread houses this morning, this afternoon I whipped up a batch of delicious-smelling and amazingly soft gingerbread play dough for Miss G to play with.

IMG 3909

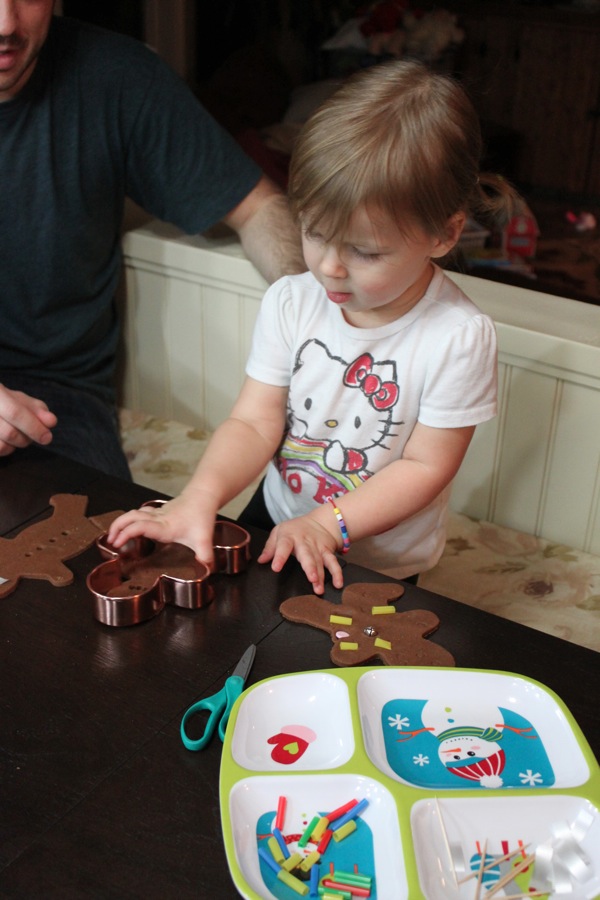
In addition to the play dough, I set out several things create gingerbread people with, including a rolling pin, cookie cutters, buttons, straw pieces, jingle bells, ribbon bits, and toothpicks.

IMG 3915

Gracen dove in as she usually does and the play dough gingerbread people began rolling out of the kitchen.

IMG 3917

IMG 3910

She came up with so many fun ways to decorate them, some more traditional, and some a little more abstract…

IMG 3913

The best part is that this dough smells so amazing that you sometimes forget that it’s just play dough and not actual gingerbread baking in the oven. ☺

♥

For more fun not found on the blog, join us on Facebook or follow us on Instagram.

2 Comments

The BEST Scented No Cook Play Dough

9 / 21 / 123 / 25 / 20

The BEST Scented No-Cook Play Dough | Mama.Papa.Bubba.

Gracen and I may have just stumbled upon the best. play dough. recipe. ever. today while combining my old go-to with a few other ideas we found around the net….  Now I know I said similar things about this recipe, but this new one involves no cooking (win!) and smells delish (double win!)

We did have to make a trip to the grocery store beforehand, as a couple of the ingredients are not things we regularly keep on hand, but it was well worth the trip.  This is by far the softest, squishiest, smoothest, nicest feeling {and smelling} play dough I’ve ever come across.

IMG_4568

IMG_4582
{this post contains affiliate links}

Now before I share the recipe, I want to say that there are LOTS of factors at play when making play dough at home.  It seems like it should be a simple enough task {and I promise that it is}, but there a few things to consider and I want to be sure that your play dough turns out well.  Believe it or not, things like the elevation at which you live, the weather / humidity where you are, and how you measure your flour can all affect whether your dough turns out too sticky, too dry, or just right.

For the purpose of this recipe, know that I measure flour by scooping a heaping amount of flour into my stainless steel measuring up and pressing it down into the cup on the inside of the bag.  Thus, my flour is fairly packed down in the measuring cup.

Also know that if your finished play dough turns out too wet, you can save it by adding a little bit of extra flour, bit by bit (just go slow here – you can overdo it quickly!) and kneading it in.  At the opposite side of the spectrum, if your dough seems too dry or tough, you can add moisture  and soften it up by adding tiny bits of one of the wet ingredients (boiling water, oil, or glycerine) at a time, again being careful not to overdo it.

The BEST Scented No-Cook Play Dough

  • 1 cup of all-purpose flour (packed down into the measuring cup)
  • 1/4 cup of  table salt
  • 1 tablespoon of cream of tartar
  • 1 packet of Kool Aid , 1 packet of Frosting Creations Flavour Mix , or enough Wilton gel food colouring to create your desired colour*


  • 1 tablespoon of vegetable oil
  • 1 tablespoon of glycerine
  • 3/4 cup of boiling water (measured in a dry measuring cup – this is important as wet and dry measures aren’t the same and using a wet measure will likely make your play dough too sticky)

*If using Kool-Aid or Frosting Creations, additional food colouring is not needed.  You can also skip Kool-Aid / Frosting Creations all together and use the gel colouring for a coloured but unscented dough.  Or leave out all three  for a unscented, natural coloured dough.

Place all of the ingredients, save the boiling water, in a bowl and whisk well.  Measure the water using your dry measuring set and add it to the bowl.  Give the mixture a quick mix with a wooden spoon, banging off it off every once and a while.  At this point, the mixture may seem too wet and sticky to make good play dough… Do not fret!  Leave the semi-mixed dough on the counter to cool for 5 or so minutes.  Afterwards, dump the mixture out onto the countertop and knead really well.  You’ll know you’re done when the dough is fully cooled, soft and squishy, and the super smooth.

Enjoy!

IMG_4574

FIY:  Kool-Aid is a powdered drink mix that you add sugar and water to make ‘juice’ and Frosting Creation Flavour Mix is a powder used to flavour store-bought icing.  Both can be used in this recipe to scent AND colour the play dough, but they can easily be left out for a natural, unscented dough or replaced with food colouring for a coloured, but unscented dough.

FIY #2:  Non-edible glycerine is readily available in the first aid section of most grocery stores  and edible glycerine is available where cake making supplies are sold.

FIY#3:  This play dough will last for months if stored at room temperature in an air-tight container or bag. Do not refrigerate or store near a heat source or on top of the fridge.

FIY #4:  When making this play dough, we use dry measuring cups only – even when measuring the boiling water.


Are you following us on Facebook and Instagram?

We’d love to have you!

46 Comments

Play Dough Day

2 / 29 / 128 / 11 / 13

Today I had barely finished mentioning making play dough and my little Lulu  had already retrieved her apron.

Now, I have always been a fan of the 2:1:1 recipe (2 parts flour to 1 part salt and 1 part water).  It’s fast, it’s easy, and it really only requires having two ingredients on hand.  I’ve used it through many, many years of babysitting, nannying, and teaching without even considering giving another recipe a try.  That is, until I decided to give this “fussy” recipe a go this Christmas. Yes, it requires both oil and cream of tartar – not to mention cooking – but if you’ve got the ingredients, extra time, and patience to let it cool, it’s totally worth it.  It’s soft, super pliable, and lasts for a ridiculously long time.  Plus, it’s really not that hard.

IMG 6643Here’s what you need:  Some flour, salt, cream of tartar, vegetable oil, water, food colouring, and a cute little sous chef to help you along the way.

IMG 6646First things first, pour your water in a large pot.

IMG 6656Next, add your salt.  Preferably into the pot.  But hey, whatever works.

IMG 6659Then, add your cream of tartar.

IMG 6670And your food colouring.  (Of course for this little one, purple was the colour of choice.) Give everything a little stir.

IMG 6675Then, over medium heat, warm the mixture until hot, but not boiling.

IMG 6680When hot, add your oil and your flour, cup by cup.
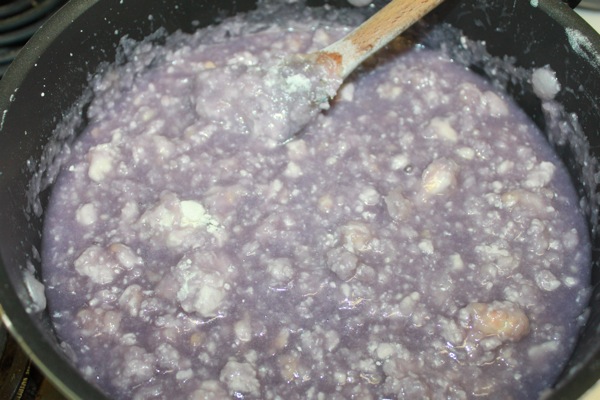
IMG 6681Don’t worry if it looks all chunky and gross.  We’ve used this recipe several times and we’ve always experienced this stage. It’ll all work out in the end.

IMG 6684When you’ve added all of the flour, give the dough one final stir and plop it out onto a well-floured counter.  Sprinkle some extra flour on top if the dough appears sticky.  Be careful – it’ll be very hot still.

IMG 6689Once it’s cooled, kneed the dough well, incorporating all of the extra flour.

IMG 6698Then give your munchkin a chunk and let her go to town.

IMG 6707Fun for hours!

Here’s our slightly tweaked version of the recipe if you want to give it a try:

  • 5 cups of water
  • 2 1/2 cups of salt
  • 3 TBSP of cream of tartar
  • 5 TBSP of vegetable oil
  • Food colouring
  • 5 1/2 cups of flour

Mix water, salt, cream of tartar, oil, and food colouring in a large pot. Cook on medium heat, stirring regularly until mixture is hot.

Add oil, then stir in flour a cup at a time, mixing in between each addition. Mix until playdough pulls away from pot and is no longer sticky.

Dump dough on a well-floured counter, let cool a bit, then knead.

Store at room temperature in an airtight container for several weeks.

Enjoy!

5 Comments

Posts navigation

Previous Page 1 2

find us here

  • Facebook
  • Instagram
  • Pinterest
  • Twitter
  • Email

looking for something?

want our posts to your inbox?

popular posts

  • BC Summer Family Fun
    BC Summer Family Fun
  • Make Your Own Surprise Boxes
    Make Your Own Surprise Boxes
  • High School or Homeschool?
    High School or Homeschool?
  • Daily Reflection Journal for Kids and Tweens
    Daily Reflection Journal for Kids and Tweens
  • 3D Paper Bag Snowflakes
    3D Paper Bag Snowflakes
  • Things to Listen to While Road Tripping with Kids
    Things to Listen to While Road Tripping with Kids
  • Dear Dad Printable Book
    Dear Dad Printable Book
  • The Best Tips for Taking Road Trips With Kids (& a GIVEAWAY!)
    The Best Tips for Taking Road Trips With Kids (& a GIVEAWAY!)
  • Easy DIY Outdoor Skating Rink
    Easy DIY Outdoor Skating Rink
  • Small Shop Gift Guide
    Small Shop Gift Guide

archives

Site made with ♥ by Angie Makes
Angie Makes Feminine WordPress Themes