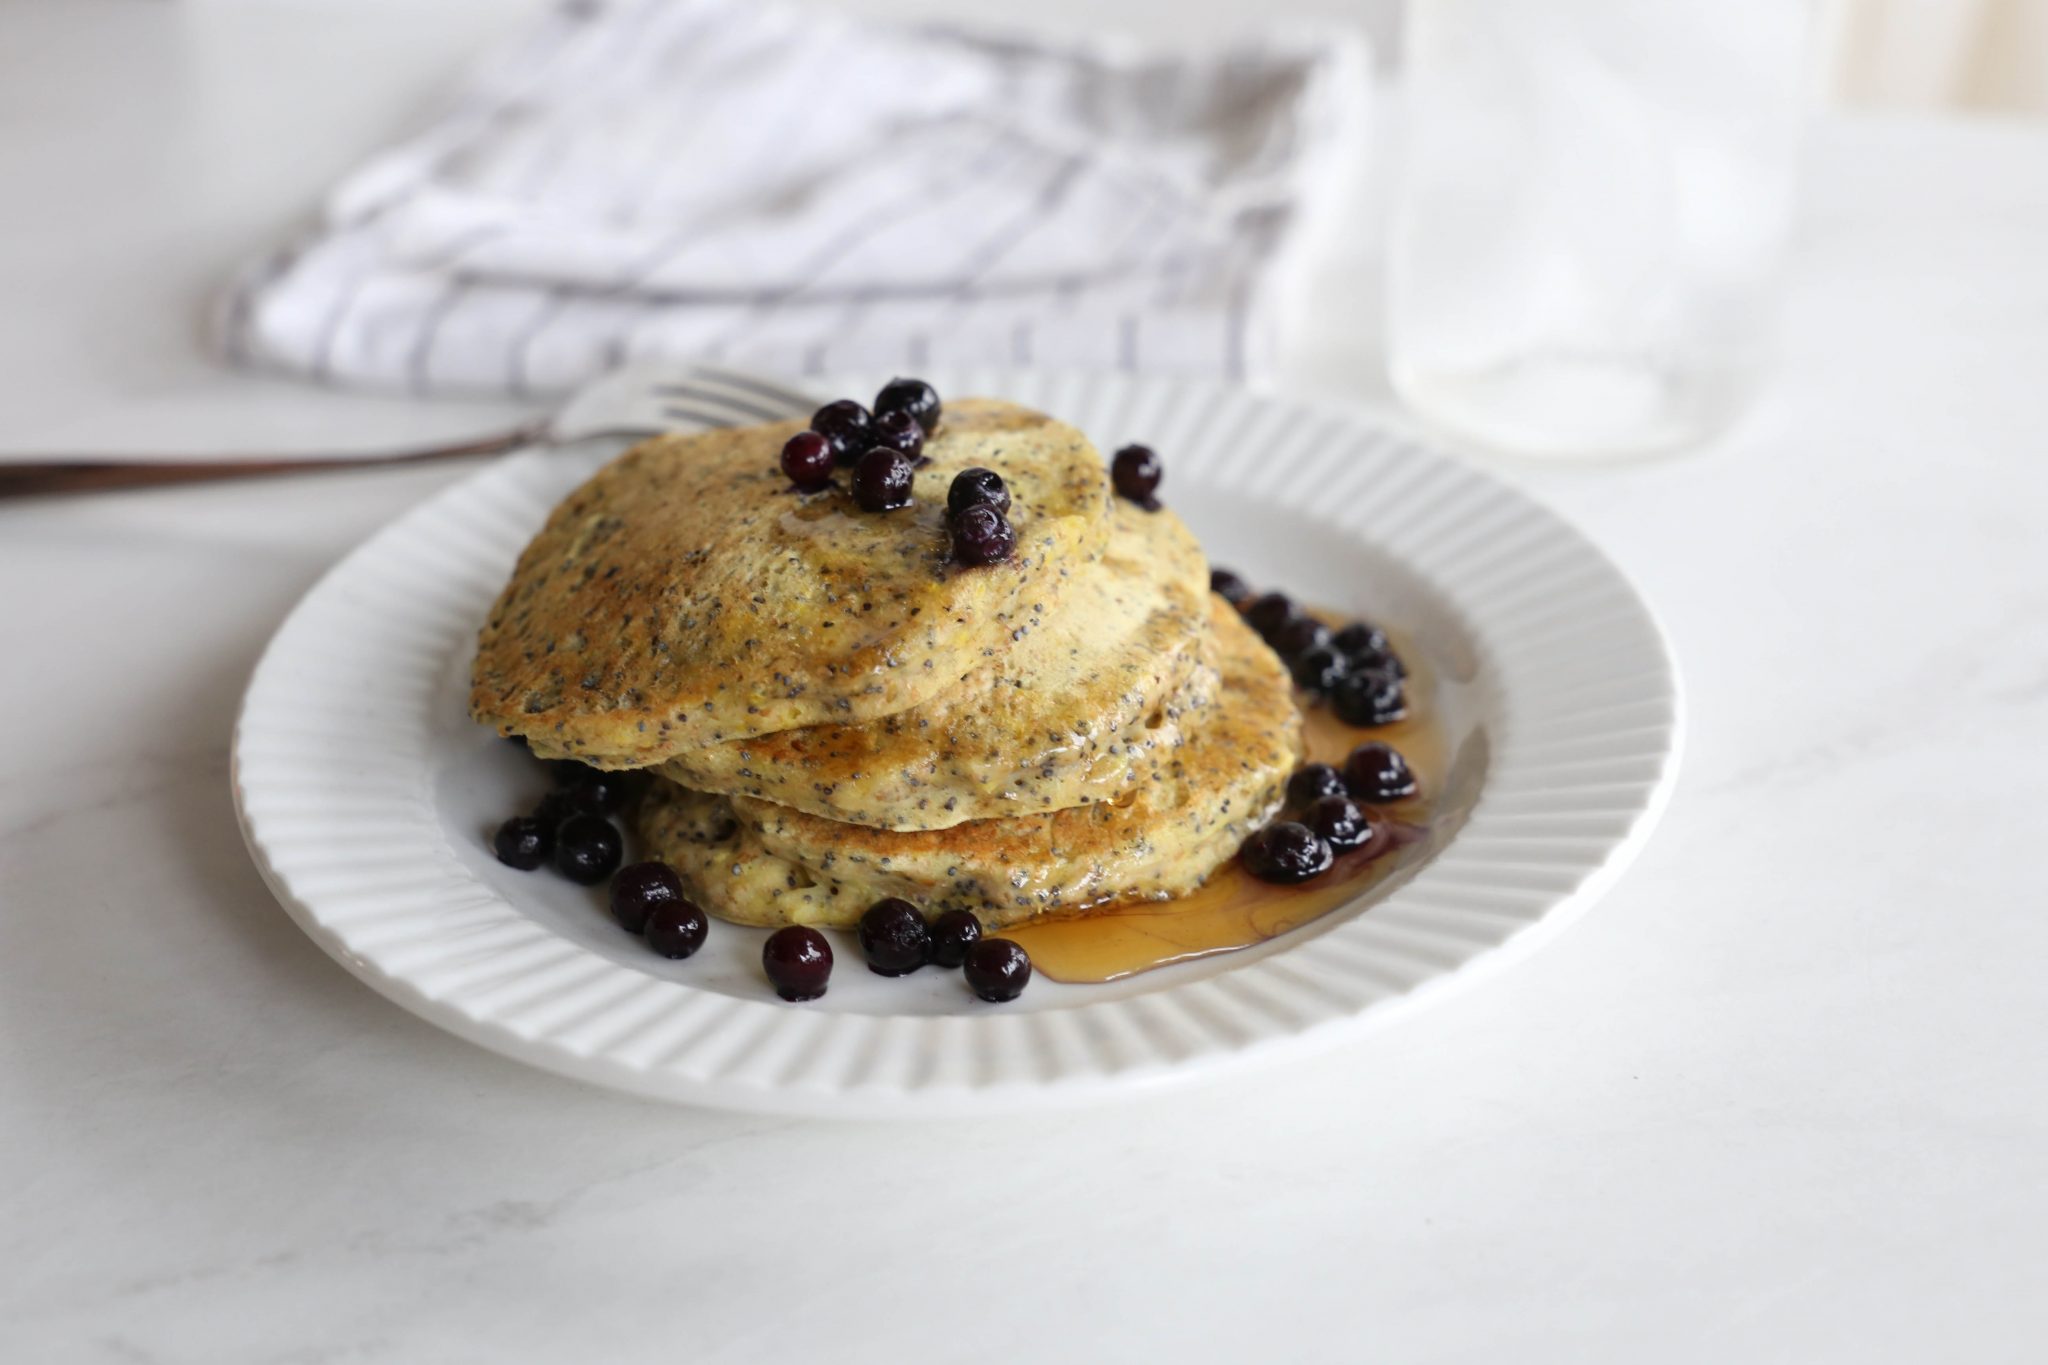
I’ve made these pancakesfor special occasions few times before, and let me tell you, they are delicious. Super healthy, however, they are not. So this morning, my little sous chef and I set out to make a healthier, wholewheat version, sans refined sugar and butter. I’m happy to say, they turned out amazingly well! While not the fluffiest pancakes in the world, they were light, tender, and full of lemony flavour, just the way we like them.
Now, I must admit, I was being a little bit chicken and didn’t go for all wholewheat flour this time around (don’t know what got into me – using white flour is not normally even an option in our house!) Next time, I’d just go all in and use wholewheat flour only. Here’s the version we made this morning…
Wholewheat Lemon Poppy Seed Pancakes
1 1/2 cups of wholewheat flour
3/4 cup of all-purpose flour
1 teaspoon of baking powder
1/2 teaspoon of baking soda
1 teeny tiny pinch of sea salt
1/3 cup of poppy seeds
2 cups of skim milk
2 tablespoons of white vinegar
2 organic egss
1/4 cup of pure maple syrup
1 tablespoon of your favourite oil
1/2 teaspoon of pure vanilla
zest of 4 large lemons
1/2 teaspoon of pure lemon extract (optional)
Pour milk into a measuring cup or bowl. Add vinegar and stir gently. Set aside. (Or just use store bought buttermilk instead.)
Measure out all dry ingredients into a large mixing bowl and mix well.
In a separate bowl, add all of the wet ingredients, including the homemade buttermilk and lemon zest, and mix well.
Add the wet ingredients to the dry ingredients and gently mix until just combined (this is important – do not over mix!)
Cook on a 300 degree griddle, flipping when bubbles begin to form.
Serve with berries and pure maple syrup.
Enjoy!
UPDATE: Since making these the first time, we now always use only wholewheat flour, and the end result is just as delicious. Cutting the pure maple syrup down a little too doesn’t hurt a thing and when in a pinch, chia seeds make for a great poppy seed replacement.
‘Tis the season for all things pumpkin, so today Grae and I decided to experiment with making a healthy, but delicious, pumpkin treat. I must say, we were definitely ‘winging it’, but our version of pumpkin spice muffins turned out great! They’re soft and moist inside, full of flavour, and perfectly sweet. Not to mention, they contain no white flour, butter/margarine, or refined sugar. Yay for that.
Here’s our line up of ingredients… Wholewheat flour, organic old-fashioned oats, ground flax seed, walnuts, pecans, baking powder, baking soda, cinnamon, nutmeg, ginger, pure organic pumpkin puree, grapeseed oil, organic eggs, pure maple syrup, and pure vanilla.
Of course, having a sweet little wispy haired sous chef helps too.
Start by putting the flour into a large mixing bowl.
Add the oats and ground flax.
Be sure to cram as many oats into your mouth as possible when no one’s looking.
Next up, add the baking powder, baking soda, and spices.
Give everything a good stir.
In a separate bowl, pour in the pureed pumpkin.
Add the maple syrup and vanilla…
The grapeseed oil…
And the eggs.
Then give everything a good mix.
Next, add the dry mixture into the wet one.
Mix until just combined.
Then add the nuts…
And gently fold them into the batter.
Prepare a muffin tin by lining it with silicone baking cups or a light layer of grapeseed oil.
Fill the muffin cups almost to the top, but not quite, then pop them in the oven.
Take them out once the tops are cracked and a toothpick comes out clean.
Let them cool for a couple of minutes and serve to your very excited and very silly little munchkin.
Preheat oven to 350 degrees and prepare muffin tin.
Mix together the dry ingredients (except the nuts) and set aside. In a separate bowl, mix together the wet ingredients. Add the dry mixture to the wet one and stir until just combined. Fold in nuts.
Transfer batter into the muffin tin. Bake for 18 to 22 minutes, or until a toothpick inserted into the centre comes out clean.
Allow to cool, then serve or store in an airtight container.
Enjoy!
See our favourite banana muffins here and our favourite carrot zucchini muffins here.
This morning Miss G and I decided to try making something new for breakfast… Cookies! Not the traditional kind, of course. Healthy, hearty ones that fill you up and start your day off right. And I’m glad to say that despite my nonchalant ‘Ah, sure we’ll throw that in too’ attitude, they turned out pretty well.
Here’s our line up of ingredients… Old-fashioned oats, pumpkin seeds, raisins, ‘just apples’ applesauce (we just used the store bought stuff this time around, but homemade would of course be better), ripe bananas, cinnamon, and organic coconut oil and vanilla (which somehow didn’t make it into the photo…)
To start, my mini sous chef peeled our bananas and popped them into the food processor.
Then she added a capful of pure vanilla…
A generous amount of applesauce…
Some cinnamon…
And a dollop of coconut oil.
Then we blended everything up until it was mostly smooth, with just a few little chunks.
With our wet mixture transferred into a large mixing bowl, Grae added some organic old-fashioned oats…
Some raw pumpkin seeds…
And some raisins…
And gave everything a good stir.
The result was oats that were completely coated in the banana/applesauce mixture, but not ‘wet’ or batter-y (if that makes any sense).
We then dropped large spoonfuls of the mixture onto a parchment-lined baking sheet, using the back of the spoon to shape them into little mounds, and popped them into the oven.
Fifteen minutes later, out came these soft, moist little oatmeal mounds. Now… Do they taste like a real cookie? No. Do they taste like a healthy bowl of cinnamon oatmeal compacted into a portable little serving? Yes! And the best part is that they’re not at all crumbly. To the point where I let Grae snack on these while in the Ergo on our recent house hunting adventures because I knew they wouldn’t crumble all over our potential landlords’ floors… Win!
Sugar-free, Dairy-free, Flour-free Cinnamon Raisin Breakfast Cookies
Add the wet ingredients (plus cinnamon) to a food processor (or good blender) and mix well. Pour the contents into a large mixing bowl and add dry ingredients. Mix until everything is evenly coated.
Drop spoonfuls of the mixture onto a parchment-lined baking sheet, using the back of a spoon to form them into mounds. Bake for 15 minutes and allow a couple of minutes to cool. Store in an airtight container on the counter for a few days, or pop them in the freezer and defrost as needed.
Today Miss G and I made one of our favourite weekend dinners… Homemade pizza. Though I do find it takes a little advanced planning to make pizza from scratch, making the dough just after breakfast and letting it sit on the counter all day until we’re ready to make dinner in the evening is easy enough for us. Plus, this recipe makes two BIG thin-crust pizzas, which allows for a few (or at least a couple) of good meals {even when your husband scarfs down 12 pieces in one sitting… hi babe! ☺}
Here are the ingredients for our go to dough, adapted from the lovely Pioneer Woman’s recipe… Wholewheat flour, dry active yeast, table salt, olive oil, and warm water.
First, sprinkle the yeast over the warm water and set it aside.
Next, add the flour…
And the salt to the bowl of your electric mixer. (This could be done by hand too, of course.)
Put the paddle attachment on your machine…
And give the dry ingredients a quick mix.
Next, measure out the olive oil…
And slowly pour it into the bowl while mixing.
Next, give the yeast and water a quick stir…
And with the mixer on, slowly add the yeast water to the flour/salt/oil mixture. Mix on low until the dough starts to come together in a sticky mass.
Prepare a separate large mixing bowl by drizzling it with olive oil.
Use your hands to pull the edges of the dough downwards and shape it into a ball. Place your dough in the bowl and gently toss it to coat it in olive oil.
Now cover your bowl tightly with plastic wrap. It can be put in the fridge and stored for 3 or 4 days, or it can be used later on in the day. If we’re making pizza the same night, we just leave ours on the counter.
Now, for my favourite… A very simple roasted veggie pizza. Chop up a bunch of vegetables of your choice (these are my favourites), drizzle them with a little bit of olive oil, and put them in a 400 oven for about 10 minutes.
While they roast, grate some cheese (we use fresh mozzarella or, like tonight, an all-natural extra sharp cheddar) and slice some fresh mushrooms.
Take your veggies out of the oven when they’re slightly soft and just beginning to turn golden in some spots.
With your toppings ready, it’s time to retrieve the dough you made earlier in the day. By now, it should be well over double its original size and soft and spongy to the touch.
Prepare a baking pan by lining it with parchment paper and sprinkling on little cornmeal (this is completely optional, but it does add a nice texture).
Using 1/2 of the dough, press it down into a thin rectangular shape. Don’t worry too much about holes – just patch them up as you go along.
For this pizza, we often use a fresh pesto sauce, which is really yummy. Equally delicious, however, is just a drizzle of olive oil and a tiny sprinkle of sea salt.
Next, arrange the veggies on the dough {stuffing as many of the red peppers into your mouth as possible, if you’re like Gracen}.
Top with cheese (adding some feta into the mix is really good too!} and pop it into the oven.
Remove when the cheese is bubbly and the crust is golden brown and let cool for a few minutes.
Now onto the one Brad prefers… A BBQ chicken pizza. Tonight we used roasted chicken breasts cut into small chunks, raw diced orange pepper and sweet onion, and some white kernel corn (adding jalapeños is really tasty too).
Prepare your pan and dough the same way as before, then spread a thin layer of BBQ sauce onto the uncooked crust (this is one of Miss G’s favourite jobs).
Add the toppings…
Cover with cheese…
And bake ’til golden.
Voila! Dinner is done. Serve on its own, or with a fresh salad.
Wholewheat Pizza
1 teaspoon of active dry yeast
1 1/2 cups of warm water (not hot, but not lukewarm)
4 cups of whole wheat flour
1/2 teaspoon of salt
1/3 cup of olive oil
Sprinkle yeast over warm water.
Mix flour and salt together. Add olive oil while mixing. Give the yeast/water mixture a quick stir and add it to the mixture while stirring also. The mixture will be sticky and wet, which is perfect.
Prepare a separate mixing bowl by drizzling it with olive oil. Using your hands, shape the dough into a ball by gently working the edges downwards and underneath. Gently toss the dough in the bowl to coat in olive oil, then cover tightly with plastic wrap. Store dough in fridge for up to 4 days, or leave on counter if using later in the day.
When ready, prepare a baking sheet by lining it with parchment paper and sprinkling it with cornmeal. Flatten the dough on the pan, top with sauce and toppings, and bake for 10 – 15 minutes in a 450 degree oven. Remove from oven when the cheese is bubbly and the crust is golden. Cut into squares and serve.
Gracen and I may have just stumbled upon the best. play dough. recipe. ever. today while combining my old go-to with a few other ideas we found around the net…. Now I know I said similar things about this recipe, but this new one involves no cooking (win!) and smells delish (double win!)
We did have to make a trip to the grocery store beforehand, as a couple of the ingredients are not things we regularly keep on hand, but it was well worth the trip. This is by far the softest, squishiest, smoothest, nicest feeling {and smelling} play dough I’ve ever come across.
{this post contains affiliate links}
Now before I share the recipe, I want to say that there are LOTS of factors at play when making play dough at home. It seems like it should be a simple enough task {and I promise that it is}, but there a few things to consider and I want to be sure that your play dough turns out well. Believe it or not, things like the elevation at which you live, the weather / humidity where you are, and how you measure your flour can all affect whether your dough turns out too sticky, too dry, or just right.
For the purpose of this recipe, know that I measure flour by scooping a heaping amount of flour into my stainless steel measuring up and pressing it down into the cup on the inside of the bag. Thus, my flour is fairly packed down in the measuring cup.
Also know that if your finished play dough turns out too wet, you can save it by adding a little bit of extra flour, bit by bit (just go slow here – you can overdo it quickly!) and kneading it in. At the opposite side of the spectrum, if your dough seems too dry or tough, you can add moisture and soften it up by adding tiny bits of one of the wet ingredients (boiling water, oil, or glycerine) at a time, again being careful not to overdo it.
The BEST Scented No-Cook Play Dough
1 cup of all-purpose flour (packed down into the measuring cup)
3/4 cup of boiling water (measured in a dry measuring cup – this is important as wet and dry measures aren’t the same and using a wet measure will likely make your play dough too sticky)
*If using Kool-Aid or Frosting Creations, additional food colouring is not needed. You can also skip Kool-Aid / Frosting Creations all together and use the gel colouring for a coloured but unscented dough. Or leave out all three for a unscented, natural coloured dough.
Place all of the ingredients, save the boiling water, in a bowl and whisk well. Measure the water using your dry measuring set and add it to the bowl. Give the mixture a quick mix with a wooden spoon, banging off it off every once and a while. At this point, the mixture may seem too wet and sticky to make good play dough… Do not fret! Leave the semi-mixed dough on the counter to cool for 5 or so minutes. Afterwards, dump the mixture out onto the countertop and knead really well. You’ll know you’re done when the dough is fully cooled, soft and squishy, and the super smooth.
Enjoy!
FIY: Kool-Aid is a powdered drink mix that you add sugar and water to make ‘juice’ and Frosting Creation Flavour Mix is a powder used to flavour store-bought icing. Both can be used in this recipe to scent AND colour the play dough, but they can easily be left out for a natural, unscented dough or replaced with food colouring for a coloured, but unscented dough.
FIY #2: Non-edible glycerine is readily available in the first aid section of most grocery stores and edible glycerine is available where cake making supplies are sold.
FIY#3: This play dough will last for months if stored at room temperature in an air-tight container or bag. Do not refrigerate or store near a heat source or on top of the fridge.
FIY #4: When making this play dough, we use dry measuring cups only – even when measuring the boiling water.
Today, after a trip to our fruit and vegetable market, Grae and I came home and put together some fun mini fruit skewers. We washed the fruit together, I did the chopping, and Gracen did the assembling. Grae had a ton of fun poking the fruit pieces onto the toothpicks and sliding them along to make room for more. As she created her snack masterpieces, she counted the pieces and named the fruits in her singsongy voice, adding each skewer to the plate when finished.
Now although we could have just mixed up our chopped fruit and eaten it as fruit salad, everything is better on skewers, right? Not to mention, making them was the best part – just look at that proud little face. Plus, they’d be great finger snacks for a play date or party… Or just as dessert for a mama and a babe. ☺
I originally made these muffins as a healthy alternative to the sugar-filled, buttercream-topped Pioneer Woman vanilla cupcakes I made for Miss G’s 2nd birthday party, and they’ve quickly became a favourite. Gracen loves them, Brad gobbles them up, and I often pack an extra in the diaper bag to eat while on the go. So this morning, on the first football Sunday of the year, Miss G and I whipped up a fresh batch.
Here’s our line up of ingredients…
very ripe bananas (fresh or previously frozen and defrosted)
oil (olive or coconut or grapeseed – I actually think olive might be my fave)
an egg or egg replacer (we’ve used a chia egg or a flax egg* for the last several years and both work perfectly)
pure vanilla
wholewheat flour
baking soda
baking powder
cinnamon
salt (which you can easily leave out if making these for really little ones – there’s not really a noticeable difference if you skip it to be honest)
walnuts or chocolate chips or a combination of both if you wish (Gracen always wishes for nuts, and I agree – the crunch definitely makes these muffins yummier)
*To make a chia or flax egg, put one tablespoon of ground chia or flax seed into a small bowl and add 3 tablespoons of warm water. Mix it well and let it sit for approximately 10 minutes before using it.
{this post contains affiliate links}
First off, add your bananas and the other wet ingredients to a large mixing bowl.
Mix until mostly smooth and only slightly chunky.
Next, place all of the dry ingredients, except the nuts and or chocolate chips, in a separate bowl.
And give them a good stir.
Once mixed, add the dry mixture to the wet mixture.
Mix just until blended.
If you’re adding nuts to your muffins, crush them up a little bit…
Add them to your muffin batter… If you’re adding chocolate chips, no need to crush them first obviously.
And give the mixture a stir.
Lastly, grease a muffin tin with some oil (or use silicone muffin liners) , scoop the mixute into the cups, and top with a walnut if desired.
Bake until cooked through and golden brown.
The BEST {No Sugar Added} Banana Muffins (adapted from Bob Ewing‘s recipe)
4 large ripe bananas
1 egg (we use a chia egg or flax egg)
1/3 cup of your favourite oil (we use olive or coconut)
1 teaspoon of pure vanilla (this vanilla is the BEST)
1 1/2 cups of whole wheat flour
1 teaspoon of cinnamon
1 teaspoon of baking soda
1 teaspoon of baking powder
1/2 teaspoon of salt (completely optional – I’d choose to leave it out in the future if making these for littles)
1/2 cup of walnuts, crushed – plus more for topping, or chocolate chips (or a 1/4 cup of each)
Preheat oven to 350° . Prepare a 12 cup muffin pan by brushing it with oil or using silicon baking cups.
If you’re using a flax or chia egg, mix 1 tablespoon of ground chia or flax seed with 3 tablespoons of warm water in a small bowl and allow it to sit for 5 or 10 minutes to thicken. Mix the bananas and other wet ingredients until the mixture is mostly smooth and only slightly chunky. In a separate bowl, mix the dry ingredients (save the walnuts and chocolate chips) well. Gently stir the dry ingredients into the wet ingredients. Fold in walnuts and/or chocolate chips if adding them. Fill the prepared muffin tin with the mixture and top each muffin with a whole walnut. Bake at 350 degrees for 20 minutes. Let cool.
Miss G and I got to experimenting in the kitchen this afternoon… We had been out in the garden collecting some goodies earlier in the day, and although we’d eaten most of our finds with lunch, we had a few measly beets left over. We’d decided we’d make a smoothie, and since we regularly add spinach and kale to our blends, I figured, why not beets? The result was a BRIGHT magenta smoothie that was yummy enough for Grae to label it “pink ice cleam” and have two cups full instead of just one.
Here’s our list of ingredients: Plain organic whole milk yogurt, frozen no-sugar-added strawberries and raspberries, a ripe frozen banana, a handful of baby beets, a few teaspoons of chia seeds, and some whole organic milk.
Another must for this recipe? Supergirl and her super girl baby.
Get started by dumping your frozen berries into your blender. Closing your eyes makes for a better challenge. Nothing Supergirl can’t handle though.
Chuck in your frozen banana. Again, amp up this step by trying it with your eyes closed.
Next, add your beets in one. by. one.
And then dump your chia seeds in too.
Next, carefully add your milk. The more you can get into the blender, the better.
Lastly, add a generous scoop of yogurt.
Blend everything up until thick and bright.
Serve with a straw or a spoon. Or both.
Watch your little superhero gobble it up.
Nutrient-Rich Beet Berry Smoothie
1/4 cup of plain organic whole milk yogurt
2/3 cup of frozen raspberries and strawberries
1 ripe frozen banana
5-6 baby beets (or one regular sized one), steamed and peeled
3 tablespoons of chia seeds
1/2 cup of organic whole milk
Put everything into a blender and mix until smooth.
Enjoy!
Another perk, besides the added nutrients, to adding chia to your smoothies? They keep overnight without becoming separating and getting watery. Try it!
With our {essential} popsicle stash running on low, Gracen and I decided we’d whip up a new batch this afternoon. I really had no recipe or flavour in mind, but as we rummaged through our fridge and freezer, Grae caught sight of frozen blueberries (her favourite!) and our decision was quickly made.
In addition to the blueberries, we gathered up some plain organic whole milk yogurt (with just a tiny touch of honey added), our new Ring Pop-esque popsicle moulds, and our food processor.
Gracen started us out by putting the blueberries into the food processor (at least the ones that were lucky enough to not be eaten).
Then she added our yogurt and honey…
And we blended it up for a decent amount of time. That’s it. Tout fini!
Now, if you don’t enjoy a bit of texture in your popsicles {and you have the patience}, you could strain the mixture at this point, but since we don’t mind the grit and I feel like they must be more nutritious with the skin bits left in, we left it as is.
With some help, Grae scooped a little bit of the mixture into each mould…
Then snapped the lids on and into the freezer they went.
Simple Blueberry Popsicles
2 parts frozen blueberries
1 part plain yogurt
1 tiny drizzle of honey (if desired)
Blend everything well in a food processor or blender. Scoop into popsicle moulds and freeze for at least a few hours.
Enjoy!
Oh, and be forewarned… There’s sure to be a similar fig popsicle recipe happening soon. We’ve got a tree bursting at the seams with fresh figs and I’m going to have to start getting creative. Surely figs must make good popsicles, right?
There’s no doubt that we’ve jumped on the one ingredient ice cream band wagon feet first this summer. Only we like ours made with two ingredients…
Here they are.
I know, when I first heard about bananas turned ice cream, I was a little skeptical too. But trust me – it’s sweet, creamy, and perfectly satisfying on a hot day. Here’s how we like to make our two ingredient soft serve…
In the morning, peel a few bananas. (Grae loves this part.)
Then slice them up.
Place the banana coins on a parchment-lined baking sheet and pop them in the freezer for at least a few hours.
In the afternoon, once they’re completely frozen through, take the bananas out of the freezer.
Place approximately 1/3 of the banana coins into a good food processor.
Mix through the chunky stage, past the crumby stage, and right into the smooth, soft serve texture stage. You may have to stop the processor once or twice to mix things up a little with a spatula, but it’s not always needed.
Once the mixture is thick and creamy, stop the food processor and add a capful of good vanilla.
Plus another 1/3 of the banana coins and mix to bring to a soft serve texture again.
Then, add the last batch of banana coins and blend again. If you’re feeling like a vanilla-flavoured treat, you can stop here and serve immediately, or put the ice cream into the freezer for a while for a more hard ice cream texture.
BUUUUUUT, if you want peanut butter and jelly neopolitan-esque treat, divide your ice cream into thirds, leaving one portion in the food processor. Place the two other portions in the freezer in the meantime.
First up, make the jelly flavoured ice cream. Add a spoonful of no-sugar-added fruit preserves…
And a few frozen strawberries.
Then blend until smooth. Pop the berry ice cream in the freezer and give your work bowl and blade a quick rinse.
Remove one of your vanilla-flavoured ice cream portions from the freezer, pop it in the processor, add a heaping tablespoon of all-natural peanut butter, and mix. When blended, transfer the peanut butter ice cream back into your bowl and pop it in the freezer.
While you tidy up a tad, let your toddler ferociously lick the bowl and spoon.
If possible, let your soft serve firm up in the freezer for 5 to 10 minutes. Or, if your toddler is like mine, serve immediately to appease the begs for “iceth cleam”.
Gracen’s been talking about applesauce {and the fact that her Mama may have eaten what was left of our strawberry applesauce during nap time one day a few weeks back} for a long time now, so I decided we’d make a new batch today.
There were a ton of yummy nectarines laying around Grandma Charlotte’s kitchen and we just picked up some local apricots during our most recent visit to Davison Orchards, so we decided to switch things up a bit… This time around, it was going to be nectarine apricot applesauce. Sounds yummy, right?
Here’s our list of ingredients… A few apples, a couple of small nectarines, a couple of apricots, a little water, and some of the most delicious smelling Mexican vanilla you’ve ever come in contact with.
You’ll have to excuse our ‘vacation look’… Messy hair, no make-up and comfy clothes is the way to go when in relaxation mode. Plus, you don’t have to look nice to whip up a delicious snack, now do you? ☺
To get started, wash, peel, and chop all of your fruit.
And put it in a pot.
Next, pour in a little water…
And a capful of really good vanilla.
Give everything a little stir…
And pop it on the stove. Cover the pot and let the mixture simmer on medium low for the better part of an hour.
When the fruit is nice and soft, remove it from the heat.
After it’s cooled for a few minutes, arm your little one with giant oven mitts and get mashing.
Eat it while it’s still warm, or transfer it into a mason jar and store in the fridge for later.
{No Sugar Added} Nectarine Apricot Applesauce
3 small apples
2 small nectarines
2 apricots
3 – 4 tablespoons of water
1 capful of good vanilla
Wash, peel, and chop all fruit. Put it in a pot with the water and vanilla. Give the mixture a quick stir, then cover and simmer over medium low heat for 45 minutes to an hour. When the fruit is good and soft, remove the pot from the heat. Mash until your desired consistency is reached. Serve warm or refrigerate for future use.
During the last couple of weeks of gorgeous weather, our popsicle supply has been hit hard. With one lone popsicle left in the freezer, it was time to replenish our supply. I came across this idea a while back on Super Healthy Kids and loved the simplicity of it. Just two ingredients? Yes please.
Here is everything you need to whip up a batch of your own… A bowl of strawberries (washed and hulled), plain organic full-fat yogurt (the thicker the better), a food processor (or good blender), and some popsicle moulds (these are my makeshift moulds that I love because of their small size – cheap containers with slits cut in the lids). Ooh – and a spoon. Can’t leave that out.
Get started by putting your strawberries into your food processor.
Let them mix until they start to turn into a puree. You can stop while the mixture is still chunky, or blend a little longer for a smoother texture, depending on your child’s preferences.
Take a little taste. If desired, you can add a touch of pure maple syrup or honey at this point and then mix again, but Grae’s enthusiastic “Mmmmmm” and request for more told me that ours was plenty sweet. (Keep in mind that the finished product will be slightly more tart.)
Transfer your strawberry puree into a measuring cup for easy pouring.
Now you’re ready to put the popsicles together. Start by adding a little scoop of yogurt into each mould. (We used plain yogurt because it’s what Gracen is used to eating, but if you don’t mind the added sugar, you could easily use a vanilla, honey, or berry flavoured yogurt. If possible, try to pick a thicker yogurt as it will make the ‘layering’ easier. Greek yogurt would be perfect.)
Next, cover the yogurt with strawberry puree.
Then add another spoonful of yogurt.
Continue layering until your moulds are nearly full.
Secure the lids onto your moulds and add the popsicle sticks (if needed).
Done! Place your strawberry creamsicles into the freezer overnight (or at least for a few hours)
And now for the best part – let your munchkin slurp up the remaining strawberry juice if there is any. Yuuuuum.
Healthy Homemade Strawberry Creamsicles
Approximately 15 large strawberries, washed and hulled
Approximately 1 cup of plain organic full-fat yogurt
Place strawberries in food processor or blender and mix until they form a puree, then transfer mixture into a measuring cup for easy pouring. Fill your popsicle moulds with layers of yogurt and puree until nearly full. Freeze overnight.
When I was gifted my first ever {decent} food processor for my birthday, I had two things I knew I needed to make asap. The first, two ingredient ice cream, got taken care of while we were still on vacation. The second was fresh pesto. I returned home eager to whip up my first batch of the delicious green sauce, only to find that both of my basil plants had been badly eaten while away. Phooey. The project got put on the back burner for a little while until it was time to whip up lunch today and my giant container of organic baby spinach reminded me of something I’ve seen numerous times online… Pesto made with spinach! Brilliant, really. Who doesn’t love adding another way to sneak loads of spinach into their family’s meals? So spinach pesto it was. I gathered up my sous chef and a good amount of the basil I did have left in the garden, and got busy.
First, we gathered our ingredients – organic baby spinach, olive oil, sea salt, asiago cheese, basil, lemon, a couple of cloves of garlic, and some walnuts. (I did consider using the pine nuts I have stashed away in the freezer, but those things are like gold nowadays, so walnuts it was. On the plus side, my mom, a health fanatic of many, many years recently told me that everyone should be eating a few walnuts a day, so there you go. Our walnut intake for the day is covered.)
Start out by placing your clean, dry spinach leaves directly into your food processor.
Next, add the walnuts…
And asiago. (Parmigiano would obviously be the more traditional choice here, but I like to change things up now and then.)
Next, add a couple of whole raw garlic cloves. Just be warned that the finished result is quite garlicky. If you prefer a more subtle garlic flavour, I suggest just adding one.
Next, give your fresh basil a good whiff…
And then add it to the food processor.
Grind in just a touch of sea salt.
And add a squeeze of fresh lemon juice.
Give everything a couple of pulses first, then turn it on while slowly drizzling the olive oil in. Blend until your desired consistency is reached. We made ours quite smooth this time around, but slightly chunky is just as good.
Next, take a little spoonful and let your toddler dip her finger in.
When you receive enthusiastic nods of approval and shouts for “More!”, you know you’re done.
Transfer into a mason jar for storage in the fridge, or use immediately for lunch (in this case, a warm orzo salad with spinach pesto, roasted red peppers, and toasted pine nuts).
Homemade Spinach Walnut Asiago Pesto
3 large handfuls of fresh baby spinach
1 handful of fresh basil leaves
1/2 cup of asiago cheese, grated
1/2 cup of raw walnuts
2 large cloves of garlic
juice of 1/4 of a lemon
1/4 teaspoon of sea salt
1/3 cup of olive oil
Place all ingredients except olive oil into a food processor and pulse a couple of times. Turn food processor on and drizzle in olive oil as the mixture blends. Stop the food processor when the sauce reaches your desired consistency. Transfer into a mason jar and store in the fridge or use immediately on pizza, pasta, crackers, or bread.
With a freezer already full of two ingredient ice cream, frozen bananas waiting to be turned into smoothies, and a few beginning to speckle bananas in the fruit bowl, I decided we’d try something new today… A much healthier version of one of my childhood favourites – frozen chocolate-dipped bananas from Dairy Queen (does anyone remember those?)
Our line up of ingredients: bananas, all-natural peanut butter, wooden popsicle sticks, and toppings. (Grae picked sesame seeds, organic raisins, sunflower seeds, and organic brown rice puffs, but almost anything would work… Dried cranberries, chopped nuts, and granola would be yummy too.)
To get started, peel a couple of bananas.
And then chop them roughly in half.
Now for the messy part… Spread your peanut butter on the banana halves. (Gracen started by spreading peanut butter on one side, then I’d insert the popsicle stick, flip the banana over, and gently cover the other side.)
It doesn’t have to be perfect, but you want most of your banana covered in a layer of peanut butter by the time you’re through.
Next, take your banana and roll it in the topping(s) of your choice. Larger items, such as raisins, can be added by hand afterwards.
Place your pops on a tray and pop them in the freezer for at least an hour or so.
In the meantime, let your little munchkin {messily} lick the spoon and snack on the leftovers.
Once they’re at least semi-frozen, serve them as a snack or for dessert.
Or heck, why not breakfast?! If there’s ever been a breakfast-appropriate popsicle, this has got to be it.
{Healthy} Frozen Banana Pops
Bananas
All-natural nut butter
Toppings of your choice
Wooden popsicle sticks
Peel your bananas and chop in half. Gently cover the bananas in nut butter and insert your wooden popsicle sticks. Holding onto the stick, roll your banana in the desired toppings. Place on a tray or baking sheet and freeze.
This afternoon we did something I’ve been avoiding for much of the week… we used the oven {the perks of a much cooler day}. When I came across this recipe from allrecipes.com on Pinterest a little while back, I knew it would be right up my little edamame lover’s alley. We tweaked the original recipe just a tad, and it turned out great.
The best part is that it’s really simple. Here’s everything you need: edamame beans, olive oil, fresh-ground pepper, sea salt, and some cheese (we used asiago).
First things first, run your beans under some cool water for a few minutes to thaw them.
Next, have your sous chef place them all in a large mixing bowl.
Add a drizzle of olive oil…
Your cheese…
A generous grinding of pepper…
And just a tiny touch of sea salt.
Then mix everything together.
Lay your beans out on a baking sheet lined with parchment paper (who doesn’t love easy clean up?!) and pop them in the oven, flipping them once about half way through.
Take them out when they’re golden brown and have a good crunch to them.
Let cool for a few minutes and serve while still warm. Mmmmm!
Crispy Asiago Edamame Beans
1/2 a package of thawed, shelled edamame beans
1/4 cup of finely grated asiago
1 teaspoon of olive oil
1/2 teaspoon of freshly-grated pepper
1/8 teaspoon of sea salt
Combine all ingredients in a mixing bowl and stir well. Lay beans on a parchment-lined baking pan and bake for approximately 30 minutes at 400 degrees, flipping once about halfway through. Let cool for a few minutes and serve warm.


 ‘Tis the season for all things pumpkin, so today Grae and I decided to experiment with making a healthy, but delicious, pumpkin treat. I must say, we were definitely ‘winging it’, but our version of pumpkin spice muffins turned out great! They’re soft and moist inside, full of flavour, and perfectly sweet. Not to mention, they contain no white flour, butter/margarine, or refined sugar. Yay for that.
 Here’s our line up of ingredients… Wholewheat flour, organic old-fashioned oats, ground flax seed, walnuts, pecans, baking powder, baking soda, cinnamon, nutmeg, ginger, pure organic pumpkin puree, grapeseed oil, organic eggs, pure maple syrup, and pure vanilla.
 Of course, having a sweet little wispy haired sous chef helps too.
 Start by putting the flour into a large mixing bowl.
 Add the oats and ground flax.
 Be sure to cram as many oats into your mouth as possible when no one’s looking.
 Next up, add the baking powder, baking soda, and spices.
 Give everything a good stir.
 In a separate bowl, pour in the pureed pumpkin.
 Add the maple syrup and vanilla…
 The grapeseed oil…
 And the eggs.
 Then give everything a good mix.
 Next, add the dry mixture into the wet one.
 Mix until just combined.
 Then add the nuts…
 And gently fold them into the batter.
 Prepare a muffin tin by lining it with silicone baking cups or a light layer of grapeseed oil.
 Fill the muffin cups almost to the top, but not quite, then pop them in the oven.
 Take them out once the tops are cracked and a toothpick comes out clean.
 Let them cool for a couple of minutes and serve to your very excited and very silly little munchkin.
 Here’s our line up of ingredients… Old-fashioned oats, pumpkin seeds, raisins, ‘just apples’ applesauce (we just used the store bought stuff this time around, but homemade would of course be better), ripe bananas, cinnamon, and organic coconut oil and vanilla (which somehow didn’t make it into the photo…)
 To start, my mini sous chef peeled our bananas and popped them into the food processor.
 Then she added a capful of pure vanilla…
 A generous amount of applesauce…
 Some cinnamon…
 And a dollop of coconut oil.
 Then we blended everything up until it was mostly smooth, with just a few little chunks.
 With our wet mixture transferred into a large mixing bowl, Grae added some organic old-fashioned oats…
 Some raw pumpkin seeds…
 And some raisins…
 And gave everything a good stir.
 The result was oats that were completely coated in the banana/applesauce mixture, but not ‘wet’ or batter-y (if that makes any sense).
 We then dropped large spoonfuls of the mixture onto a parchment-lined baking sheet, using the back of the spoon to shape them into little mounds, and popped them into the oven.
 Fifteen minutes later, out came these soft, moist little oatmeal mounds. Now… Do they taste like a real cookie? No. Do they taste like a healthy bowl of cinnamon oatmeal compacted into a portable little serving? Yes! And the best part is that they’re not at all crumbly. To the point where I let Grae snack on these while in the Ergo on our recent house hunting adventures because I knew they wouldn’t crumble all over our potential landlords’ floors… Win!
 Here are the ingredients for our go to dough, adapted from the lovely
  First, sprinkle the yeast over the warm water and set it aside.
 Next, add the flour…
 And the salt to the bowl of your electric mixer. (This could be done by hand too, of course.)
 Put the paddle attachment on your machine…
 And give the dry ingredients a quick mix.
 Next, measure out the olive oil…
 And slowly pour it into the bowl while mixing.
 Next, give the yeast and water a quick stir…
 And with the mixer on, slowly add the yeast water to the flour/salt/oil mixture. Mix on low until the dough starts to come together in a sticky mass.
 Prepare a separate large mixing bowl by drizzling it with olive oil.
 Use your hands to pull the edges of the dough downwards and shape it into a ball. Place your dough in the bowl and gently toss it to coat it in olive oil.
 Now cover your bowl tightly with plastic wrap. It can be put in the fridge and stored for 3 or 4 days, or it can be used later on in the day. If we’re making pizza the same night, we just leave ours on the counter.
  Now, for my favourite… A very simple roasted veggie pizza. Chop up a bunch of vegetables of your choice (these are my favourites), drizzle them with a little bit of olive oil, and put them in a 400 oven for about 10 minutes.
 While they roast, grate some cheese (we use fresh mozzarella or, like tonight, an all-natural extra sharp cheddar) and slice some fresh mushrooms.
 Take your veggies out of the oven when they’re slightly soft and just beginning to turn golden in some spots.
 With your toppings ready, it’s time to retrieve the dough you made earlier in the day. By now, it should be well over double its original size and soft and spongy to the touch.
 Prepare a baking pan by lining it with parchment paper and sprinkling on little cornmeal (this is completely optional, but it does add a nice texture).
 Using 1/2 of the dough, press it down into a thin rectangular shape. Don’t worry too much about holes – just patch them up as you go along.
 For this pizza, we often use a fresh pesto sauce, which is really yummy. Equally delicious, however, is just a drizzle of olive oil and a tiny sprinkle of sea salt.
 Next, arrange the veggies on the dough {stuffing as many of the red peppers into your mouth as possible, if you’re like Gracen}.
 Top with cheese (adding some feta into the mix is really good too!} and pop it into the oven.
 Remove when the cheese is bubbly and the crust is golden brown and let cool for a few minutes.
 Now onto the one Brad prefers… A BBQ chicken pizza. Tonight we used roasted chicken breasts cut into small chunks, raw diced orange pepper and sweet onion, and some white kernel corn (adding jalapeños is really tasty too).
 Prepare your pan and dough the same way as before, then spread a thin layer of BBQ sauce onto the uncooked crust (this is one of Miss G’s favourite jobs).
 Add the toppings…
 Cover with cheese…
 And bake ’til golden.


 Now although we could have just mixed up our chopped fruit and eaten it as fruit salad, everything is better on skewers, right? Not to mention, making them was the best part – just look at that proud little face. Plus, they’d be great finger snacks for a play date or party… Or just as dessert for a mama and a babe. ☺


 Here’s our list of ingredients: Plain organic whole milk yogurt, frozen no-sugar-added strawberries and raspberries, a ripe frozen banana, a handful of baby beets, a few teaspoons of chia seeds, and some whole organic milk.
 Another must for this recipe? Supergirl and her super girl baby.
 Get started by dumping your frozen berries into your blender. Closing your eyes makes for a better challenge. Nothing Supergirl can’t handle though.
 Chuck in your frozen banana. Again, amp up this step by trying it with your eyes closed.
 Next, add your beets in one. by. one.
 And then dump your chia seeds in too.
 Next, carefully add your milk. The more you can get into the blender, the better.
 Lastly, add a generous scoop of yogurt.
 Blend everything up until thick and bright.
 Serve with a straw or a spoon. Or both.
 Watch your little superhero gobble it up.
 In addition to the blueberries, we gathered up some plain organic whole milk yogurt (with just a tiny touch of honey added), our new
  Gracen started us out by putting the blueberries into the food processor (at least the ones that were lucky enough to not be eaten).
 Then she added our yogurt and honey…
 And we blended it up for a decent amount of time. That’s it. Tout fini!
 With some help, Grae scooped a little bit of the mixture into each mould…
 Then snapped the lids on and into the freezer they went.
 Here they are.
  In the morning, peel a few bananas. (Grae loves this part.)
 Then slice them up.
 Place the banana coins on a parchment-lined baking sheet and pop them in the freezer for at least a few hours.
  In the afternoon, once they’re completely frozen through, take the bananas out of the freezer.
 Place approximately 1/3 of the banana coins into a good food processor.
  Mix through the chunky stage, past the crumby stage, and right into the smooth, soft serve texture stage. You may have to stop the processor once or twice to mix things up a little with a spatula, but it’s not always needed.
 Once the mixture is thick and creamy, stop the food processor and add a capful of good vanilla.
 Plus another 1/3 of the banana coins and mix to bring to a soft serve texture again.
 Then, add the last batch of banana coins and blend again. If you’re feeling like a vanilla-flavoured treat, you can stop here and serve immediately, or put the ice cream into the freezer for a while for a more hard ice cream texture.
 BUUUUUUT, if you want peanut butter and jelly neopolitan-esque treat, divide your ice cream into thirds, leaving one portion in the food processor. Place the two other portions in the freezer in the meantime.
 First up, make the jelly flavoured ice cream. Add a spoonful of no-sugar-added fruit preserves…
 And a few frozen strawberries.
 Then blend until smooth. Pop the berry ice cream in the freezer and give your work bowl and blade a quick rinse.
 Remove one of your vanilla-flavoured ice cream portions from the freezer, pop it in the processor, add a heaping tablespoon of all-natural peanut butter, and mix. When blended, transfer the peanut butter ice cream back into your bowl and pop it in the freezer.
 While you tidy up a tad, let your toddler ferociously lick the bowl and spoon.
 If possible, let your soft serve firm up in the freezer for 5 to 10 minutes. Or, if your toddler is like mine, serve immediately to appease the begs for “iceth cleam”.
 Enjoy!
 You’ll have to excuse our ‘vacation look’… Messy hair, no make-up and comfy clothes is the way to go when in relaxation mode. Plus, you don’t have to look nice to whip up a delicious snack, now do you? ☺
 And put it in a pot.
 Next, pour in a little water…
 And a capful of really good vanilla.
 Give everything a little stir…
 And pop it on the stove. Cover the pot and let the mixture simmer on medium low for the better part of an hour.
 When the fruit is nice and soft, remove it from the heat.
 After it’s cooled for a few minutes, arm your little one with giant oven mitts and get mashing.
 Eat it while it’s still warm, or transfer it into a mason jar and store in the fridge for later.
 Here is everything you need to whip up a batch of your own… A bowl of strawberries (washed and hulled), plain organic full-fat yogurt (the thicker the better), a food processor (or good blender), and some popsicle moulds (these are my makeshift moulds that I love because of their small size – cheap containers with slits cut in the lids). Ooh – and a spoon. Can’t leave that out.
 Get started by putting your strawberries into your food processor.
 Let them mix until they start to turn into a puree. You can stop while the mixture is still chunky, or blend a little longer for a smoother texture, depending on your child’s preferences.
 Take a little taste. If desired, you can add a touch of pure maple syrup or honey at this point and then mix again, but Grae’s enthusiastic “Mmmmmm” and request for more told me that ours was plenty sweet. (Keep in mind that the finished product will be slightly more tart.)
 Transfer your strawberry puree into a measuring cup for easy pouring.
 Now you’re ready to put the popsicles together. Start by adding a little scoop of yogurt into each mould. (We used plain yogurt because it’s what Gracen is used to eating, but if you don’t mind the added sugar, you could easily use a vanilla, honey, or berry flavoured yogurt. If possible, try to pick a thicker yogurt as it will make the ‘layering’ easier. Greek yogurt would be perfect.)
  Next, cover the yogurt with strawberry puree.
 Then add another spoonful of yogurt.
 Continue layering until your moulds are nearly full.
 Secure the lids onto your moulds and add the popsicle sticks (if needed).
 Done! Place your strawberry creamsicles into the freezer overnight (or at least for a few hours)
 And now for the best part – let your munchkin slurp up the remaining strawberry juice if there is any. Yuuuuum.
 First, we gathered our ingredients – organic baby spinach, olive oil, sea salt, asiago cheese, basil, lemon, a couple of cloves of garlic, and some walnuts. (I did consider using the pine nuts I have stashed away in the freezer, but those things are like gold nowadays, so walnuts it was. On the plus side, my mom, a health fanatic of many, many years recently told me that everyone should be eating a few walnuts a day, so there you go. Our walnut intake for the day is covered.)
 Start out by placing your clean, dry spinach leaves directly into your food processor.
 Next, add the walnuts…
 And asiago. (Parmigiano would obviously be the more traditional choice here, but I like to change things up now and then.)
 Next, add a couple of whole raw garlic cloves. Just be warned that the finished result is quite garlicky. If you prefer a more subtle garlic flavour, I suggest just adding one.
 Next, give your fresh basil a good whiff…
 And then add it to the food processor.
 Grind in just a touch of sea salt.
 And add a squeeze of fresh lemon juice.
 Give everything a couple of pulses first, then turn it on while slowly drizzling the olive oil in. Blend until your desired consistency is reached. We made ours quite smooth this time around, but slightly chunky is just as good.
 Next, take a little spoonful and let your toddler dip her finger in.
 When you receive enthusiastic nods of approval and shouts for “More!”, you know you’re done.
 Transfer into a mason jar for storage in the fridge, or use immediately for lunch (in this case, a warm orzo salad with spinach pesto, roasted red peppers, and toasted pine nuts).
 Our line up of ingredients: bananas, all-natural peanut butter, wooden popsicle sticks, and toppings. (Grae picked sesame seeds, organic raisins, sunflower seeds, and organic brown rice puffs, but almost anything would work… Dried cranberries, chopped nuts, and granola would be yummy too.)
 To get started, peel a couple of bananas.
 And then chop them roughly in half.
 Now for the messy part… Spread your peanut butter on the banana halves. (Gracen started by spreading peanut butter on one side, then I’d insert the popsicle stick, flip the banana over, and gently cover the other side.)
 It doesn’t have to be perfect, but you want most of your banana covered in a layer of peanut butter by the time you’re through.
 Next, take your banana and roll it in the topping(s) of your choice. Larger items, such as raisins, can be added by hand afterwards.
 Place your pops on a tray and pop them in the freezer for at least an hour or so.
 In the meantime, let your little munchkin {messily} lick the spoon and snack on the leftovers.
 Once they’re at least semi-frozen, serve them as a snack or for dessert.
 Or heck, why not breakfast?! If there’s ever been a breakfast-appropriate popsicle, this has got to be it.
 The best part is that it’s really simple. Here’s everything you need: edamame beans, olive oil, fresh-ground pepper, sea salt, and some cheese (we used asiago).
 First things first, run your beans under some cool water for a few minutes to thaw them.
 Next, have your sous chef place them all in a large mixing bowl.
 Add a drizzle of olive oil…
 Your cheese…
 A generous grinding of pepper…
 And just a tiny touch of sea salt.
 Then mix everything together.
 Lay your beans out on a baking sheet lined with parchment paper (who doesn’t love easy clean up?!) and pop them in the oven, flipping them once about half way through.
 Take them out when they’re golden brown and have a good crunch to them.
 Let cool for a few minutes and serve while still warm. Mmmmm!