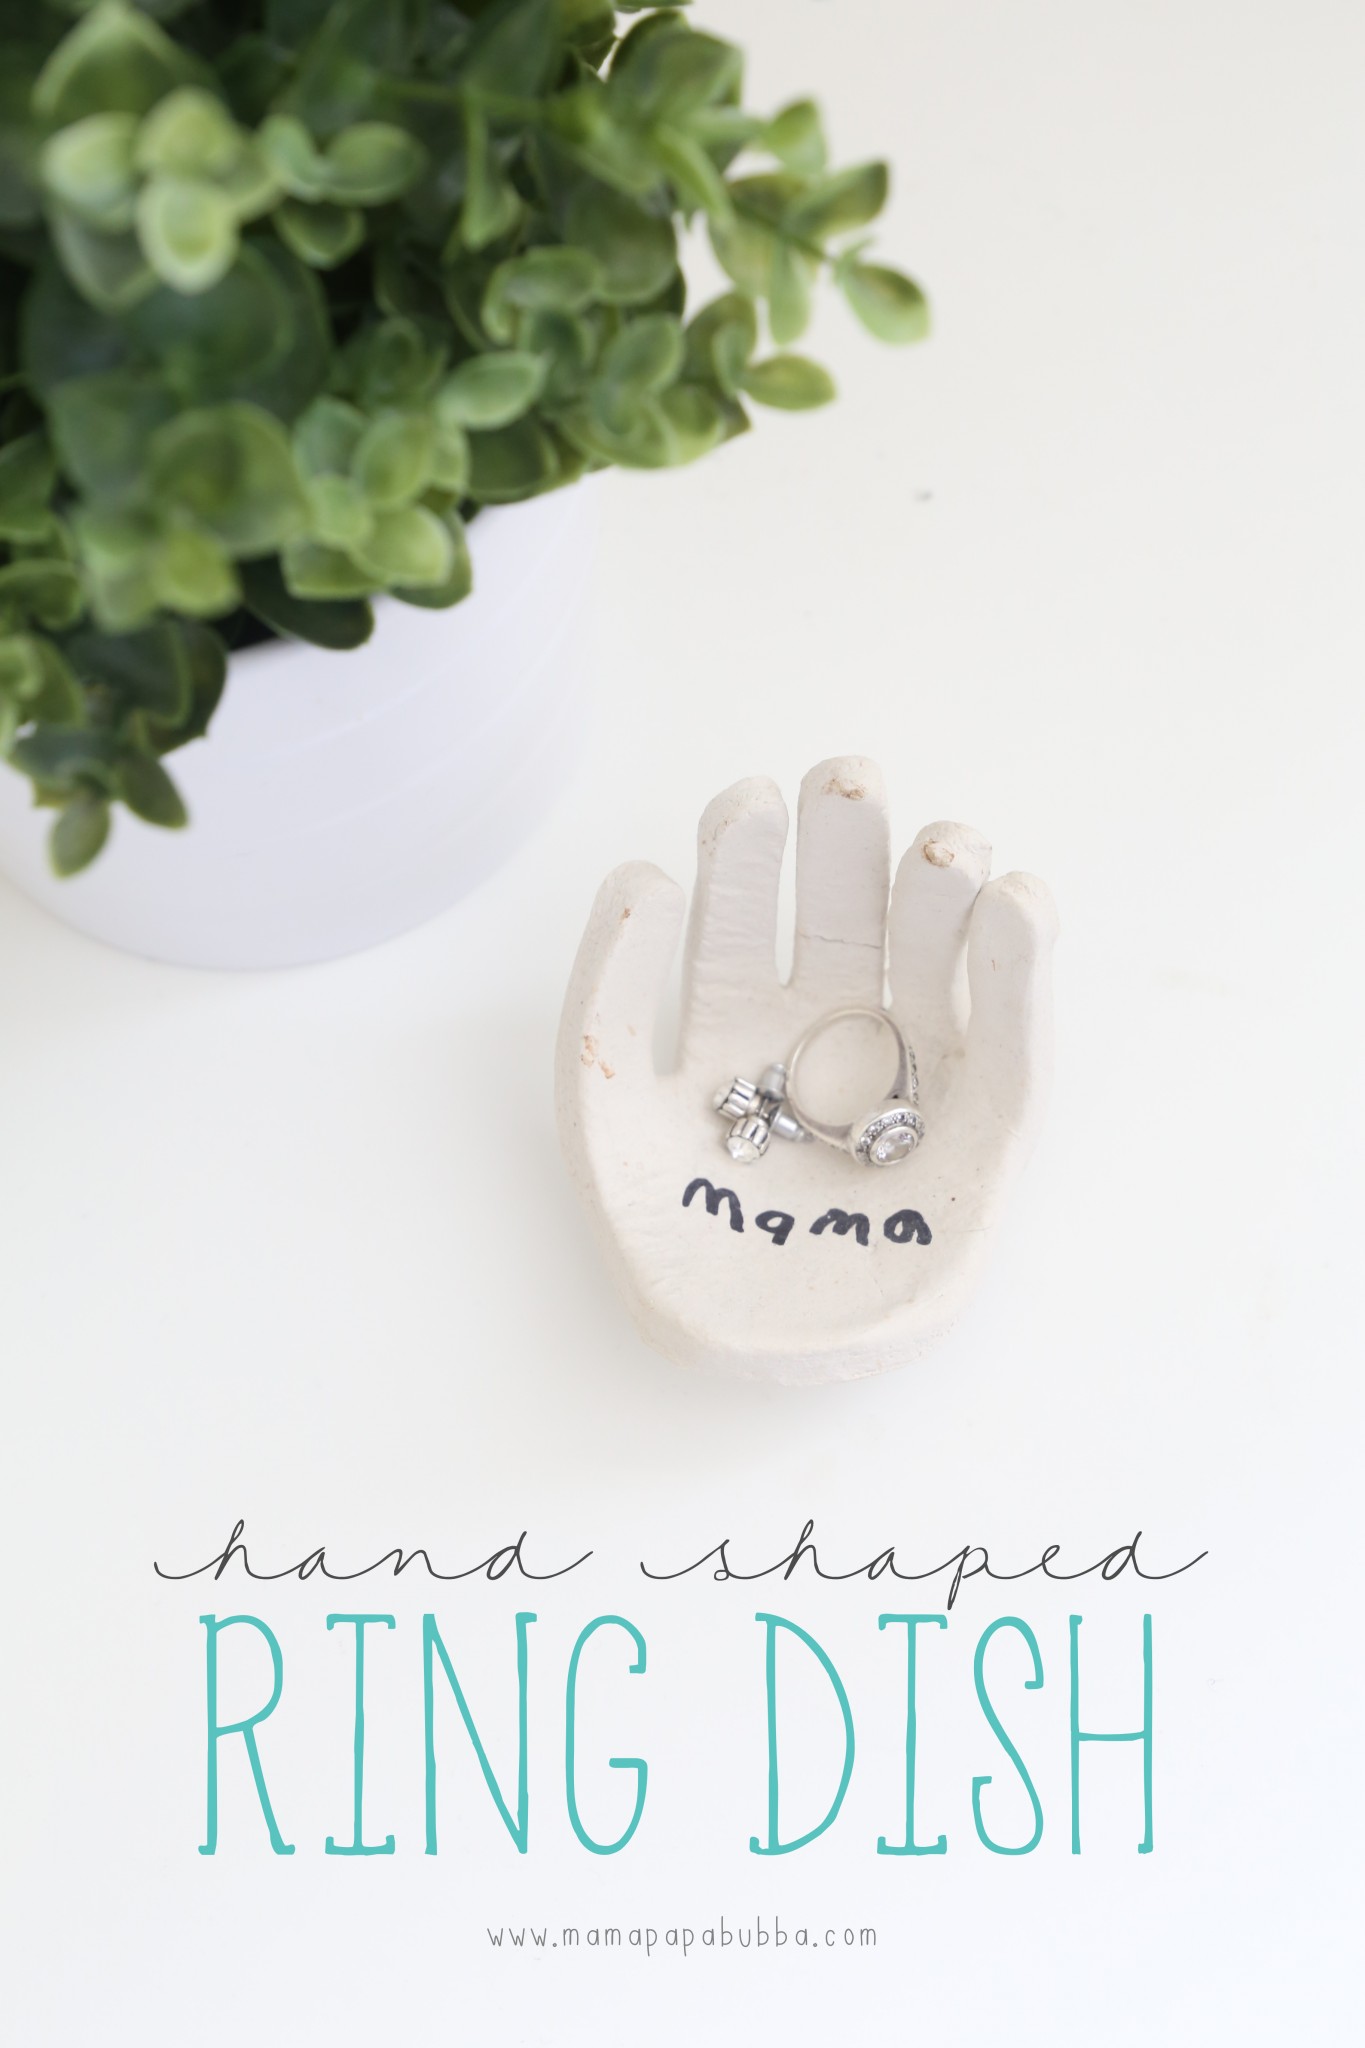
With Mother’s Day only a few days away, I started thinking about some of the fun Mother’s / Father’s Day gifts kids tend to make in school year after year. The first project that came to mind? Clay pinch pots – a classic. I don’t know what exactly has made them the go-to gift for moms and dads, but my guess is that it’s their versatility. Dad needs a coin dish? Check. A safe spot to store his tie clip and cufflinks? Check. Mom needs a bowl to hold bobby pins and hair elastics? A special spot to store her rings at night? Check. Check. And that’s how this project came about. I {quite desperately} need a spot to keep my rings while not wearing them instead of my usual leaving them somewhere in our large apartment only misplace them and eventually find them a few days later. While we could have made just a regular pinch pot, we decided to try making a hand-shaped ring dish since I’m a little obsessed with handprint projects. Didn’t it turn out sweet?
With our last crafting class of the year coming up in just a few short days, Miss G and I wanted to prepare some simple gifts to share with the little friends she’s made at Bright Minds over the last few months. We adore play dough and had so much fun with our larger scale play dough snowman building activity that we decided to make miniature versions in easy to pack cases – everything needed to build play dough snowmen in small locking lid containers for some holiday fun on the go {or at home, really}.
First, we gathered up our materials… A double batch of our yummy-smelling vanilla mint play dough, awesome divided locking lid containers, beads, buttons, googly eyes, orange matchsticks, small twigs, and miniature scarves cut from inexpensive felt.
{this post contains affiliate links}
We found our locking divided containers at City Star here in Kuwait, but these Sistema Klip It Split Food Containers on Amazon look similar. I love them because they’re small, easy for little ones to seal and unseal, and perfect for packing in a purse, diaper bag, or carry-on. Plus, they keep the play dough and the ‘building accessories’ {as Miss G calls them} separate, which I like too.
To get started, I added a big ball of vanilla mint play dough to one compartment of each container.
Then Gracen added the accessories to the other. To keep things uniform, we came up with a ‘recipe’ of what should be added to each container (2 googly eyes, 2 matchstick carrot noses, 2 twig arms, 5 beads, 5 buttons, and 1 felt scarf), which turned out to be great counting practice for Miss G.
This is how our kits looked when we were done with them.
Afterwards, Gracen matched up the lids, locked them on, and I used a regular glue stick to adhere some very basic labels I made and printed to fit our containers. And that was it – simple but cute gifts for our friends to enjoy over the holidays, be it at home, on an airplane, and while waiting in restaurants and doctors’ offices. I am so keeping one of these to bring along on our upcoming trip to Germany. In fact, I’m thinking I may create a couple of other little ‘play on-the-go’ kits too! ☺
Of course the one I tucked away for our trip didn’t remain a secret for long…
In fact, Grae’s already had several play dough snowman building sessions with her little kit.
Now let’s just hope the excitement continues until Christmas break rolls around and we board that plane!
Now I know it’s good for kids to learn that they don’t always get something when someone else does, but I still really enjoy bringing a small and simple ‘sibling gift’ when Miss G and I attend one of her friends’ birthday parties. Most of the time it’s something handmade and useful or consumable – meaning not just another little plastic toy to add to the heap – so I don’t feel bad about gifting it.
So it’s very possible that I’ve passed my love of gift giving onto Miss G… Besides regularly packaging up her personal belongings in paper envelopes held shut with washi tape to hand out to people during our day-to-day, she’s always suggesting we buy things to surprise people with while we’re out shopping too. This simple gift, however, took it to a whole new level. I don’t think she’s ever been so excited to give something to someone in her whole life. We made it to take to a crafty little friend’s birthday party today and what was Grae most excited about? Not a morning full of friends, treats, and fun. Nope. She was most excited to give her gift.
To date, most of our gifts to Miss G’s friends have been personalized wooden block sets, wooden memory match games, pretty headbands, and DIY felt boards with a few of our favourite felt board games (can you tell that I’m a big fan of handmade?), but here at The Dunes, those things are a little too ‘young’ for the slightly order crew of kiddos. With the birthday girl being a big fan of arts and crafts, we knew exactly what we could put together for her… A fun craft kit filled with all sorts of interesting supplies! So that’s just what we did.
Okay, I fully admit it… Between the yearly handprint canvas we did just a couple of months ago and the paper strip handprint art we did just a couple of days ago, we may be a teensy bit handprint obsessed. I can’t help it. I don’t know if it’s the Kindergarten teacher in me or the mama in me, but having these little handprints frozen in time just makes my heart happy.
These keepsakes are a favourite in our house. Miss G and I have made variations of this project many times in the past, some of which have become decor, some heartfelt gifts, and others Christmas tree ornaments.
No matter what they become in the end, we always make them out of our very favourite homemade baking soda clay. This stuff is a dream to work with and is super easy and inexpensive to make {plus you most likely have erything you need to make it in your kitchen at this very moment!}
How you decorate them is up to you, but we went with GLITTER this time around, which both Miss G and I loved. So pretty, right?! {Not to mention that it’s super forgiving when it comes to little cracks and imperfections along the edges of the keepsake… Add glitter and consider them gone!}
For all of the details of this project, as well as our simple baking soda clay recipe, pop on over to CBC Parents and check out our Baking Soda Clay Handprint Keepsakes post.
FYI: With the recipe in the link, we made our handprint keepsake, plus 20 small cookie cutter ornaments, which is probably equivalent to 3 or 4 handprint ornaments {depending on the size you make them of course}.
Admittedly, baking soda clay can be a little finicky sometimes… For tips and tricks we’ve learned over the years, click here.
While you’re at it, check out some of our other favourite handprint projects here.
A few weeks ago, Gracen’s {great} aunt sent me this photo of a footprint butterfly flower pot and asked if Miss G could make her one. After some serious detective work, I believe that the photo was originally shared on Carol’s Classic Gifts and Decor’s Facebook page, but I could be wrong (please correct me if I am!) Though there were no instructions attached, the project looked pretty straight forward, we went for it.
Because of the potentially {very} messy nature of this project, we opted to do it outside with the garden hose and a pile of old rags nearby (and I’m thankful we did…things got MESSY despite my precautionary steps). To get started, I applied a thick layer of paint to Grae’s foot. In our case, we used purple and green (Auntie Judy’s favourite colours) with a little bit of white in the middle, but you could obviously use any colours you like. One thing I would say is that if you want the colours to mix together where they meet, you should probably help them along with your paintbrush while on the foot. I expected the mixing to sort of naturally happen when Grae’s foot was pressed down on the pot, but it didn’t (not a lot, at least).
We carefully pressed one foot onto the pot, washed it off, then painted the other foot and pressed it on so that the two straight edges were in the middle (with a small space between them) and the two arched edges were pointing outwards.
After giving the footprints a few minutes to dry, I used the Sharpie to draw a very simple butterfly body and antennae in the centre.
Then we flipped the pot over and wrote a little message so that Auntie Judy will remember who made the pot and when it was created years down the road.
As a final step, I gave the butterfly part of the pot a light spray of matte sealant, just to make it a little more durable. Ten minutes later it was dry and we had an adorable personalized gift that was both easy and inexpensive to make.
While we should have probably had these done last weekend and in the mail days ago, Miss G and I just put together these little gifts for the grandmas today. (Sorry Grandmas! Here’s a sneak peek of what’s coming very soon.)
‘I love you because…’ flowers are an old favourite of mine. I think I done a version of this project every year that I’ve taught and I absolutely adore hearing about why my munchkins love their moms (or fathers/caretakers/aunts/grandmas/etc.) – the answers are often heartwarming and hilarious all at once.
To get started, Gracen and I filed through my scrapbook paper stash and selected some paper colours for both of her grandmas. We talked about the parts of a flower, and as she described them, I cut them out. 6 petals, a ‘middle’, a stem, 2 leaves, and a background later, Miss G was ready to start assembling her first flower.
When I asked her if she knew what to do, she said she didn’t, but she got started independently anyways. She wanted to start with the yellow circle, and the only thing I helped her with was positioning it in a spot that would allow for enough room for both the petals and the stem.
She squeezed a dollop of glue on the back of each petal, then carefully tucked them underneath the centre piece, making sure that none overlapped too much.
When she was done with the petals, she glued on the stem and leaves.
Here’s her finished flower. Adorable, right?!
Once the flower had had a moment to dry, we sat down together and used the hand over hand technique to print ‘I love Grandma Sue because…’ in the middle of the flower. Then we talked about the reasons why she loved her Grandmas and added one idea to each petal. She was happy to help me print the first couple, but asked me to write down the ideas on my own after that, which I was totally fine with. This project is all about the ideas! I wrote down her phrases just as she’d said them, even when she told me that she loved Grandma Sue because of her nice feet and belly – hah! ☺
I think the grandmas are going to love these, and it will definitely be interesting to see how her reasons change over the years. Now to get them in the mail, ASAP.
♥
For extra fun, like us on Facebook here and find us on Instagram here.


 {this post contains affiliate links}


 {this post includes affiliate links}


 While we should have probably had these done last weekend and in the mail days ago, Miss G and I just put together these little gifts for the grandmas today. (Sorry Grandmas! Here’s a sneak peek of what’s coming very soon.)
 To get started, Gracen and I filed through my scrapbook paper stash and selected some paper colours for both of her grandmas. We talked about the parts of a flower, and as she described them, I cut them out. 6 petals, a ‘middle’, a stem, 2 leaves, and a background later, Miss G was ready to start assembling her first flower.
 When I asked her if she knew what to do, she said she didn’t, but she got started independently anyways. She wanted to start with the yellow circle, and the only thing I helped her with was positioning it in a spot that would allow for enough room for both the petals and the stem.
 She squeezed a dollop of glue on the back of each petal, then carefully tucked them underneath the centre piece, making sure that none overlapped too much.
 When she was done with the petals, she glued on the stem and leaves.
 Here’s her finished flower. Adorable, right?!
 Once the flower had had a moment to dry, we sat down together and used the hand over hand technique to print ‘I love Grandma Sue because…’ in the middle of the flower. Then we talked about the reasons why she loved her Grandmas and added one idea to each petal. She was happy to help me print the first couple, but asked me to write down the ideas on my own after that, which I was totally fine with. This project is all about the ideas! I wrote down her phrases just as she’d said them, even when she told me that she loved Grandma Sue because of her nice feet and belly – hah! ☺