Mama.Papa.Bubba. -
Menu
Skip to content
  • SHOP
  • preemie
  • baby
  • play
  • craft
  • learn
  • cook
  • DIY
  • kuwait
  • vancouver
  • contact
  • about

Tag Archives: simple fun

Simple Fizzy Eruptions

10 / 25 / 18

Simple Fizzy Eruptions | Mama Papa Bubba

Baking soda and vinegar…  It just never ever gets old.  This very simple fizzy eruptions activity has been a hit with so many of our little friends and guests over the years.  And it doesn’t matter if they’ve just turned two or they’re nearly eleven years old – everyone who has come over when I’ve had this set out for a co-op meet-up, play date, or birthday party has pretty much loved it.  I mean what’s not to love about colourful fizzy eruptions that leave your play surface looking just like that of the moon, right?

Simple Fizzy Eruptions | Mama.Papa.Bubba.{this post contains affiliate links}

Here’s the simple-as-can-be set-up…  A plate of baking soda (or soda bicarbonate for our UK friends), several little jars of white vinegar coloured with liquid food colouring, gel food colouring, or liquid watercolours {my personal favourite because of the fact that they’re fully washable}, some pipettes, and a play tray to contain the mess {this one from Ikea is our fave}.

Simple Fizzy Eruptions | Mama.Papa.Bubba.

At nearly 3 years old, Sam has just really nailed down how to successfully use pipettes, but Miss G was using them when she was freshly 2, so it just depends on the kiddo!

That being said, kids who haven’t mastered pipette use can totally still create fizzy eruptions on their own!  Instead of giving them the usual jar / pipette combo, just put the coloured vinegar in old glue bottles, any other squirt bottle with a small opening, or old liquid soap bottles with a pump and let them squeeze or pump the vinegar onto their plate of baking soda.

Simple Fizzy Eruptions | Mama.Papa.Bubba.

If they’re able to use a pipette, it’s as easy as squeeze to collect coloured vinegar…

Simple Fizzy Eruptions | Mama.Papa.Bubba.

Then squeeze to release the coloured vinegar onto the baking soda base and watch the fizzy eruption magic happen!

Simple Fizzy Eruptions | Mama.Papa.Bubba.

When the fizzy foam settles down, you’ll be left with the coolest coloured spots that look just like the moon’s surface {hence why we sometimes call this ‘moon painting’}.

Simple Fizzy Eruptions | Mama.Papa.Bubba.

Now if you really want to take things to the next level {like Sam does ALWAYS}, you may want to try the triple pipette method {patent pending – HAHA!}

Simple Fizzy Eruptions | Mama.Papa.Bubba.

Simply shove all three of your pipettes into a single jar, squeeze up as much vinegar as humanly possible…

Simple Fizzy Eruptions | Mama.Papa.Bubba.

And enthusiastically squeeze them out onto your baking soda in order to create the biggest fizzy eruption possible. The more force the better, really.

Simple Fizzy Eruptions | Mama.Papa.Bubba.

Simple Fizzy Eruptions | Mama.Papa.Bubba.

I mean, just look at how fun it looks!!

Simple Fizzy Eruptions | Mama.Papa.Bubba.

And when you’re nearly done, may as well just dump the rest of the vinegar out, right??  ‘Papa says sam can do it’, I’m told. Hah!

But in all seriousness, when the entire plate is flooded in vinegar like this, most often you can dump off the liquid and use the remaining {wet} baking soda below for round 2.  I mean you may as well get as much bang for your buck as possible, right?  {This is especially important when you live in Kuwait and you’re buying 45 of these tiny 100 gram containers of baking soda at a time.}

Fizzy Eruptions with Baking Soda and Vinegar | Mama Papa Bubba

Are you following us on social media?  

Find us on: Facebook  |  Instagram  |  Pinterest  |  Twitter


We’d love to have you!

6 Comments

Winter Nature Sensory Soup

12 / 21 / 141 / 12 / 15

Winter Nature Sensory Soup | Mama Papa Bubba

Today, while out touring around Heidelberg, Miss G and I kept our eyes peeled for pretty winter nature items.  As we came across different things, we added them to reusable bag and then continued along our way.  Just the fact that things like evergreen branches and winter berries can be found here is a huge treat to our little desert-dwelling lady, so collecting a bagful with the intention of making a winter nature sensory soup was really exciting.

Read More

1 Comment

Moving Fun for Miss G

7 / 31 / 138 / 17 / 13

Simple Ways to Keep Kids Happily Engaged During a Move | Mama Papa Bubba

In order to get through our move, Miss G spent a lot of time playing independently, which is difficult when the majority of your things are packed and life as you know it is being turned upside-down in front of your eyes.  In order to make things a little bit easier for her, each day that we spent packing, I’d set out a couple of very simple invitations to play with whatever was around at the time.  I have to say, she handled the situation very well and even created a few fun activities of her own.  Here’s some of what our little lady did last week…

Read More

Leave a comment

Floating Flowers… Fun for Pools, Baths, & Sensory Bins

7 / 18 / 137 / 25 / 13

Floating Flowers for Water PlayWhen we went to pick up a pool noodle for Gracen’s marble run water slide, she originally fell in love with a flower-shaped noodle.  While I knew it wouldn’t be the best fit for our marble run, at $1.25, I knew we would eventually figure out a way to put it to good use.  

IMG 0351It was my first time seeing this sort of pool noodle, and all I knew was that I wanted to slice it up to create tons of little individual flower shapes.  

IMG 0349So that’s just what I did.  Just like when slicing a pool noodle in half vertically, I found that using a sharp, serrated knife and a sawing motion worked best.  I sliced ours about an inch thick, but you could do them any thickness you like – even varying thicknesses would be fun!

IMG 0353As I chopped, Miss G ran the ready flowers over to her blow up pool and tossed them in!  

IMG 0375It’s such a simple thing, but they looked so pretty and inviting dancing around on the water’s surface.  (I’m already picturing them in bath tubs and sensory bins too!)

IMG 0367I think Miss G agreed, because she immediately jumped in {despite the freezing cold water} and started splashing around like mad!

IMG 0361When the splashing had subsided a little bit, Grandma Charlotte showed Grae how the flowers could be used as building blocks.  

IMG 0458It’s definitely easier in still-ish water, but it’s equally fun when in or out of the pool.  Towers can be built…

IMG 0460Pyramids can be built…

IMG 0466And ‘trains’ can be built too!  Of course, the possibilities are really endless when it comes to building structures – even when they’re floating ones. 

IMG 0358Now the only question is how I’m going to convince Brad that heaps of pool noodle flowers are a Kuwait necessity…  I mean with the heat and the amount of time we spend in and around water there, they are, aren’t they? ☺ 

Building Structures With Floating Flowers | Mama Papa Bubba

♥ 

For extra fun, like us on Facebook here and find us on Instagram here.   

 
4 Comments

{Simple Fun} Sink Play

7 / 16 / 131 / 19 / 14

Simple Fun Sink Play | Mama Papa Bubba

I forgot how trying and time consuming this whole Kuwait documentation process is… We’re currently in the throws of police clearances, medical tests,  notarizations, and phone calls, which isn’t all that fun.  Add in a very busy, wanting-to-be-on-the-go toddler, and it’s that much more difficult.   Today, between Embassy calls and trips to the police station and medical lab, I pulled out one of my favourite tried and true ways to keep Miss G happily engaged while we got a few things done – a sink full of water.  It’s a super simple invitation to play and is a hit every single time.  Today it involved a couple of drops of blue/green food colouring, a couple of rocks, some glass gems, and a bowl of plastic creepy crawlies.  That’s it.  We set it up together, she pulled her little Ikea stool up to the bathroom sink, and the play began.

IMG 0262

The best part is that it’s not at all limited to a bug swamp.  In fact, the possibilities are endless!  Here are a few of our favourite sink play ideas…

1.  Baby bath – Grab a plastic doll, a wash cloth and/or sponge, some watered down shampoo or bubble bath,and a small towel and the baby doll will be cleaner than ever.  For extra fun, add in a toothbrush and hairbrush for when bath time is done.

2. Ocean – Add a couple of drops of blue food colouring to the water, then add some rocks, seashells, driftwood pieces and plastic ocean creatures.  Instant fun!

3. Floating building station – Place several pool noodle pieces (sliced about an inch thick) in the sink and let your little one experiment with building floating structures – towers, pyramids, ‘trains’ – anything goes!

♥

For extra fun, like us on Facebook here and find us on Instagram here. 

3 Comments

iPhoneography // Simple Rice Tray Play

6 / 9 / 139 / 12 / 13

Simple Rice Tray Play | Mama Papa Bubba

This morning I had a little bit of housework to do and Miss G suggested that she’d play with some freshly coloured rice I’d made while I got my clean on.  It’d been a quite a while since she’d last opted to play with a rice bin or tray, so I was happy to hear that she was still excited about such a simple sensory activity.  While I put the rice into small containers, she picked out items she wanted to use while playing with it.  She gathered up a divided plate,  heart-shaped ice cube tray,  cup, scoop, bowl, and funnel and we laid everything down on a large blanket in the living room.

Photo copy 2

She got to playing right away and immediately mixed the different colours in the bowl while using the funnel.  Watching the individual colours mix into speckled sea of rainbow colours is always so much fun (and so is crazy bed head ☺).

Photo copy

There was a lot of mixing, dumping, and pouring, but the favourite of the morning was definitely this little scoop paired with the funnel.  She quickly learned that using the two together was a great way to fill the little heart-shaped ice moulds and we later on we even experimented with extending our funnel using a bubble tea straw.

After she was through playing, we scooped up the rice, added it to the bin of coloured rice we keep in the solarium, and shook the remaining grains off of the blanket outside.  Easy, simple fun.

To see how we make our coloured rice, click here.

♥

For extra fun, like us on Facebook here and find us on Instagram here. 

2 Comments

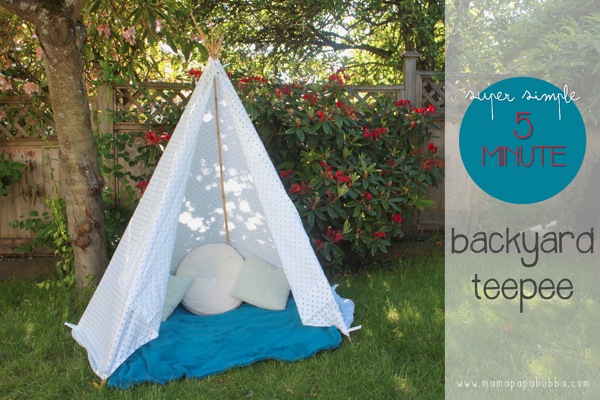
Super Simple 5 Minute Backyard Teepee

6 / 3 / 131 / 15 / 14

First off, I have to say that my Baba is hands down one of the most amazing, wonderful women I know.  She’s one of those ladies who can truly do anything…  From sewing to cooking to running a farm, fixing things, painting, gardening, building things, and entertaining – she excels at all.  Oh, and at 70 something years old, having never used a computer or the internet, she bought herself an iPad and taught herself how to use it too.  Amazing, right? (Hi Baba!  Love you!)  ☺

Growing up, my little brother and I would spend a week or two at my Baba’s house each summer.  Our days out at the farm were wonderful.  We spent nearly all of our time outdoors…  We herded cattle, carried huge buckets of grain out each morning, and watched calves being born.  We roamed through massive gardens with freedom to pick and eat as much as we pleased.  We devoured fresh peas off the vine, ate up buckets of raspberries, and wandered around with long stalks of rhubarb with little glass bowls of dipping sugar.  Baba taught us how to use the ride-on mower, make pedaheh from scratch, and draw with artists’ pencils and shading sticks – all of the things childhoods should be made of.

But above all other adventures and activities that took place on that farm, the one that stands out most in my mind – the one that was most anticipated each year – was building a backyard teepee.  Baba would take us out into the forest, small saw in hand, and we’d cut down the trees that would form the structure of our new home.  We’d drag them back, position them and tie them up, then drape them in sheets until our teepee was fully enclosed.  Perhaps the very best part was furnishing it afterwards.  We’d carefully separate the space in half, position our mattresses and end tables (Baba doesn’t mess around), then stock it up with blankets, flashlights, snacks, books, and activities.  I can’t even describe how cool it all seemed as a child.

Super Simple 5 Minute Backyard Teepee | Mama Papa Bubba

Recently, I introduced the magic of backyard teepees to Miss G.  Nothing that could rival one of the ones my Baba used to make, but a teepee none the less.  Our first one was a completely impromptu build, but it was so quick and easy that we’ve made them the same way each time since.  Here’s how we put together our super simple backyard teepee in no longer than five minutes…

Super Simple 5 Minute Teepee Materials | Mama Papa Bubba

First up, the materials…  We use 6 6-foot tall bamboo stakes (purchased at any store that has a decent gardening section), a king-sized sheet, some jute, and 10 – 12 clothespins.

IMG 8594

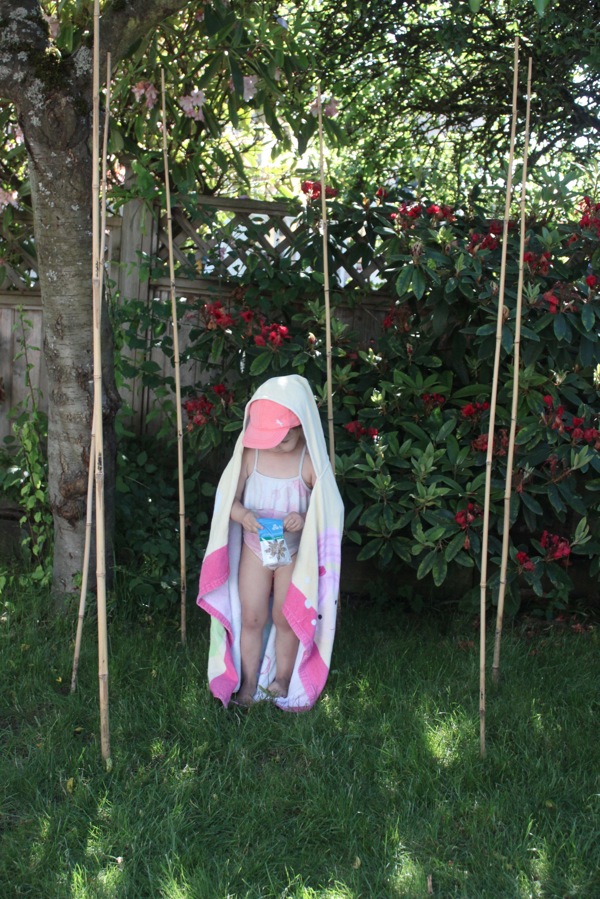
To start out, I push the stakes into the ground just an inch or two to form a circle with an open front.  (As you can see, G likes to stand in the middle and have me build around her. ☺)

IMG 8604

Next, I gather up the top of the stakes in one hand (there really isn’t a right way to do this – I just grab them and how they come together is how they come together) and use the other hand to wrap the jute around.  One thing I try to do while wrapping the jute is to weave it in and out of the stakes  – this gives it some better holding power.  When the jute seems secure, I tie it off in a bow so it’s easy to undo later.

IMG 8605

IMG 8607

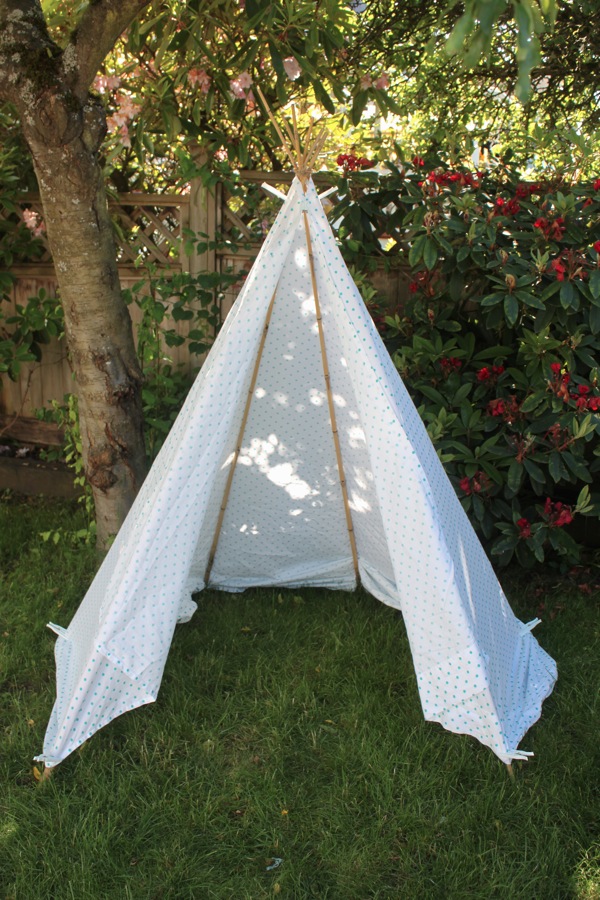
With the structure built, it’s time to enclose it with the sheet.  To do this, I simply drape the sheet around the stakes horizontally with the ends being at the front opening.  To hold it in place temporarily, I bring the two sides of the sheet together at the top and secure it using a clothespin and add another two at the base of the two front stakes.

Teepee

IMG 8611

Next up, it’s time fix the positioning a little, smooth everything out, tuck in the extra fabric, and secure it all. I like to start at the front, making sure that both of the front stakes are fully covered and each side has a flap of extra fabric that can be used to close up the teepee completely if desired.  To do this, I just tug and adjust until it’s the way I want it.  With the sheet positioned properly, I move to the top and add several clothes pins to secure the sheet to the stakes.  I usually use four, but you could put one on each of the 6 stakes if you wanted to.  Then I go to the bottom and add a pin to each of the stakes, tucking under the extra fabric along the way if needed.

And that’s it – the basic teepee is complete.  Super simple, right?

IMG 8617

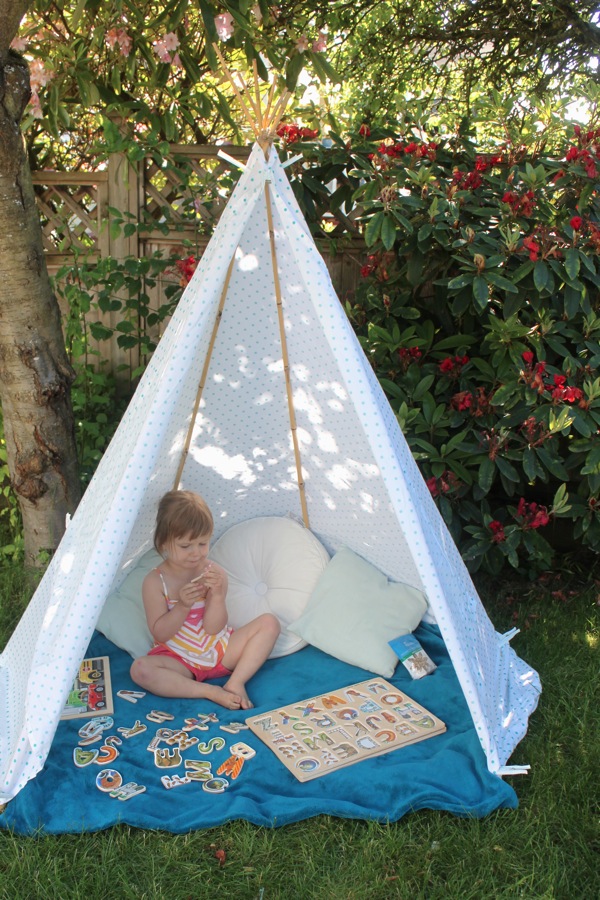
To make ours extra cozy, we always add a blanket in the bottom and a few throw cushions along the sides.

IMG 8623

IMG 8628

One of Gracen’s favourite parts is selecting an activity to bring into her teepee with her.  Most often, it’s a stack of books to read, but today it was a stack of puzzles instead.

IMG 8634

When we’re done playing for the day, we normally take down the sheet and bring everything inside, but leave the bamboo stake structure up, which makes for an even faster set up the next time and the time after that and the time after that…

♥

Are you following us on Facebook and Instagram yet?

We’d love to have you!


22 Comments

Simple Outdoor Fun: Painting Sidewalk Chalk Shapes With Water

5 / 5 / 136 / 2 / 13

Painting Sidewalk Chalk Shapes With Water | Mama Papa BubbaWhile we’ve done plenty of regular mess-free painting on our sidewalks and fence, today Gracen asked if I’d draw her something to paint.  While maybe not as open-ended as I’d usually aim for, I do find that sometimes she prefers having a jumping off point, so I drew an assortment of shapes on the ground using sidewalk chalk.  The activity was actually perfect for her new found interest of colouring in the lines, and when the water dried, it left our cement pad covered in beautiful, watercolour-esque shapes.  So simple, but she enjoyed so much that she’s already asked to do it again.

♥ 

For extra fun, like us on Facebook here and find us on Instagram here.


2 Comments

Fruit & Veggie Sorting {Using Flyer Clippings}

4 / 18 / 134 / 20 / 13

Fruit  Veggie Sorting Using Flyer Clippings | Mama Papa BubbaEvery few days, a newspaper bound in a long rubber band makes its way onto our porch.  If it’s not already soaked through with early morning rain, I half-heartedly flip through the stories and flyers {that make up the majority of the paper} so I feel a tiny bit less guilty about recycling it almost immediately.  This morning, however, when we found a bone dry paper on our porch, we decided to put it to use.

Fruit and Vegetable Sorting | Mama Papa BubbaGracen’s been helping me wash our produce and sort it into the different refrigerator sections for a long while now and often asks if things are fruits or vegetables, so I decided we’d use our grocery store flyers to play a little fruit and veggie sorting game.  

We gathered up a small piece of poster board, a ruler, some glue, and some scissors to start.  I drew a quick T chart while explaining that one ‘box’ would be for all the fruit pictures we found and the other would be for the veggies.  Grae shared with me one thing that she was certain was a fruit (an apple) and one thing she was certain was a vegetable (a potato) and we added little picture clues at the top next to the column headings.

IMG 8190Next we had a little chat about how we know if something is a fruit or vegetable…  While it’s kind of a complex subject filled with talk of flowers, ovaries, and plant accessory parts, I subscribe to the fruits have seeds theory when teaching kids (true story – avocados, peppers, and cucumbers are all fruits!)  It’s not a perfect rule because wee ones often don’t realize that things like bananas and blueberries have seeds, but it works for most things.

IMG 8196After adding a few little seeds next to our fruit heading, I began cutting pictures out of the flyers.  I’d pass one to Grae, ask her what it was, whether or not it had seeds, and if she thought it was a fruit or veggie, and she’d paste it in the correct box.

IMG 8197After a couple of times, she took things into her own hands… I’d pass her a picture and she’d say, “Dis is lettuce.  It no have seeds, so it’s a vegetable!”

IMG 8201When we’d used up all of the flyer photos, she took a minute to admire her project.  She was a very proud girl and immediately went to hang her poster on the fridge.

IMG 8213Later on in the day, after a big produce shop, Grae was helping me lay all of the freshly washed produce on the butcher block to dry.  Right away, I could see that she was putting all of the fruits on one side and the veggies on the other, so I grabbed a wooden spoon to act as a divider {and she grabbed her poster to add to the display}.  Instantly we had a real life sorting game.

Fruits vs Veggies | Mama Papa BubbaThese are her piles when she decided she was done playing.  The Chinese eggplant on the right is what she chose this time for our weekly fruit/veggie investigation, and though she’s not sure, her prediction is that it is a vegetable.  We’ll have to see when we open it up!  ☺

♥ 

For extra fun, like us on Facebook here and find us on Instagram here. 

 
2 Comments

find us here

  • Facebook
  • Instagram
  • Pinterest
  • Twitter
  • Email

looking for something?

want our posts to your inbox?

popular posts

  • BC Summer Family Fun
    BC Summer Family Fun
  • Make Your Own Surprise Boxes
    Make Your Own Surprise Boxes
  • High School or Homeschool?
    High School or Homeschool?
  • Daily Reflection Journal for Kids and Tweens
    Daily Reflection Journal for Kids and Tweens
  • 3D Paper Bag Snowflakes
    3D Paper Bag Snowflakes
  • Things to Listen to While Road Tripping with Kids
    Things to Listen to While Road Tripping with Kids
  • Dear Dad Printable Book
    Dear Dad Printable Book
  • The Best Tips for Taking Road Trips With Kids (& a GIVEAWAY!)
    The Best Tips for Taking Road Trips With Kids (& a GIVEAWAY!)
  • Easy DIY Outdoor Skating Rink
    Easy DIY Outdoor Skating Rink
  • Small Shop Gift Guide
    Small Shop Gift Guide

archives

Site made with ♥ by Angie Makes
Angie Makes Feminine WordPress Themes