
 Have you every come home from a shopping trip with surprise item in your bags? That’s exactly what happened with this hair gel… I do not use hair gel. Brad does not use hair gel. No one in our house uses hair gel. Yet after returning home from a grocery shopping trip with Miss G a few weeks ago, there it was in one of our bags. My immediate thought was, ‘Crap! Did we accidentally steal this?!’ I checked the bill and nope, we’d paid for it. How it got through the checkout and into our bags, I have no idea.
 Anyways, knowing that we wouldn’t be using it in our hair anytime soon, I decided we’d use it for some sort of play. And when nothing brilliant had come to mind in a few week’s time, I decided that we’d mix it with cornstarch. Because cornstarch mixed with any sort of liquid = cool, right?
 It took some serious mixing to bring the ingredients together first, then it took some serious kneading to smooth it out and soften it up. The result, however, was quite lovely. Pillowy soft and lightweight, this dough behaves a lot like ooblek does. When handled gently and moved slowly, it’s stretchy and elastic, and when handled more abruptly, it breaks off in chunks.
 Gracen wanted to play with it immediately, so together we collected some bowls, silicon moulds, and plastic utensils and brought everything outside to play with.
 She began exploring her new dough by sinking her hands into it, squishing it between her fingers, and poking holes into it…
 Then it was time to fill all of the containers with “oatmeal”.
 With a good breakfast in our tummies, it was time for dessert. ☺ The dough rolls into balls really nicely, so Miss G turned our ball collection into cupcakes with cherries on top.
 When we were done with our first round of dessert, Gracen shouted, “Cookies next!” and took off into the house running. She returned with a tray of creative table goodies – buttons, pony beads, straw pieces, gems, and sparkly pompoms. I was put in charge of forming the cookies and she was in charge of decorating.
 To show that we had eaten the cookies all up, Miss G crumbled them all into a bowl.
 The cool part was that as soon as she was done, the crumbles had already started melting together to form one mass.
This was such a fun new dough to explore and play with. One thing we did notice is that after being played with for an hour, it had dried quite a bit. It definitely can be played with again, but this is not the type of dough you’ll want to leave out for very long when not in use.
Oobleck Dough
- 1 cup hair gel
- 1/2 cup water
- food colouring (optional)
- 2 cups corn starch
Mix the wet ingredients together. Add in the cornstarch and mix really well. Once the dough comes together in a mass, knead until smooth and soft.
Play!
♥
For extra fun, like us on Facebook here and find us on Instagram here.
 Day 7: It’s official. All of our fuzzy little caterpillars have successfully built chrysalises and are hanging from their container lids waiting for the big transformation to occur.
 Though it’ll still be several days until they start emerging as butterflies, this morning we moved our little table and hanging structure directly under our
  One thing I love surprising Grae with is a fun, playful baths before bedtime. While sometimes that means simply giving her a little container of epsom salts to sprinkle into her tub or putting a couple of drops of food colouring into the water, and other times it means something a little more elaborate (some of our favourites are
  With the water tinted blue with a few drops of food colouring, I added in some blue and green flat glass beads we keep on hand for sensory play, as well as some {well washed} driftwood pieces collected from the beach.
 Next, using a large sheet of green craft foam, I cut out several lily pads to float on the surface. While I kept some plain, I added water lily-ish faux flowers to others with a dab of hot glue.
 The final addition was these cute stretchy frogs I found at the dollar store. While we have another set of harder ones, I particularly like these because they float and can be stuck to the bath tub walls and tiles.
 Gracen absolutely adored this bath and had great fun seeing how many frogs she could balance on a lily pad at once.
  After the bath was done, we simply scooped everything up and put it into an empty plastic bin to dry out. The best part is that next time we’re in need of a sensory bin, all we’ll have to do is add water!


 One of our very favourite rainy day spots, the
  (showing them the
  ‘Hello, yittle chrysalises! Yook, I’m a butterfly just like you’re going to be!’
 I’m well aware that many people may think I’m crazy, but recently, I’ve been helping Gracen learn how to safely use sharp knives while cooking. She’s been helping in the kitchen since shortly after her first birthday, and is becoming an expert pourer, mixer, peeler, and grater, so this felt like a natural next step. I fully subscribe to the notion that children, even wee ones, are very capable little human beings… More so than we often give them credit for. So, given her kitchen experience, her ability to follow instructions, and her generally cautious nature, I felt like she was ready. Plus, I sort of feel that being handed a cucumber to cut and a butter knife to do the job must feel a little insulting.
  Wouldn’t you trust this innocent little face? ☺
 When she’s practicing her cutting skills, I like to give Grae my favourite tomato knife. It’s quite sharp, but it doesn’t have a pointed tip and it doesn’t seem to easily puncture the skin – perhaps because it’s serrated? I also make sure to give her soft foods that have at least one flat side (no rolling) and are long and thinnish (more space for holding).
 So far, we’ve been focusing on holding the food at the far end and really being aware of where the knife is in relation to her little fingers.
 This morning, while we were at the grocery store, I let Grae pick out what she wanted to cut. First on her list was cantaloupe.
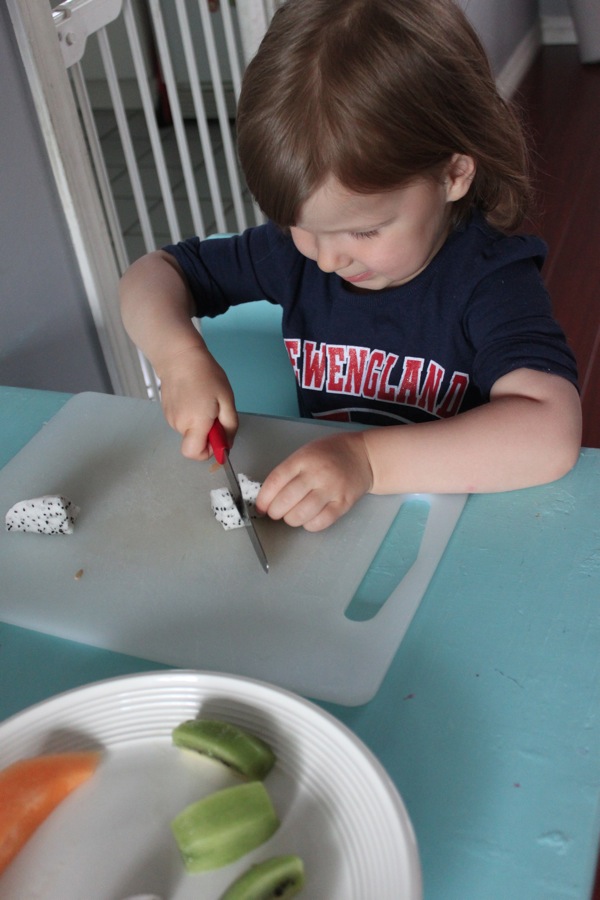 She also selected a dragon fruit and a couple of kiwi fruits…
 Perfect for a fruit salad! Overall, she’s doing really well with it. I still always stay close to her and monitor her chopping carefully, and I did ask her to slow down a little bit today, but for the most part, she can safely use a sharp knife on her own.
 The best part is how proud she is of herself. Chopping up all the fruit for a big bowl of fruit salad while using a sharp knife = official big girl status.
  With our butterfly enclosure ready and our first chrysalises ready to be hung, Miss G and I had to get a little creative this morning. When raising butterflies in my classroom, I used to hang the chrysalises from the inside of a wooden block that was open on two sides, but without one of those at our disposal, we decided to try and craft one. A box, some packaging tape, and a utility knife later, we had this. As you can see, it certainly ain’t pretty. Buuuut, it gets the job done.
 Once the newly-formed chrysalises had been left alone for 12 – 24 hours, we very carefully lifted the lids off of the containers, gently loosening the webbing off of the container walls with a paintbrush if needed. Then we simply created tape rolls using a good strong masking tape, and stuck the lids to the ceiling of our homely box block. This is where they’ll hang now until the final step of their transformation takes place.
 As for our other guys who are still busy eating, they all got a good container cleaning and fresh food. Let’s hope this is a welcomed change and not something that harms their ability to begin their transformation.
 And while I was busy cutting, hanging, and cleaning, Miss G worked on her own project beside me. When she was done, she brought me her scrap cardboard and explained, “First we have fuzzy yittle caterpillars, and then they build their chrysalises. You wait for a long, long, loooooong time, and they POP out and be butterflies! Then the butterflies will fly, fly, fly away.” She never ceases to amaze me.
 Amy’s Just: Be sessions are designed to capture the love between a parent and child while they are connecting, bonding, and ‘just being’ together… which I adore. Before the shoot, Amy sends out a questionnaire which helps her design a personalized session, just for you. From the colour that best represents Grae to why I’m most proud of her, the questions definitely made me think. In a good way.
  When we arrived to her studio, Amy had caffine-free cookie dough tea waiting for us, which immediately won over the little miss. Grae had been up extra early that morning and it was very near nap time, but Amy was incredibly patient and creative with the ways she engaged her. The shoot itself was laid-back and short, which is any toddler mama’s dream.
 When I received our images from the session, I was blown away. They perfectly capture the simple, raw moments of being Gracen’s mama that I never want to forget. They’re soft, honest, and unposed, and truly allow our personalities to shine through. Without a doubt, these images will forever be cherished.
 It’s day 4 with our caterpillars and look at what we have today! We woke up to find that three of our fuzzy little caterpillars had build their chrysalises over night. We were actually cleaning up from breakfast already when Gracen called out, “Some of the caterpillars built their chrysalises, Mama!”
 And thank goodness. If they weren’t pupas today, I was going to go into their containers and do a major clean up. I know that school kits normally say that once the container is closed, leave it closed, and that handling them as little as possible is best, but it can’t be fun to live in your own poop. Besides, from what I read, serious butterfly raisers clean out caterpillar frass daily. For our 5 remaining caterpillars, it’s house cleaning day. Wish me luck!
 To start out, I carefully made two large perpendicular cuts on the very bottom of the storage unit in order to open it up. Then, very carefully, I snipped out all of the mesh dividers that created the separate compartments.
  Next, using some picnic table covering plastic (found on large rolls at IKEA and hardware stores), I cut out circles just a hair larger than the circular openings along the sides of the tube. With a hot glue gun and a hand I was wiling to burn repeatedly for the sake of my students and soon-to-be butterflies (just kidding…um… kinda ☺), I glued the plastic windows to the inside of my tube to cover up the holes (gluing them to the outside would have undoubtedly been easier, but that would have also allowed my hot glue slip-ups to be more obvious, which simply was not acceptable at the time).
  In order to create some homey resting ledges for my winged friends, I glued several brightly coloured faux flowers to the inside of the enclosure too.
  In the meantime, since we’re not at the chrysalis stage yet, I pinned up the butterfly enclosure, set our caterpillar containers on the little wooden table, and set up a little reading and observing corner for her to enjoy.
  Now to figure out how we’ll hang our chrysalises… While teaching, I stuck them (still attached to their container lids) to the ceiling of a large wooden block that was open on two sides, but since we don’t have one of those, I’m going to have to get a little creative. We shall see what we come up with!
 With 1/2 a crate of mango in the fridge and our supply of
  Here’s our lineup of ingredients… Pineapple chunks (we used frozen because it’s what we had on hand, but fresh would be even better), mango chunks, a lime, one ripe banana, coconut milk, and Grae’s addition – unsweetened shredded coconut.
 We began by juicing our lime and threw both the juice and the pulp into our food processor…
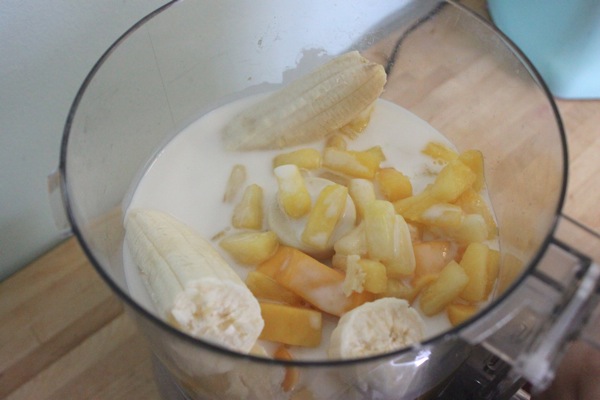 Along with everything else, except the shredded coconut.
 Then we blended everything up until completely smooth while this little monkey gave our food processor some love.
 Next, we added the shredded coconut and gave the mixture just a couple of pulses to mix it in. At this point, we had a little taste test and decided to add in a teaspoon of good honey because our mango was very tart (totally optional, of course).
 Now while it does mean dirtying another dish, I always like to pour our popsicle mixture into a large measuring cup before filling the moulds. It’s so much easier and quicker than clumsy me attempting to pour straight from the food processor. Of course, if you use a blender, this won’t be an issue.
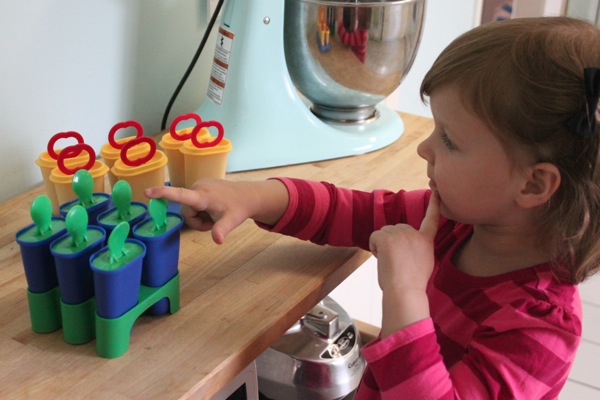 After I fill the moulds, Miss G’s job is to place a ‘stick’ in each one. When she was done, she desperately wanted a popsicle to eat (particularly, “the green and blue one on the riiiiiight”) .
 Luckily, the disappointment that came with me telling her they’d need to sit in the freezer for several hours first was kicked to the curb with the offer of drinking up the leftover mixture, smoothie style.
 Healthy Tropical Fruit Popsicles
 While we should have probably had these done last weekend and in the mail days ago, Miss G and I just put together these little gifts for the grandmas today. (Sorry Grandmas! Here’s a sneak peek of what’s coming very soon.)
 To get started, Gracen and I filed through my scrapbook paper stash and selected some paper colours for both of her grandmas. We talked about the parts of a flower, and as she described them, I cut them out. 6 petals, a ‘middle’, a stem, 2 leaves, and a background later, Miss G was ready to start assembling her first flower.
 When I asked her if she knew what to do, she said she didn’t, but she got started independently anyways. She wanted to start with the yellow circle, and the only thing I helped her with was positioning it in a spot that would allow for enough room for both the petals and the stem.
 She squeezed a dollop of glue on the back of each petal, then carefully tucked them underneath the centre piece, making sure that none overlapped too much.
 When she was done with the petals, she glued on the stem and leaves.
 Here’s her finished flower. Adorable, right?!
 Once the flower had had a moment to dry, we sat down together and used the hand over hand technique to print ‘I love Grandma Sue because…’ in the middle of the flower. Then we talked about the reasons why she loved her Grandmas and added one idea to each petal. She was happy to help me print the first couple, but asked me to write down the ideas on my own after that, which I was totally fine with. This project is all about the ideas! I wrote down her phrases just as she’d said them, even when she told me that she loved Grandma Sue because of her nice feet and belly – hah! ☺
 There’s no doubt that I’m a huge fan of kid-friendly cafés and restaurants. And though a great kid’s menu is a good start, in my opinion, a kid’s play corner of some sort sets a restaurant apart from the rest when it comes to family-friendliness. Needless to say, when I heard that
  The next thing I noticed was the kid’s menu. Grae and I normally share a dish when we’re out for a meal (partly because one dish is plenty of food for both of us, and partly because usual kid’s menus are filled with deep-fried junk and processed white carbs), but with a menu that includes meals made with wholewheat, organic, and locally-sourced ingredients, I was more than happy to let Miss G order something of her own. She picked the margarita pizza on a wholewheat honey rosemary crust, then was off to play.
  The play area, which is right in front of the big open window at the front of the restaurant, was well stocked with a play kitchen and pretend food, a workshop filled with plastic tools, wooden toys and puzzles, board books, mega blocks, and art supplies. The best part, however, is that it’s fully enclosed. No escaping kids here.
 Gracen’s food arrived in no time at all, and she dove in immediately. After polishing off her third piece, she paused for a moment and I assumed she’d had her fill. When I went to wipe off her hands and face, she looked at me confused and said, “But Mama, I still have more!” The girl ate six pieces. SIX.
  My food was just as good. I ordered the red wine braised organic chicken panini and it was delish. And the green salad? It included dried blueberries, pine nuts, and wild rice. Yum.
 After lunch, the kiddos got back to playing while us mamas finished our meals and got to visit a little bit (not easily done when out to lunch with a bunch of toddlers at a normal restaurant).
  After
After 
 With freshly washed hands, we carefully opened the shipping container and took a better look at our babies. Gracen supervised them closely as I scooped a small chunk of the provided artificial food into each container, making sure leave the dirty bits behind. With the food in the containers, I used a gloved finger to gently press it down into the bases.
 Then, very carefully, we used the tip of our paintbrush to pick up our caterpillars one at a time and place them into their new homes.
 While handling them as minimally as possible is definitely the key to success when raising caterpillars/butterflies, Miss G was absolutely desperate to hold one of her fuzzy friends. With clean hands and a promise not to move, I gently placed one in her little palm. He crawled around, she watched in wonder, and when he made his way off of her fingertip, we placed him in his new home.