Gracen and I whipped up one of our all time favourite treats this afternoon. Sadly, I can take ZERO credit for the amazingness that is this dish… It’s something my friend Lara made all the time (she even has a special dish!) while we were living in Kuwait and it was just too amazing not to steal and call my own (sorry, Lara!) It is seriously the easiest, yummiest {and naughtiest} appetizer ever. Bring it to a party and you will instantly win everyone over – I promise.
Here’s the lineup of ingredients… A wedge of brie, garlic, and sun-dried tomatoes.
First, remove most of the rind off of the top of the wedge.
Cut the wedge into chunks in order to fit it snugly in the baking dish.
Next, round up between 2 and 4 garlic cloves, depending on how garlicky you want your dish to be.
Enlist your sous chef to peel them for you…
And chop them up into small pieces.
Sprinkle the garlic on top of the brie. Sneak a few pieces down along the sides too if you can.
Next chop up a few big pinches of sun-dried tomatoes.
Sprinkle them on top of the brie too.
Pop the cheese into the oven and watch it melt into a delicious bowl of cheesy goodness.
Remove from the oven when the cheese is bubbly and beginning to brown. Serve with crackers or fresh baguette rounds.
Roasted Garlic & Sun-Dried Tomato Brie
Wedge of brie
2 – 4 garlic cloves
3 generous tablespoons of sun-dried tomatoes
Preheat the oven to 400 degrees. Remove the rind from the top of the brie. Cut the cheese in order to fit it snugly into an oven-safe dish. Chop the garlic and sun-dried tomatoes and sprinkle on top of the cheese. Roast the cheese in the oven for approximately 15 minutes. Serve with crackers or fresh baguette rounds.
Enjoy!
Like Mama.Papa.Bubba. on Facebook here and find us on Instagram here.
Another week, another Toddler Food post… But before we get on with the photos, here’s a question I received last week:
What is Miss G’s eating schedule? How many meals does she eat per day? And how much milk does she drink? Do you limit it?
Alright, this one is actually pretty simple. Gracen eats 3 full meals a day, plus morning and afternoon snacks. As far as a schedule goes, she eats breakfast a little while after she wakes up, which normally ends up being around 7:30 a.m. Then, a couple of hours later, around 9:30 or 10:00, she has a small snack… Usually something like fruit slices, raw veggies, or nuts. By the time noon rolls around, she’s ready for lunch. We eat, clean up, do our regular nap time routine, and then she goes to sleep. She normally sleeps from about 1:00 to 3:00 p.m., and when she wakes up, she’s ready for her afternoon snack. Later on in the evening, normally just before 6:00, we have dinner, and that’s her last meal for the day.
As far as milk is concerned, yes, we absolutely limit her intake. She loves good, healthy foods, but that’s not to say that she wouldn’t fill up on milk if it was limitless. She has milk 3 times a day – with breakfast, after her nap, and with dinner. For each serving she gets a small cup, about half full, and other than that, she drinks water.
Alright… I hope that answers that! Now onto what Miss G’s been eating lately…
A few months ago, I bought a cookbook for kids put out by the Mayo Clinic. Gracen loves flipping through the recipes and selecting new “projects” for us to try, and without fail, if I ask her what she thinks we should have for dinner, she’ll respond with, “Just a minute, Mama. Grae Grae checks recipes!” She’s had the book open to a recipe for chocolate raspberry scones for a couple of days now, so today we finally got around to whipping up our version of the recipe.
We went all out and used butter (I always replace butter and margarine with grapeseed or olive oil), but I justified it with the fact that it was organic butter and it was a pretty small amount. I just didn’t know if scones would have the proper texture without it. Though they aren’t very sweet {at all}, I’m happy to say that they are moist, tender, and perfect when paired with jam.
Here are our ingredients… Whole wheat flour, plain organic yogurt, baking soda, baking powder, organic butter, honey, frozen raspberries, vanilla, and a lemon.
We started by combining the dry ingredients.
Then we added the butter and cut it into the flour mixture with a fork because I could not for the life of me find my pastry cutter (perhaps I owned one in Kuwait, but not in Canada? Hmmm…)
Next, we added the frozen raspberries and lemon zest into the dry mixture and gently stirred them in.
Then, in a separate bowl, we mixed the yogurt, honey, lemon juice, and vanilla together.
Grae then poured the wet mixture into the dry mixture and gently stirred it until just combined.
Afterwards, we plopped in onto a piece of parchment paper, kneaded the dough a few times, and shaped it into a circle about an inch thick.
Our dough was pretty sticky at this point, and probably could have used a little extra flour, but we just went with it and cut it up into triangles.
Then we carefully moved the scones onto a parchment-lined sheet, and popped them in the oven to bake.
Voila! A delicious homemade snack or breakfast.
Wholewheat Raspberry Scones
2 cups of wholewheat flour
1 tablespoon of baking powder
1/4 teaspoon of baking soda
1/3 cup of organic butter
1/2 cup of frozen raspberries
zest of 1 lemon
1 cup of plain organic yogurt
2 tablespoons of honey (more if you prefer a sweet scone)
1 teaspoon of pure vanilla
juice of 1 lemon
Preheat oven to 350 degrees. Mix dry ingredients well. Using a fork or pastry blender, cut in the butter. Add the raspberries and lemon zest and stir gently.
In a separate bowl, mix the wet ingredients together.
Add the wet ingredients to the dry ingredients and stir until just barely combined. Spill dough out onto a countertop and knead it a few times. Shape it into a circle that is approximately an inch thick. Using a sharp knife, cut the circle into triangles, as you would a pizza.
Gently place the wedges onto a parchment-lined baking sheet and bake for approximately 12 – 14 minutes.
I must admit, I’ve seen many recipes like this one from Under the Sycamore floating around the internet, and I’ve been skeptical. Very skeptical, in fact. I guess I was envisioning some sort of jello-y bird seedy concoction and I just couldn’t wrap my mind around the fact that a hunk of seedy gelatine could last more than a few minutes (especially in the summertime) when tied to a string and hung from a tree.
But when Gracen woke up from her nap today and immediately announced “All done sleeping! Nice nap. Grae Grae wants to MAKE some ping!”, then suggested bird feeders, I decided we’d give it a shot. I had two goals in mind – first, seeing if gelatine + bird seed really does equal cool bird feeders, and second, figuring out a way of making them without having to have Grae stand at a hot stove to stir a pot of water.
I’m happy to say, our experiment was a success. Not only do we have trees sprinkled with pretty bird feeders (thus some very happy birds), but Gracen was able to do almost all of the steps on her own at our butcher block and there was no stove required.
Here’s what we used for the project… Bird seed, gelatine, boiling water, straws cut into 2 inch pieces, some baker’s twine, and some cookie cutters and pancake moulds.
We started off by emptying two packets (not boxes – the above photo is misleading) of plain gelatine into a very large mixing bowl.
Then I carefully poured in a little bit of boiling water (this is one of the only jobs I did for the project).
Gracen then stirred the mixture very gently until all of the gelatine was dissolved.
Next, we measured out our bird seed. We used a “wild bird” variety, but I think pretty much any type would work as long as the seeds and bits are not too big – I think a finer blend works best in this case.
Then Grae poured the bird seed into our gelatine/water mixture.
We stirred it for a few minutes, making sure that all of the seeds were evenly coated and that there was no longer excess water at the bottom of the bowl.
Next, we covered a tray in parchment paper and laid out our cookie cutters and moulds.
Using a teaspoon, Grae filled each cookie cutter with seed, one by one.
Here she is hard at work…
You want to make sure that they’re a little bit overfull, so be generous with the seed. (This recipe made these five feeders, plus a large bird seed “cupcake” too).
Because the mixture gets really sticky, we covered the cookie cutters with a layer of parchment and Grae pressed the seeds down into the moulds.
You want to make sure the seeds are packed very tightly – it’s part of what makes the feeders stay together well.
Next, we took our straws and carefully inserted them into the cookie cutters, making sure to not place them too close to the edges. Once the straws were in the seed, we pressed the seeds down around them to make sure everything stayed tight.
Next, we popped the entire tray into the fridge and let them set for a couple of hours before taking them out and letting them dry out on the counter. We left them for most of the evening, and before I went to bed for the night, I flipped them over so that the bottoms could dry out too. (It’s a bit awkward to flip them with the straw sticking out the way it is, but you could trim the straw if you liked.)
The next morning, we gently popped the shapes out of their moulds.
Then we plucked out the straws and made sure that the holes were clear all the way through.
For the last step, we took some baker’s twine (ribbon or jute would be perfect too), put it through the holes, and knotted the tops. Voila! Pretty little feeders for the hungry birds in our yard.
Cookie Cutter Bird Seed Feeders (a toddler-friendly method)
Pour the water into a very large mixing bowl. Add two packages of gelatine and stir until it’s fully dissolved. Add the bird seed and mix well until everything is evenly coated.
Place cookie cutters/moulds onto a parchment-lined tray and scoop seed mixture in until heaping full. Place another piece of parchment on top of the cookie cutters and press down firmly to pack in all of the seeds. Remove the top parchment layer and gently poke straw pieces all the way through the seed shapes (be sure not to put them too close to the edges). Pop the tray into the fridge for a couple of hours to allow the feeders to set.
Later on, remove the tray from the fridge and let sit on the counter to dry out. Flip the cookie cutters over a few hours later to let the bottoms dry out too. Let sit for at least 3 – 4 more hours (overnight is best) until the feeders are completely dry.
Gently remove the seed shapes from the moulds (they should be fully dry and hard to the touch at this point – if not, allow to dry longer). Carefully remove the straws and tie a twine loop through the holes. Hang in a tree.
This is a breakfast both Gracen and I love. I love it because super healthy and I can throw all of the ingredients into a mason jar before I go to bed and wake up to an already prepared breakfast. I’m sure she loves it because it’s sweet, creamy, and it feels like you’re having dessert for breakfast. And that’s okay with me. I agree!
If you haven’t yet tried chia seeds, you definitely should. They’re often called the “super seed”, and for good reason. They’re packed with essential fatty acids, fibre, calcium, and a bunch of other vitamins and minerals, plus they can absorb up to 12 times their weight in liquid. Besides using them in puddings, around here we add them to yogurt, muffins, cereal, and smoothies too. In fact, they quickly became my secret smoothie ingredient when I learned that adding a tablespoon of chia to a blender of our favourite smoothie would keep it thick and prevent it from separating (even when kept in the fridge overnight!)
But onto the recipe. Here’s what we use to make our overnight mango coconut chia pudding… Your choice of milk (coconut milk is especially delicious in this recipe), pure maple syrup, chia seeds, pure vanilla, unsweetened coconut, and a mango (not pictured because it isn’t needed until morning).
I like to make this recipe in a mason jar because it seals well and I can give the jar a little shake every now and then, but any sort of bowl or container that has a lid will do.
To get started, add your chia seeds to the milk.
Then add the coconut…
The maple syrup…
And the vanilla.
Give everything a stir…
Pop the lid on and put the jar in the fridge. If you come back to the fridge again that night, give the jar a gentle shake to prevent clumping. If not, it’s not a big deal.
Now go to sleep.
Zzzzzzzzzzzzzz….
When you wake up in the morning, retrieve your mason jar of pudding. It’ll be thick and creamy by now and will resemble the insides of a passionfruit. Grab a mango too. (Though mango / coconut is one of our favourite combinations, strawberries, bananas, and blueberries pair well with the coconut too.)
Now peel and chop up your mango into small pieces…
And add them to the jar.
Mix everything together well.
Breakfast is ready!
Serve with fresh or frozen berries, mint leaves, or almond slices.
Put the first set of ingredients into a jar and stir. Put the lid on the jar and put in the fridge overnight. If you come back to the fridge later in the evening, give the jar a shake or two (if not, don’t worry about it).
In the morning, retrieve your jar and a mango. Peel and dice the mango, add it to the jar, and give everything a stir.
Serve with berries, mint leaves, or almond slices.
Bright and early this morning {while still in pajamas}, Gracen and I put together some little Halloween treats for her “yittle dance class fends”. While a little non-traditional, I wanted to make something Gracen-friendly (she hasn’t had refined sugar / junk yet) and call me a downer, but between sweets from family members, school, and trick-or-treating, I think most kids get more than enough junk on Halloween as it is. Our alternative? Mini mason jars filled with sparkly slime. ☺
First off, Miss G helped me collect a few ingredients from around the house… Warm water, Borax, food colouring, glitter, and white glue.
To get us started, she emptied a generous amount of white glue into a large mixing bowl…
Then added some warm water…
A single drop of gel food colouring (she chose pink which isn’t particularly Halloween-ish, but I figure it’s perfect for a group of teeny tiny ballerinas)…
And a liberal amount of glitter.
Then we stirred everything up really well until the mixture was smooth and all of the glue globs had disappeared.
After setting our glue / water mixture aside, we added some Borax to the remaining warm water…
And stirred it well.
Then it was time for the magic! While Gracen gently stirred the glue / water mixture, I slowly began pouring the water / Borax mixture in.
In just seconds, we could see the liquid starting to thicken up and come together in a large mass.
Once everything had been well mixed, I poured out what little excess water was left and Grae began kneading the slime. Before long, the slime was firmer, less sticky, and ready to be packaged.
But not before sneaking in a little play time first though. ☺
Afterwards, we separated our pink sparkly concoction into 12 mini mason jars, which we already had on hand from the individual mason jar cheesecakes we had at Gracen’s recent 2nd birthday party.
With our slime divided into containers, it was off to the computer next. Gracen chose some fluorescent pink paper and the pumpkin clipart, I chose the fonts, and together we came up with these super simple labels.
A little orange marker and a dash of sparkle, and here’s the finished product.
Combine the first set of ingredients until the mixture is smooth and free of glue blobs.
In a separate measuring cup / bowl, combine the second set of ingredients until the Borax is dissolved into the water.
Slowly pour the Borax mixture into the glue mixture, stirring as you pour. When the slime comes together in a large mass, pour off the excess water and kneed the slime for a few minutes.
Package in pretty little mason jars and gift to your friends on Halloween.
* One thing to keep in mind is that while clear Elmer’s glue will work just fine for this recipe, the ‘environmentally friendly’ version will not. Trust me. We tried it. TWICE. *
* Also, if you’re wondering about the safety of Borax, this post is extremely helpful. *
♥
For more fun, join Mama.Papa.Bubba. on Facebook here.
Tonight Gracen and I whipped up some insanely easy “paint” to amp up this evening’s bath time fun. The best news? It only contains two ingredients.
Before getting started, we rounded up a few things… Dr. Bronner’s Pure Castile Liquid Soap (ours is almond scented), some traditional liquid food colouring, a couple of paintbrushes, and some paint containers.
With our materials gathered, we got started by pouring some of our liquid soap into our containers.
Next, Gracen squeezed a few drops of food colouring into each.
And gently stirred the colour into the soap.
That’s it! Less than two minutes later and we were ready for bath time.
Once in the tub, Gracen happily painted the tiles with “numbers” and “zigzags” using her homemade paint. It was a messy, drippy, bubbly good time.
Another perk? We ended up with a blue and purple bubbly tub full of water.
And a squeaky clean toddler who smelled deliciously of almond.
When it came time for bed, we took the shower head down, gave the tiles a rinse, and watched all of our designs melt down the drain with almost no effort. I must admit, our white grout is tinted slightly pink and blue in a few places, but meh – it will fade with time. All in the name of good fun. ☺
Two Ingredient Bath Tub Paint
4 tablespoons of Dr. Bronner’s pure castile liquid soap
Only I would try to amp up the nutritional value of bananas… Haha! I kid. (Kinda.) The truth is, Miss G has been on a two ingredient ice cream kick lately. After asking for it for the third afternoon in a row, I decided it was time to switch things up a little bit. Though we’ve made frozen banana pops before (which Grae loved), I wanted to try something smaller and easier to snack on this time around. So along came the frozen banana bite. With only 3 ingredients, they’re a breeze to make, plus, dare I say they taste like banana cream pie? I do.
Here’s the ingredient lineup… Bananas (ripe, but not overripe), roasted ground flax seed, and cinnamon.
Start off by peeling the bananas and making sure all of the white stringy things are removed.
Chop them into coins (maybe about a half inch thick?) and set them aside.
Next, pour some roasted ground flax seed into a container with a lid (or a zip close bag).
Enthusiastically dump some cinnamon in too.
Put the lid on the container and give it a little shake.
Next, place the banana coins on top of the cinnamon/flax mixture.
Place the lid on the container again and shake until all of the banana coins are well coated.
Next, place the coated banana pieces onto a parchment-lined baking sheet.
Place the tray in the freezer for at least an hour.
Serve them frozen to your excited toddler and watch them disappear. (Without a word of a lie, Gracen gobbled up our entire batch – and that was after a full meal!)
Frozen Banana Bites (that taste like banana cream pie)
2-3 large ripe (but not over ripe) bananas
3 tablespoons of roasted ground flax seed
1/2 teaspoon of cinnamon
Peel the bananas and slice them into coins about a half inch thick, then set aside.
Put flax seed and cinnamon into a container with a lid or zip close bag and shake. Add the banana coins to the flax mixture and shake again. Place the coated banana pieces on a parchment-lined baking sheet and put in the freezer.
After about an hour in the freezer, the banana bites will be frozen, but still a tiny bit soft, making them perfect for serving. If you aren’t serving them right away, transfer the bites into a airtight container. When you’re ready to eat them, you can serve them completely frozen, or let them sit on the counter for 5 to 10 minutes beforehand (my preference).
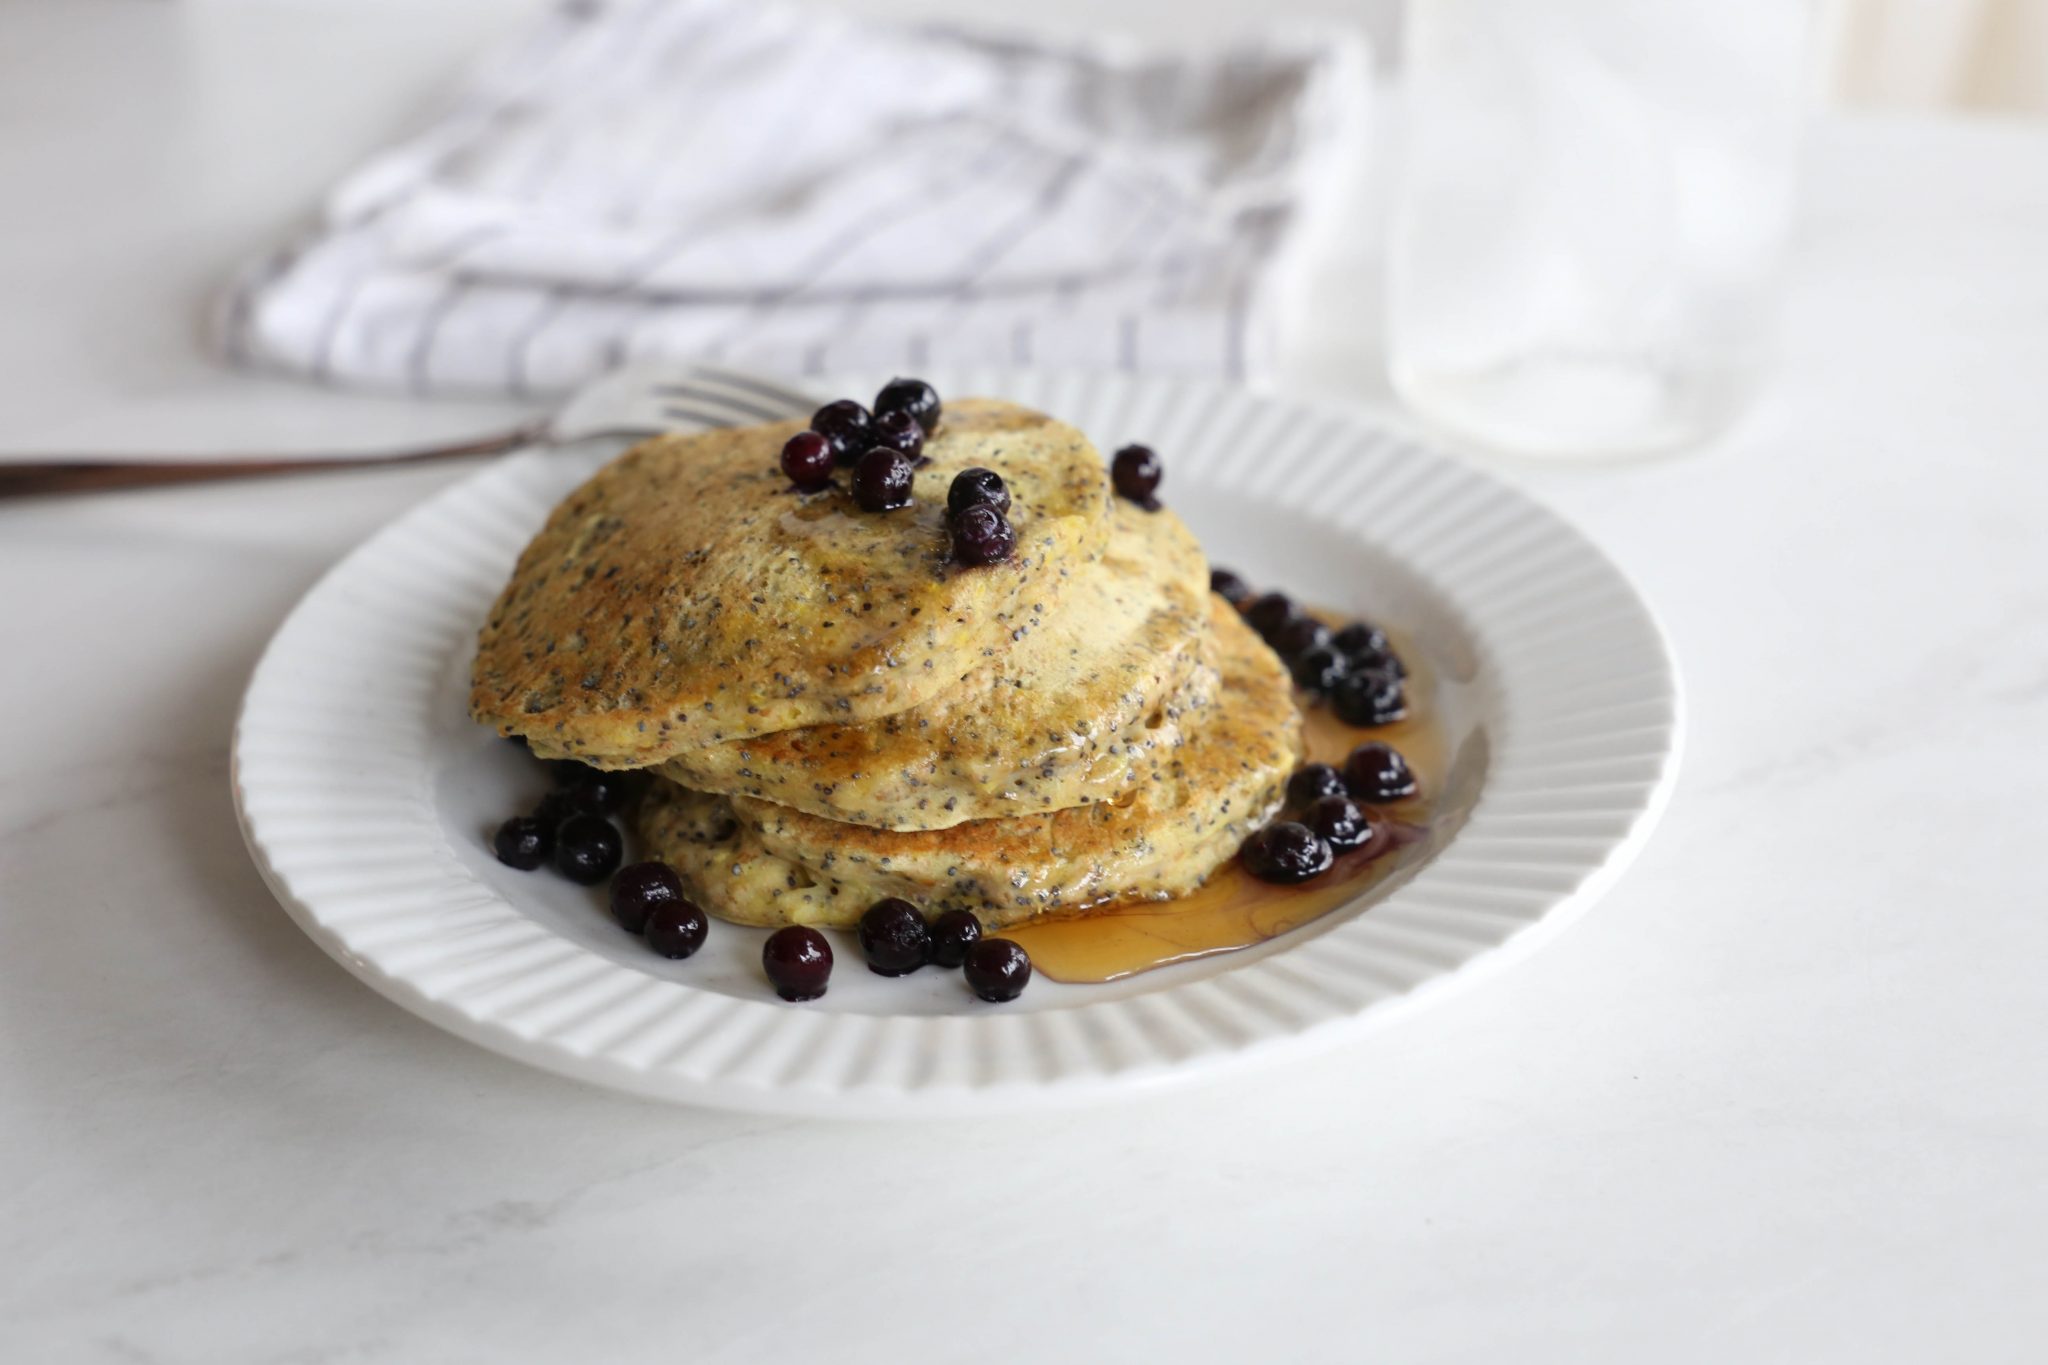
I’ve made these pancakesfor special occasions few times before, and let me tell you, they are delicious. Super healthy, however, they are not. So this morning, my little sous chef and I set out to make a healthier, wholewheat version, sans refined sugar and butter. I’m happy to say, they turned out amazingly well! While not the fluffiest pancakes in the world, they were light, tender, and full of lemony flavour, just the way we like them.
Now, I must admit, I was being a little bit chicken and didn’t go for all wholewheat flour this time around (don’t know what got into me – using white flour is not normally even an option in our house!) Next time, I’d just go all in and use wholewheat flour only. Here’s the version we made this morning…
Wholewheat Lemon Poppy Seed Pancakes
1 1/2 cups of wholewheat flour
3/4 cup of all-purpose flour
1 teaspoon of baking powder
1/2 teaspoon of baking soda
1 teeny tiny pinch of sea salt
1/3 cup of poppy seeds
2 cups of skim milk
2 tablespoons of white vinegar
2 organic egss
1/4 cup of pure maple syrup
1 tablespoon of your favourite oil
1/2 teaspoon of pure vanilla
zest of 4 large lemons
1/2 teaspoon of pure lemon extract (optional)
Pour milk into a measuring cup or bowl. Add vinegar and stir gently. Set aside. (Or just use store bought buttermilk instead.)
Measure out all dry ingredients into a large mixing bowl and mix well.
In a separate bowl, add all of the wet ingredients, including the homemade buttermilk and lemon zest, and mix well.
Add the wet ingredients to the dry ingredients and gently mix until just combined (this is important – do not over mix!)
Cook on a 300 degree griddle, flipping when bubbles begin to form.
Serve with berries and pure maple syrup.
Enjoy!
UPDATE: Since making these the first time, we now always use only wholewheat flour, and the end result is just as delicious. Cutting the pure maple syrup down a little too doesn’t hurt a thing and when in a pinch, chia seeds make for a great poppy seed replacement.
Another Toddler Food post! I’m still playing catch up a little bit, so many of these photos are from the end of summer when our house was ridiculously hot and my motivation to cook was nearly non-existent. Now that autumn is officially here though, I’m looking forward to spending more time in the kitchen again, experimenting with some new meal ideas and whipping up some old favourites with my favourite little sous chef. ☺
Breakfast // Plain organic whole milk yogurt with diced apples and a generous sprinkle of cinnamon.
Breakfast // Peanut butter and apple salad (chopped apples, grapes, and bananas topped with all-natural peanut butter/plain yogurt/vanilla ‘dressing’ and peanuts).
Breakfast // Organic whole grain low-sugar cereal with raw walnuts, frozen blueberries, and organic whole milk.
Breakfast // Overnight coconut chia pudding (coconut milk, chia seeds, and vanilla stored overnight in the fridge and topped with almonds in the morning – adding mango is delicious too!)
Lunch // Wholewheat red lentil mac and cheese. Roasted rainbow carrots. Steamed beets.
Lunch {on the go} // Raw almonds. Chicken and Israeli couscous salad. Freeze-dried bananas and berries. Ice water. Fresh peaches.
{Picnic} Lunch {for two} // Raw almonds. Apple slices and peach chunks. Veggies and roasted red paper humus. Fruit and veggie bars. Turkey and avocado roll-ups.
Dinner // Turkey tortellini with homemade veggie-packed tomato sauce.
Dinner // Turkey, spinach, and pasta soup.
Dinner // Roasted carrots and green beans. Lemon and dill salmon. Smashed potatoes.
‘Tis the season for all things pumpkin, so today Grae and I decided to experiment with making a healthy, but delicious, pumpkin treat. I must say, we were definitely ‘winging it’, but our version of pumpkin spice muffins turned out great! They’re soft and moist inside, full of flavour, and perfectly sweet. Not to mention, they contain no white flour, butter/margarine, or refined sugar. Yay for that.
Here’s our line up of ingredients… Wholewheat flour, organic old-fashioned oats, ground flax seed, walnuts, pecans, baking powder, baking soda, cinnamon, nutmeg, ginger, pure organic pumpkin puree, grapeseed oil, organic eggs, pure maple syrup, and pure vanilla.
Of course, having a sweet little wispy haired sous chef helps too.
Start by putting the flour into a large mixing bowl.
Add the oats and ground flax.
Be sure to cram as many oats into your mouth as possible when no one’s looking.
Next up, add the baking powder, baking soda, and spices.
Give everything a good stir.
In a separate bowl, pour in the pureed pumpkin.
Add the maple syrup and vanilla…
The grapeseed oil…
And the eggs.
Then give everything a good mix.
Next, add the dry mixture into the wet one.
Mix until just combined.
Then add the nuts…
And gently fold them into the batter.
Prepare a muffin tin by lining it with silicone baking cups or a light layer of grapeseed oil.
Fill the muffin cups almost to the top, but not quite, then pop them in the oven.
Take them out once the tops are cracked and a toothpick comes out clean.
Let them cool for a couple of minutes and serve to your very excited and very silly little munchkin.
Preheat oven to 350 degrees and prepare muffin tin.
Mix together the dry ingredients (except the nuts) and set aside. In a separate bowl, mix together the wet ingredients. Add the dry mixture to the wet one and stir until just combined. Fold in nuts.
Transfer batter into the muffin tin. Bake for 18 to 22 minutes, or until a toothpick inserted into the centre comes out clean.
Allow to cool, then serve or store in an airtight container.
Enjoy!
See our favourite banana muffins here and our favourite carrot zucchini muffins here.
This morning Miss G and I decided to try making something new for breakfast… Cookies! Not the traditional kind, of course. Healthy, hearty ones that fill you up and start your day off right. And I’m glad to say that despite my nonchalant ‘Ah, sure we’ll throw that in too’ attitude, they turned out pretty well.
Here’s our line up of ingredients… Old-fashioned oats, pumpkin seeds, raisins, ‘just apples’ applesauce (we just used the store bought stuff this time around, but homemade would of course be better), ripe bananas, cinnamon, and organic coconut oil and vanilla (which somehow didn’t make it into the photo…)
To start, my mini sous chef peeled our bananas and popped them into the food processor.
Then she added a capful of pure vanilla…
A generous amount of applesauce…
Some cinnamon…
And a dollop of coconut oil.
Then we blended everything up until it was mostly smooth, with just a few little chunks.
With our wet mixture transferred into a large mixing bowl, Grae added some organic old-fashioned oats…
Some raw pumpkin seeds…
And some raisins…
And gave everything a good stir.
The result was oats that were completely coated in the banana/applesauce mixture, but not ‘wet’ or batter-y (if that makes any sense).
We then dropped large spoonfuls of the mixture onto a parchment-lined baking sheet, using the back of the spoon to shape them into little mounds, and popped them into the oven.
Fifteen minutes later, out came these soft, moist little oatmeal mounds. Now… Do they taste like a real cookie? No. Do they taste like a healthy bowl of cinnamon oatmeal compacted into a portable little serving? Yes! And the best part is that they’re not at all crumbly. To the point where I let Grae snack on these while in the Ergo on our recent house hunting adventures because I knew they wouldn’t crumble all over our potential landlords’ floors… Win!
Sugar-free, Dairy-free, Flour-free Cinnamon Raisin Breakfast Cookies
Add the wet ingredients (plus cinnamon) to a food processor (or good blender) and mix well. Pour the contents into a large mixing bowl and add dry ingredients. Mix until everything is evenly coated.
Drop spoonfuls of the mixture onto a parchment-lined baking sheet, using the back of a spoon to form them into mounds. Bake for 15 minutes and allow a couple of minutes to cool. Store in an airtight container on the counter for a few days, or pop them in the freezer and defrost as needed.
Wow… It’s been a while… A very loooong while since I put together a Toddler Food post, but here’s hoping they’ll be posted on a weekly basis again. Here’s some of what Miss G has been eating in {semi} recent days…
Breakfast // All-natural cream cheese on a 4 seed wholewheat bagel thin. Cantaloupe sticks.
Snacks & Lunch {on the go} // All-natural peanut butter and granny smith sandwich. Fresh strawberries and blueberries. Sugar snaps. Raw almonds and walnuts. Old cheddar cubes. Red pepper slices.
Lunch // Veggie sandwich on multigrain (cream cheese, cucumber, red onion, red pepper, and avocado). Watermelon sticks. Gouda cubes.
Dinner // Spicy black bean and chicken rice bowl with avocado and sour cream.
Dinner // Steamed broccoli, beets, and carrots. Lemon and herb salmon. Fresh spinach pasta.
Today Miss G and I made one of our favourite weekend dinners… Homemade pizza. Though I do find it takes a little advanced planning to make pizza from scratch, making the dough just after breakfast and letting it sit on the counter all day until we’re ready to make dinner in the evening is easy enough for us. Plus, this recipe makes two BIG thin-crust pizzas, which allows for a few (or at least a couple) of good meals {even when your husband scarfs down 12 pieces in one sitting… hi babe! ☺}
Here are the ingredients for our go to dough, adapted from the lovely Pioneer Woman’s recipe… Wholewheat flour, dry active yeast, table salt, olive oil, and warm water.
First, sprinkle the yeast over the warm water and set it aside.
Next, add the flour…
And the salt to the bowl of your electric mixer. (This could be done by hand too, of course.)
Put the paddle attachment on your machine…
And give the dry ingredients a quick mix.
Next, measure out the olive oil…
And slowly pour it into the bowl while mixing.
Next, give the yeast and water a quick stir…
And with the mixer on, slowly add the yeast water to the flour/salt/oil mixture. Mix on low until the dough starts to come together in a sticky mass.
Prepare a separate large mixing bowl by drizzling it with olive oil.
Use your hands to pull the edges of the dough downwards and shape it into a ball. Place your dough in the bowl and gently toss it to coat it in olive oil.
Now cover your bowl tightly with plastic wrap. It can be put in the fridge and stored for 3 or 4 days, or it can be used later on in the day. If we’re making pizza the same night, we just leave ours on the counter.
Now, for my favourite… A very simple roasted veggie pizza. Chop up a bunch of vegetables of your choice (these are my favourites), drizzle them with a little bit of olive oil, and put them in a 400 oven for about 10 minutes.
While they roast, grate some cheese (we use fresh mozzarella or, like tonight, an all-natural extra sharp cheddar) and slice some fresh mushrooms.
Take your veggies out of the oven when they’re slightly soft and just beginning to turn golden in some spots.
With your toppings ready, it’s time to retrieve the dough you made earlier in the day. By now, it should be well over double its original size and soft and spongy to the touch.
Prepare a baking pan by lining it with parchment paper and sprinkling on little cornmeal (this is completely optional, but it does add a nice texture).
Using 1/2 of the dough, press it down into a thin rectangular shape. Don’t worry too much about holes – just patch them up as you go along.
For this pizza, we often use a fresh pesto sauce, which is really yummy. Equally delicious, however, is just a drizzle of olive oil and a tiny sprinkle of sea salt.
Next, arrange the veggies on the dough {stuffing as many of the red peppers into your mouth as possible, if you’re like Gracen}.
Top with cheese (adding some feta into the mix is really good too!} and pop it into the oven.
Remove when the cheese is bubbly and the crust is golden brown and let cool for a few minutes.
Now onto the one Brad prefers… A BBQ chicken pizza. Tonight we used roasted chicken breasts cut into small chunks, raw diced orange pepper and sweet onion, and some white kernel corn (adding jalapeños is really tasty too).
Prepare your pan and dough the same way as before, then spread a thin layer of BBQ sauce onto the uncooked crust (this is one of Miss G’s favourite jobs).
Add the toppings…
Cover with cheese…
And bake ’til golden.
Voila! Dinner is done. Serve on its own, or with a fresh salad.
Wholewheat Pizza
1 teaspoon of active dry yeast
1 1/2 cups of warm water (not hot, but not lukewarm)
4 cups of whole wheat flour
1/2 teaspoon of salt
1/3 cup of olive oil
Sprinkle yeast over warm water.
Mix flour and salt together. Add olive oil while mixing. Give the yeast/water mixture a quick stir and add it to the mixture while stirring also. The mixture will be sticky and wet, which is perfect.
Prepare a separate mixing bowl by drizzling it with olive oil. Using your hands, shape the dough into a ball by gently working the edges downwards and underneath. Gently toss the dough in the bowl to coat in olive oil, then cover tightly with plastic wrap. Store dough in fridge for up to 4 days, or leave on counter if using later in the day.
When ready, prepare a baking sheet by lining it with parchment paper and sprinkling it with cornmeal. Flatten the dough on the pan, top with sauce and toppings, and bake for 10 – 15 minutes in a 450 degree oven. Remove from oven when the cheese is bubbly and the crust is golden. Cut into squares and serve.

 Gracen and I whipped up one of our all time favourite treats this afternoon. Sadly, I can take ZERO credit for the amazingness that is this dish… It’s something my friend Lara made all the time (she even has a special dish!) while we were living in Kuwait and it was just too amazing not to steal and call my own (sorry, Lara!) It is seriously the easiest, yummiest {and naughtiest} appetizer ever. Bring it to a party and you will instantly win everyone over – I promise.
  Here’s the lineup of ingredients… A wedge of brie, garlic, and sun-dried tomatoes.
 First, remove most of the rind off of the top of the wedge.
 Cut the wedge into chunks in order to fit it snugly in the baking dish.
 Next, round up between 2 and 4 garlic cloves, depending on how garlicky you want your dish to be.
 Enlist your sous chef to peel them for you…
 And chop them up into small pieces.
 Sprinkle the garlic on top of the brie. Sneak a few pieces down along the sides too if you can.
 Next chop up a few big pinches of sun-dried tomatoes.
 Sprinkle them on top of the brie too.
 Pop the cheese into the oven and watch it melt into a delicious bowl of cheesy goodness.
 Remove from the oven when the cheese is bubbly and beginning to brown. Serve with crackers or fresh baguette rounds.
 Another week, another
 Breakfast // Organic multigrain o’s with sliced almonds and frozen blueberries (a Gracen favourite).
 Breakfast // Wholewheat banana blueberry muffin. Kiwi slices.
 Breakfast // Avocado omega seed toast. Granny smith apples with all-natural peanut butter.
 Breakfast //
  Breakfast //
  Breakfast // Plain organic yogurt with sliced almonds and pomegranate seeds.
 Lunch // Mexican couscous with black beans, veggies, and fresh avocado. Shredded chicken breast.
 Lunch // Homemade chicken veggie soup. Broiled parmesan multigrain toast.
 Lunch // Cheese ravioli with basil, sun-dried tomatoes, and feta. Roasted carrots with fresh dill.
 Lunch //
  Lunch // Chicken wild rice soup.
 Dinner // Roasted garlic broccoli. Cheese-filled veggie tortellini with chicken tomato basil sauce.
 Dinner // Spinach ricotta veggie lasagna.
 Dinner // Chicken, tofu, and veggie stir-fry with fresh asian noodles.
 Dinner // Roasted herbed chicken. Potato crisps. Roasted butternut squash and carrots. Stir-fried garlic asian melon.
 Dinner // Butter chicken on brown rice, black barley, and daikon radish seeds. Garlic naan. Steamed broccoli.
 Dinner // Roasted herbed chicken. Brown rice medley. Snap peas. Steamed beets.
 Dessert //
  Here are our ingredients… Whole wheat flour, plain organic yogurt, baking soda, baking powder, organic butter, honey, frozen raspberries, vanilla, and a lemon.
 We started by combining the dry ingredients.
 Then we added the butter and cut it into the flour mixture with a fork because I could not for the life of me find my pastry cutter (perhaps I owned one in Kuwait, but not in Canada? Hmmm…)
 Next, we added the frozen raspberries and lemon zest into the dry mixture and gently stirred them in.
  Then, in a separate bowl, we mixed the yogurt, honey, lemon juice, and vanilla together.
 Grae then poured the wet mixture into the dry mixture and gently stirred it until just combined.
 Afterwards, we plopped in onto a piece of parchment paper, kneaded the dough a few times, and shaped it into a circle about an inch thick.
 Our dough was pretty sticky at this point, and probably could have used a little extra flour, but we just went with it and cut it up into triangles.
 Then we carefully moved the scones onto a parchment-lined sheet, and popped them in the oven to bake.
 Voila! A delicious homemade snack or breakfast.
 I’m happy to say, our experiment was a success. Not only do we have trees sprinkled with pretty bird feeders (thus some very happy birds), but Gracen was able to do almost all of the steps on her own at our butcher block and there was no stove required.
 Here’s what we used for the project… Bird seed, gelatine, boiling water, straws cut into 2 inch pieces, some baker’s twine, and some cookie cutters and pancake moulds.
 We started off by emptying two packets (not boxes – the above photo is misleading) of plain gelatine into a very large mixing bowl.
 Then I carefully poured in a little bit of boiling water (this is one of the only jobs I did for the project).
 Gracen then stirred the mixture very gently until all of the gelatine was dissolved.
 Next, we measured out our bird seed. We used a “wild bird” variety, but I think pretty much any type would work as long as the seeds and bits are not too big – I think a finer blend works best in this case.
 Then Grae poured the bird seed into our gelatine/water mixture.
 We stirred it for a few minutes, making sure that all of the seeds were evenly coated and that there was no longer excess water at the bottom of the bowl.
 Next, we covered a tray in parchment paper and laid out our cookie cutters and moulds.
 Using a teaspoon, Grae filled each cookie cutter with seed, one by one.
 You want to make sure that they’re a little bit overfull, so be generous with the seed. (This recipe made these five feeders, plus a large bird seed “cupcake” too).
 Because the mixture gets really sticky, we covered the cookie cutters with a layer of parchment and Grae pressed the seeds down into the moulds.
 You want to make sure the seeds are packed very tightly – it’s part of what makes the feeders stay together well.
 Next, we took our straws and carefully inserted them into the cookie cutters, making sure to not place them too close to the edges. Once the straws were in the seed, we pressed the seeds down around them to make sure everything stayed tight.
 Next, we popped the entire tray into the fridge and let them set for a couple of hours before taking them out and letting them dry out on the counter. We left them for most of the evening, and before I went to bed for the night, I flipped them over so that the bottoms could dry out too. (It’s a bit awkward to flip them with the straw sticking out the way it is, but you could trim the straw if you liked.)
 The next morning, we gently popped the shapes out of their moulds.
 Then we plucked out the straws and made sure that the holes were clear all the way through.
 For the last step, we took some baker’s twine (ribbon or jute would be perfect too), put it through the holes, and knotted the tops. Voila! Pretty little feeders for the hungry birds in our yard.

 But onto the recipe. Here’s what we use to make our overnight mango coconut chia pudding… Your choice of milk (coconut milk is especially delicious in this recipe), pure maple syrup, chia seeds, pure vanilla, unsweetened coconut, and a mango (not pictured because it isn’t needed until morning).
 I like to make this recipe in a mason jar because it seals well and I can give the jar a little shake every now and then, but any sort of bowl or container that has a lid will do.
  Then add the coconut…
 The maple syrup…
 And the vanilla.
 Give everything a stir…
 Pop the lid on and put the jar in the fridge. If you come back to the fridge again that night, give the jar a gentle shake to prevent clumping. If not, it’s not a big deal.
 When you wake up in the morning, retrieve your mason jar of pudding. It’ll be thick and creamy by now and will resemble the insides of a passionfruit. Grab a mango too. (Though mango / coconut is one of our favourite combinations, strawberries, bananas, and blueberries pair well with the coconut too.)
 Now peel and chop up your mango into small pieces…
 And add them to the jar.
 Mix everything together well.
 Breakfast is ready!
 Breakfast //
  Breakfast // Spinach, sun-dried tomato, and garlic organic eggs. Kiwi slices. Avocado spears. Omega seed toast.
 Breakfast // All-natural peanut butter banana bites topped with freeze-dried raspberries, raisins, organic o’s, and freeze-dried blueberries.
 Breakfast //
  Breakfast // Peanut butter banana oatmeal.
 Breakfast // Poached organic egg on omega seed toast. Green grapes. Berry kale smoothie.
 Lunch // Quinoa veggie soup. Grilled cheddar sandwich on multigrain flax.
 Lunch // Pasta with green beans, toasted pine nuts, and feta.
 Snacks & Lunch {on the go} // Raw almonds. Organic egg salad roll up. Banana. Apple. Red grapes. Homemade cinnamon crisps. Carrot sticks. Purple pepper slices.
 Lunch // All-natural low-sodium turkey, cheddar, and spinach on omega flax bread. Orange segments.
 Lunch // Wholewheat couscous and black bean salad with cheddar, avocado, and fresh cilantro.
 Lunch // Black bean veggie quesadilla with sour cream and tomatillo salsa. Avocado chunks.
 Lunch //
  Dinner // Chicken and veggie stir fry on brown rice.
 Dinner // Creamy turkey tortellini and fresh feb soup. Grilled cheddar on omega seed bread.
 Dinner // Spicy veggie laksa.
 Dinner //
  Dinner // Smashed garden potatoes. All-natural spinach and feta chicken sausage. Edamame and carrot coins. Steamed broccoli with feta.
 Dinner // Salsa baked chicken. Steamed garden carrots. Orzo with feta and toasted pine nuts.
 Dinner // Roasted halibut. Beet walnut salad. Herbed harvest grains.
 Dinner // Amita’s Indian curry on brown rice, black barley, and daikon radish seeds.
 Bright and early this morning {while still in pajamas}, Gracen and I put together some little Halloween treats for her “yittle dance class fends”. While a little non-traditional, I wanted to make something Gracen-friendly (she hasn’t had refined sugar / junk yet) and call me a downer, but between sweets from family members, school, and trick-or-treating, I think most kids get more than enough junk on Halloween as it is. Our alternative? Mini mason jars filled with sparkly slime. ☺
 First off, Miss G helped me collect a few ingredients from around the house… Warm water, Borax, food colouring, glitter, and white glue.
 To get us started, she emptied a generous amount of white glue into a large mixing bowl…
 Then added some warm water…
 A single drop of gel food colouring (she chose pink which isn’t particularly Halloween-ish, but I figure it’s perfect for a group of teeny tiny ballerinas)…
 And a liberal amount of glitter.
 Then we stirred everything up really well until the mixture was smooth and all of the glue globs had disappeared.
 After setting our glue / water mixture aside, we added some Borax to the remaining warm water…
 And stirred it well.
 Then it was time for the magic! While Gracen gently stirred the glue / water mixture, I slowly began pouring the water / Borax mixture in.
 In just seconds, we could see the liquid starting to thicken up and come together in a large mass.
 Once everything had been well mixed, I poured out what little excess water was left and Grae began kneading the slime. Before long, the slime was firmer, less sticky, and ready to be packaged.
 But not before sneaking in a little play time first though. ☺
 Afterwards, we separated our pink sparkly concoction into 12 mini mason jars, which we already had on hand from the individual mason jar cheesecakes we had at
  With our slime divided into containers, it was off to the computer next. Gracen chose some fluorescent pink paper and the pumpkin clipart, I chose the fonts, and together we came up with these super simple labels.
 A little orange marker and a dash of sparkle, and here’s the finished product.
 Tonight Gracen and I whipped up some insanely easy “paint” to amp up this evening’s bath time fun. The best news? It only contains two ingredients.
 Before getting started, we rounded up a few things…
  With our materials gathered, we got started by pouring some of our liquid soap into our containers.
 Next, Gracen squeezed a few drops of food colouring into each.
 And gently stirred the colour into the soap.
 That’s it! Less than two minutes later and we were ready for bath time.

 Once in the tub, Gracen happily painted the tiles with “numbers” and “zigzags” using her homemade paint. It was a messy, drippy, bubbly good time.
 Another perk? We ended up with a blue and purple bubbly tub full of water.
 And a squeaky clean toddler who smelled deliciously of almond.
 Only I would try to amp up the nutritional value of bananas… Haha! I kid. (Kinda.) The truth is, Miss G has been on a
  Here’s the ingredient lineup… Bananas (ripe, but not overripe), roasted ground flax seed, and cinnamon.
  Start off by peeling the bananas and making sure all of the white stringy things are removed.
 Chop them into coins (maybe about a half inch thick?) and set them aside.
 Next, pour some roasted ground flax seed into a container with a lid (or a zip close bag).
 Enthusiastically dump some cinnamon in too.
 Put the lid on the container and give it a little shake.

 Place the lid on the container again and shake until all of the banana coins are well coated.
 Next, place the coated banana pieces onto a parchment-lined baking sheet.
 Place the tray in the freezer for at least an hour.
 Serve them frozen to your excited toddler and watch them disappear. (Without a word of a lie, Gracen gobbled up our entire batch – and that was after a full meal!)

 Breakfast // Plain organic whole milk yogurt with diced apples and a generous sprinkle of cinnamon.
 Breakfast // Peanut butter and apple salad (chopped apples, grapes, and bananas topped with all-natural peanut butter/plain yogurt/vanilla ‘dressing’ and peanuts).
 Breakfast // Organic whole grain low-sugar cereal with raw walnuts, frozen blueberries, and organic whole milk.
 Breakfast // Overnight coconut chia pudding (coconut milk, chia seeds, and vanilla stored overnight in the fridge and topped with almonds in the morning – adding mango is delicious too!)
 Snack // Local pears.
 Snack //
  Snacks & Lunch {on the go} // Apple and orange slices. Marble cheese cubes. Wholewheat flax blueberry muffin. Shredded chicken. Garden peas. Cottage cheese.
 Lunch {on the go} // Tofu cubes. Apple chunks. Orange slices. Baby cucumber. Almond butter roll-up. Red pepper slices.
 Lunch // Wholewheat veggie mac and cheese (the sauce is made of all-natural sharp cheddar, carrots, zucchini, squash, onion, and herbs).
 Lunch // Veggies and jalapeño humus. Leftover
  Lunch // Wholewheat red lentil mac and cheese. Roasted rainbow carrots. Steamed beets.
 Lunch {on the go} // Raw almonds. Chicken and Israeli couscous salad. Freeze-dried bananas and berries. Ice water. Fresh peaches.
 {Picnic} Lunch {for two} // Raw almonds. Apple slices and peach chunks. Veggies and roasted red paper humus. Fruit and veggie bars. Turkey and avocado roll-ups.
 Dinner // Turkey tortellini with homemade veggie-packed tomato sauce.
 Dinner // Turkey, spinach, and pasta soup.
 Dinner // Roasted carrots and green beans. Lemon and dill salmon. Smashed potatoes.
 Dinner //
  Dinner {on a ‘our house is too hot to actually cook’ night} // Curried pea and almond salad. Turkey, spinach, and feta Israeli couscous salad.
 Dinner // Baked chicken tender. Homemade honey mustard sauce. Corn on the cob. Veggie mac and cheese.
 Dinner // Broccoli, green bean, and almond Israeli couscous salad with grilled chicken.
 Dessert //
  Dessert // Strawberries and
  ‘Tis the season for all things pumpkin, so today Grae and I decided to experiment with making a healthy, but delicious, pumpkin treat. I must say, we were definitely ‘winging it’, but our version of pumpkin spice muffins turned out great! They’re soft and moist inside, full of flavour, and perfectly sweet. Not to mention, they contain no white flour, butter/margarine, or refined sugar. Yay for that.
 Here’s our line up of ingredients… Wholewheat flour, organic old-fashioned oats, ground flax seed, walnuts, pecans, baking powder, baking soda, cinnamon, nutmeg, ginger, pure organic pumpkin puree, grapeseed oil, organic eggs, pure maple syrup, and pure vanilla.
 Of course, having a sweet little wispy haired sous chef helps too.
 Start by putting the flour into a large mixing bowl.
 Add the oats and ground flax.
 Be sure to cram as many oats into your mouth as possible when no one’s looking.
 Next up, add the baking powder, baking soda, and spices.
 Give everything a good stir.
 In a separate bowl, pour in the pureed pumpkin.
 Add the maple syrup and vanilla…
 The grapeseed oil…
 And the eggs.
 Then give everything a good mix.
 Next, add the dry mixture into the wet one.
 Mix until just combined.
 Then add the nuts…
 And gently fold them into the batter.
 Prepare a muffin tin by lining it with silicone baking cups or a light layer of grapeseed oil.
 Fill the muffin cups almost to the top, but not quite, then pop them in the oven.
 Take them out once the tops are cracked and a toothpick comes out clean.
 Let them cool for a couple of minutes and serve to your very excited and very silly little munchkin.
 Here’s our line up of ingredients… Old-fashioned oats, pumpkin seeds, raisins, ‘just apples’ applesauce (we just used the store bought stuff this time around, but homemade would of course be better), ripe bananas, cinnamon, and organic coconut oil and vanilla (which somehow didn’t make it into the photo…)
 To start, my mini sous chef peeled our bananas and popped them into the food processor.
 Then she added a capful of pure vanilla…
 A generous amount of applesauce…
 Some cinnamon…
 And a dollop of coconut oil.
 Then we blended everything up until it was mostly smooth, with just a few little chunks.
 With our wet mixture transferred into a large mixing bowl, Grae added some organic old-fashioned oats…
 Some raw pumpkin seeds…
 And some raisins…
 And gave everything a good stir.
 The result was oats that were completely coated in the banana/applesauce mixture, but not ‘wet’ or batter-y (if that makes any sense).
 We then dropped large spoonfuls of the mixture onto a parchment-lined baking sheet, using the back of the spoon to shape them into little mounds, and popped them into the oven.
 Fifteen minutes later, out came these soft, moist little oatmeal mounds. Now… Do they taste like a real cookie? No. Do they taste like a healthy bowl of cinnamon oatmeal compacted into a portable little serving? Yes! And the best part is that they’re not at all crumbly. To the point where I let Grae snack on these while in the Ergo on our recent house hunting adventures because I knew they wouldn’t crumble all over our potential landlords’ floors… Win!
 Breakfast // All-natural cream cheese on a 4 seed wholewheat bagel thin. Cantaloupe sticks.
 Breakfast // Bear toast (multigrain flax bread, all-natural peanut butter, bananas, and raisins).
 Breakfast // Plain organic whole milk yogurt with fresh strawberries, blueberries, and sliced almonds.
 Breakfast // Baked blueberry banana currant oatmeal with whole organic milk.
 Breakfast // Eggs ole. Country-style potatoes. Toasted squirrelly bread.
 Breakfast // Shredded organic wheat with walnuts, almonds, strawberries, and blueberries.
 Breakfast // Toasted omega seed bread with all-natural cream cheese and strawberry slices. Raw almonds.
 Breakfast // Low-sugar organic cereal with walnuts and frozen blueberries.
 Snack // Apple chunks. Wholewheat pita crisps broiled with havarti.
 Snack //
  Lunch // Turkey, rice, spinach tomato soup.
 Lunch // Wholewheat pasta with spinach asiago pesto and baby peas.
 Lunch // Roasted salmon and mozzarella sandwich. Veggies and dilly yogurt dip.
 Lunch // Greek wholewheat couscous salad with avocado. Orange slices and grapes.
 Lunch // Curried apple tuna on omega seedy bread. Red peppers and blueberries.
 Lunch // Spicy Asian noodle salad with grilled breaded chicken. Sugar snaps and avocado spears.
 Lunch // Organic veggie shells and cheese with tuna, steamed broccoli, and carrots.
 Lunch // Greek rice. Steamed broccoli. Avocado. Chicken souvlaki. Lemon roasted potatoes.
 Snacks & Lunch {on the go} // All-natural peanut butter and granny smith sandwich. Fresh strawberries and blueberries. Sugar snaps. Raw almonds and walnuts. Old cheddar cubes. Red pepper slices.
 Lunch // Veggie sandwich on multigrain (cream cheese, cucumber, red onion, red pepper, and avocado). Watermelon sticks. Gouda cubes.
 Dinner // Spicy black bean and chicken rice bowl with avocado and sour cream.
 Dinner // Steamed broccoli, beets, and carrots. Lemon and herb salmon. Fresh spinach pasta.
 Dinner // Chicken souvalki. Pita. Greek salad. Lemon roasted potatoes. Greek rice.
 Dinner // Roasted Carrots, onions, and garlic. Wholewheat couscous. Lemon and herb roasted chicken.
 Dinner // All-natural turkey kolbassa. Cottage cheese perogy with sour cream. Roasted brussel sprouts. Steamed spinach with balsamic and feta.
 Dinner // Tempeh and veggie stir fry on brown rice.
 Dinner // Wholewheat couscous. Barbecued chicken and veggie skewer. Fresh avocado with cilantro dressing.
 Dessert//
  Dessert //
  Dessert //
  Here are the ingredients for our go to dough, adapted from the lovely
  First, sprinkle the yeast over the warm water and set it aside.
 Next, add the flour…
 And the salt to the bowl of your electric mixer. (This could be done by hand too, of course.)
 Put the paddle attachment on your machine…
 And give the dry ingredients a quick mix.
 Next, measure out the olive oil…
 And slowly pour it into the bowl while mixing.
 Next, give the yeast and water a quick stir…
 And with the mixer on, slowly add the yeast water to the flour/salt/oil mixture. Mix on low until the dough starts to come together in a sticky mass.
 Prepare a separate large mixing bowl by drizzling it with olive oil.
 Use your hands to pull the edges of the dough downwards and shape it into a ball. Place your dough in the bowl and gently toss it to coat it in olive oil.
 Now cover your bowl tightly with plastic wrap. It can be put in the fridge and stored for 3 or 4 days, or it can be used later on in the day. If we’re making pizza the same night, we just leave ours on the counter.
  Now, for my favourite… A very simple roasted veggie pizza. Chop up a bunch of vegetables of your choice (these are my favourites), drizzle them with a little bit of olive oil, and put them in a 400 oven for about 10 minutes.
 While they roast, grate some cheese (we use fresh mozzarella or, like tonight, an all-natural extra sharp cheddar) and slice some fresh mushrooms.
 Take your veggies out of the oven when they’re slightly soft and just beginning to turn golden in some spots.
 With your toppings ready, it’s time to retrieve the dough you made earlier in the day. By now, it should be well over double its original size and soft and spongy to the touch.
 Prepare a baking pan by lining it with parchment paper and sprinkling on little cornmeal (this is completely optional, but it does add a nice texture).
 Using 1/2 of the dough, press it down into a thin rectangular shape. Don’t worry too much about holes – just patch them up as you go along.
 For this pizza, we often use a fresh pesto sauce, which is really yummy. Equally delicious, however, is just a drizzle of olive oil and a tiny sprinkle of sea salt.
 Next, arrange the veggies on the dough {stuffing as many of the red peppers into your mouth as possible, if you’re like Gracen}.
 Top with cheese (adding some feta into the mix is really good too!} and pop it into the oven.
 Remove when the cheese is bubbly and the crust is golden brown and let cool for a few minutes.
 Now onto the one Brad prefers… A BBQ chicken pizza. Tonight we used roasted chicken breasts cut into small chunks, raw diced orange pepper and sweet onion, and some white kernel corn (adding jalapeños is really tasty too).
 Prepare your pan and dough the same way as before, then spread a thin layer of BBQ sauce onto the uncooked crust (this is one of Miss G’s favourite jobs).
 Add the toppings…
 Cover with cheese…
 And bake ’til golden.