

I don’t know why, but lately I’ve had a real hankering for Rice Krispie treats… Of course I could have easily whipped up the classic butter and marshmallow version I grew up with, but number one, I wouldn’t feel good about letting Miss G try one (which is slowly becoming the determining factor of whether or not any of us should eat particular foods), and number two, have you ever read the ingredient list on the side of a bag of marshmallows?! It’s not good.
So today Miss G and I set off on a little mission to create our own healthier version.

To be honest, I really had no idea if it was going to work. My thought process went something like this… Hmmm… I guess I could replace the butter with a nut butter (still lots of fat, but good fat with some added nutrition mixed in). Then I could replace the marshmallows with a more natural sticky sweetener (Maybe maple syrup? Honey? Brown rice syrup?) And the regular Rice Krispies cereal could easily be swapped for a sugar-free crisp brown rice cereal. It at least sounds like an okay plan, right?
In the end, I decided to go with cashew butter… It’s light, has a mild flavour {that is almost mallowy}, and is super creamy. As for my sweetener, after a bit of online research, I decided to go with this brown rice syrup. I haven’t used brown rice syrup a whole lot in the past, but that’s only because I hadn’t yet done my research. What I found out is that brown rice syrup is a natural sweetener produced by fermenting cooked rice and treating it with natural enzymes from sprouted barley. It’s about half as sweet as sugar, has a mild flavour, and is thick and syrupy (somewhere between pure maple syrup and a good honey). The benefits are that it has a low glycemic value, and it’s a good source of minerals and minor nutrients. Sold. In order to add just a touch of sweetness, we added a little bit of pure maple syrup, and pure vanilla is a must in almost all baking projects in our house.
So there you have it – crisp brown rice cereal, brown rice syrup, cashew butter, pure maple syrup, and pure vanilla – and all were available in our nearby {regular} grocery store.

Just for fun, we decided to make our treats in individual portions using a muffin tin, so Grae prepared the tray ahead of time by lightly brushing on some grapeseed oil.

Now for the actual cooking part… First, we put our brown rice syrup to a large pot…

Then we added our cashew butter…

And a little bit of pure maple syrup for sweetness.

Then we transferred the pot over to the stove and stirred the mixture over medium heat until it was hot and liquidy, but not bubbling.

Next, we added a good amount of vanilla, gave the mixture another quick stir, and removed it from the heat.

While you could just as easily dump your cereal into the pot and dirty one less dish, we opted for dumping our cereal into a large bowl and pouring the mixture on top so Miss G wouldn’t have to worry about the hot pot during the mixing process.

Then we mixed everything up until the cereal was evenly coated with the gooey mixture.

Working quickly, I filled each cup with a heaping scoop of crisp rice mixture.

Then we placed a large sheet of parchment paper on top and pushed the mixture down firmly into the cups.

Voila!

After a little bit of time in the freezer, I used a butter knife to pop out our treats.

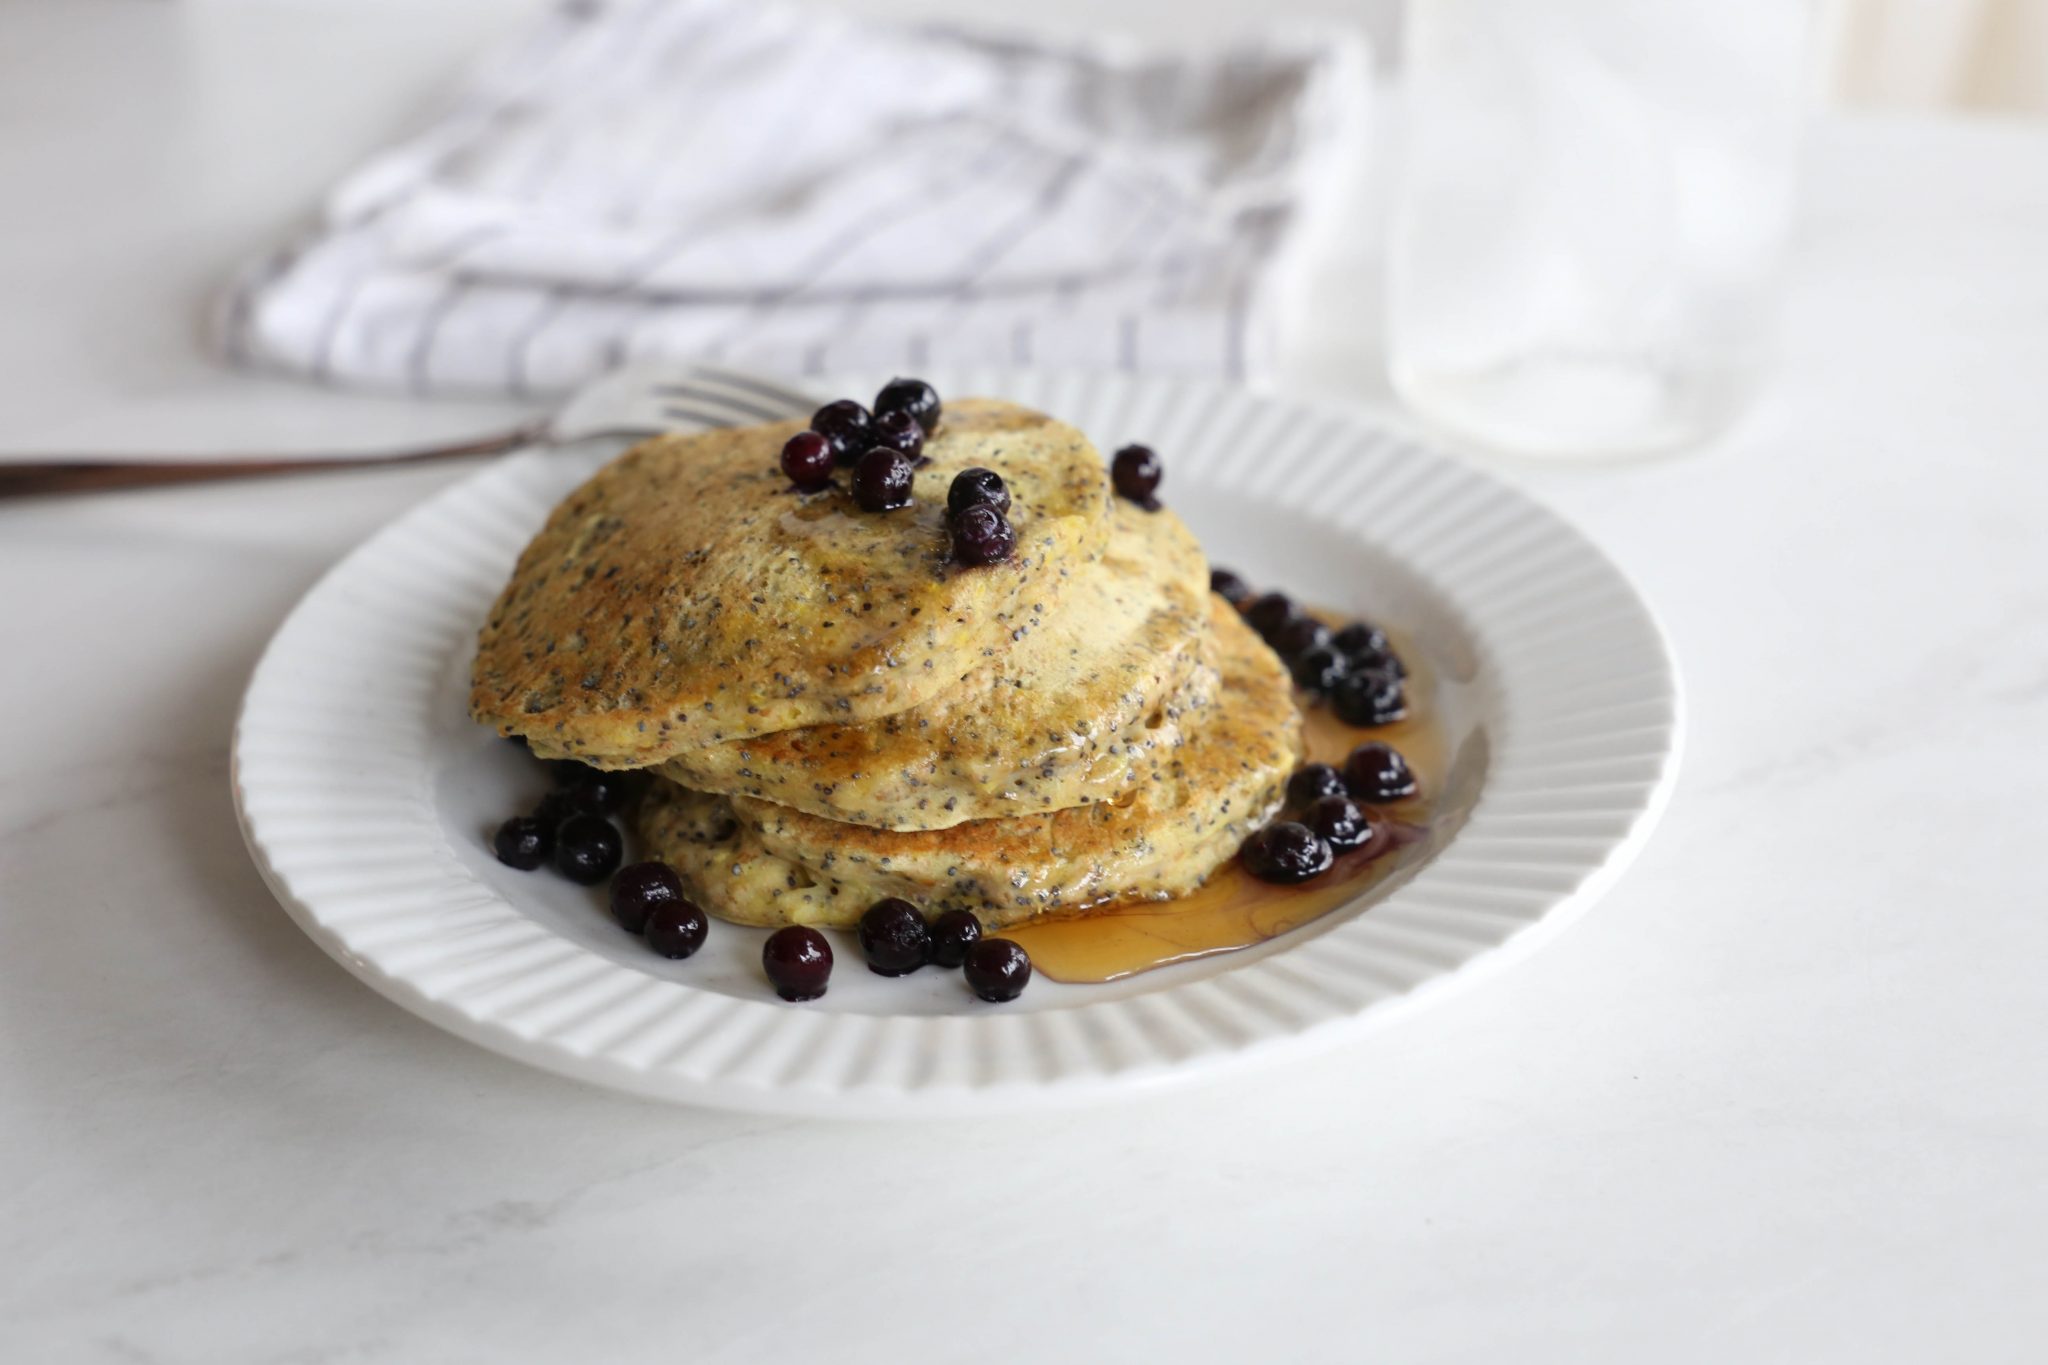
The verdict on Miss G’s first ever crispy rice treat? She LOVED it.

We all loved them in fact. They’re soft and gooey just like regular Rice Krispie treats, with a similar flavour that is just slightly more caramely.
The true determining factor of success? Brad {my sometimes picky husband who doesn’t always love the ‘weird food’ G and I cook} announcing that he likes them just as much as the classic variety, only to later decide that he thinks he likes them more. Score. ☺
Healthy Crisp Rice Treats
- 1/2 cup of organic brown rice syrup
- 1/2 cup of cashew butter (or your favourite nut butter)
- 1 tablespoon of pure maple syrup
- 1 tablespoon of pure vanilla
- 4 cups of organic sugar-free crispy brown rice cereal
Measure the brown rice syrup, nut butter, and maple syrup into a large pot. Warm over medium heat, stirring almost constantly. When the mixture is hot and liquidy (but not bubbling), add the vanilla, give it another quick stir, and remove the pot from the heat.
Add in the crispy rice cereal and mix well to ensure the cereal is evenly coated with the sticky mixture.
Dump the mixture into a parchment-lined baking pan or scoop into a greased muffin cups and press it down firmly. Pop the pan into the freezer for about 15 minutes to allow the treats to set.
Enjoy your much healthier crispy rice treats!
♥
Keep up with all the Mama.Papa.Bubba. fun, like us on Facebook here and find us on Instagram here.
 I’ve seen snow ice cream floating around the web a lot lately (like
  Here’s our line up of ingredients… Cream, vanilla almond milk, pure maple syrup, pure vanilla, and some really good cinnamon.
  Oh, and a bunch of this – light and fluffy freshly-fallen snow.
 To get us started, Gracen poured both the cream and vanilla almond milk into a large mixing bowl.
 Then she added some pure maple syrup…
 Some pure vanilla…
 And a few pinches of cinnamon.
 Then she stirred everything up.
 The next step involved adding the snow.
 The monkey requested a mitten in order to get the job done.
 With all of the ingredients added, it was time to mix, mix, mix.
 We found that alternating mixing with a sort of mashing motion worked really well and broke up the clumps at the same time. Here’s what our batch looked like once it was ready.
 To serve it, I added a little sprinkle of cinnamon (Miss G loves it and it has great health benefits, so we add it to a lot of things) and topped it with a pecan.
 Not only was it delish, but it was a really fun snowy day activity.
 Gracen and I whipped up one of our all time favourite treats this afternoon. Sadly, I can take ZERO credit for the amazingness that is this dish… It’s something my friend Lara made all the time (she even has a special dish!) while we were living in Kuwait and it was just too amazing not to steal and call my own (sorry, Lara!) It is seriously the easiest, yummiest {and naughtiest} appetizer ever. Bring it to a party and you will instantly win everyone over – I promise.
  Here’s the lineup of ingredients… A wedge of brie, garlic, and sun-dried tomatoes.
 First, remove most of the rind off of the top of the wedge.
 Cut the wedge into chunks in order to fit it snugly in the baking dish.
 Next, round up between 2 and 4 garlic cloves, depending on how garlicky you want your dish to be.
 Enlist your sous chef to peel them for you…
 And chop them up into small pieces.
 Sprinkle the garlic on top of the brie. Sneak a few pieces down along the sides too if you can.
 Next chop up a few big pinches of sun-dried tomatoes.
 Sprinkle them on top of the brie too.
 Pop the cheese into the oven and watch it melt into a delicious bowl of cheesy goodness.
 Remove from the oven when the cheese is bubbly and beginning to brown. Serve with crackers or fresh baguette rounds.
 Here are our ingredients… Whole wheat flour, plain organic yogurt, baking soda, baking powder, organic butter, honey, frozen raspberries, vanilla, and a lemon.
 We started by combining the dry ingredients.
 Then we added the butter and cut it into the flour mixture with a fork because I could not for the life of me find my pastry cutter (perhaps I owned one in Kuwait, but not in Canada? Hmmm…)
 Next, we added the frozen raspberries and lemon zest into the dry mixture and gently stirred them in.
  Then, in a separate bowl, we mixed the yogurt, honey, lemon juice, and vanilla together.
 Grae then poured the wet mixture into the dry mixture and gently stirred it until just combined.
 Afterwards, we plopped in onto a piece of parchment paper, kneaded the dough a few times, and shaped it into a circle about an inch thick.
 Our dough was pretty sticky at this point, and probably could have used a little extra flour, but we just went with it and cut it up into triangles.
 Then we carefully moved the scones onto a parchment-lined sheet, and popped them in the oven to bake.
 Voila! A delicious homemade snack or breakfast.
 I’m happy to say, our experiment was a success. Not only do we have trees sprinkled with pretty bird feeders (thus some very happy birds), but Gracen was able to do almost all of the steps on her own at our butcher block and there was no stove required.
 Here’s what we used for the project… Bird seed, gelatine, boiling water, straws cut into 2 inch pieces, some baker’s twine, and some cookie cutters and pancake moulds.
 We started off by emptying two packets (not boxes – the above photo is misleading) of plain gelatine into a very large mixing bowl.
 Then I carefully poured in a little bit of boiling water (this is one of the only jobs I did for the project).
 Gracen then stirred the mixture very gently until all of the gelatine was dissolved.
 Next, we measured out our bird seed. We used a “wild bird” variety, but I think pretty much any type would work as long as the seeds and bits are not too big – I think a finer blend works best in this case.
 Then Grae poured the bird seed into our gelatine/water mixture.
 We stirred it for a few minutes, making sure that all of the seeds were evenly coated and that there was no longer excess water at the bottom of the bowl.
 Next, we covered a tray in parchment paper and laid out our cookie cutters and moulds.
 Using a teaspoon, Grae filled each cookie cutter with seed, one by one.
 You want to make sure that they’re a little bit overfull, so be generous with the seed. (This recipe made these five feeders, plus a large bird seed “cupcake” too).
 Because the mixture gets really sticky, we covered the cookie cutters with a layer of parchment and Grae pressed the seeds down into the moulds.
 You want to make sure the seeds are packed very tightly – it’s part of what makes the feeders stay together well.
 Next, we took our straws and carefully inserted them into the cookie cutters, making sure to not place them too close to the edges. Once the straws were in the seed, we pressed the seeds down around them to make sure everything stayed tight.
 Next, we popped the entire tray into the fridge and let them set for a couple of hours before taking them out and letting them dry out on the counter. We left them for most of the evening, and before I went to bed for the night, I flipped them over so that the bottoms could dry out too. (It’s a bit awkward to flip them with the straw sticking out the way it is, but you could trim the straw if you liked.)
 The next morning, we gently popped the shapes out of their moulds.
 Then we plucked out the straws and made sure that the holes were clear all the way through.
 For the last step, we took some baker’s twine (ribbon or jute would be perfect too), put it through the holes, and knotted the tops. Voila! Pretty little feeders for the hungry birds in our yard.


 To set up a simple pomegranate play station for her, I sliced the pomegranate in half, cut a cross about an inch deep on the flat surface of one of the halves, and popped it in a big bowl of cool water for her. (Removing the seeds of a pomegranate in water is by far the best way to do it. Keeping the fruit submerged in water seems to loosen everything up a little, plus it prevents nasty pomegranate stains from occurring. )
 I also set out a little tray of “tools” which included a small bowl, a teaspoon, and a large slotted spoon.

 Without any direction or modelling, I asked her, “Do you want to play?” She of course let out an immediate “YES!” and jumped right in.
 Right away, she began pulling apart the peel and pulp, digging out the seeds (which are actually called ‘arils’, but who says that?) by scraping her finger along the membranes, and adding them to the small yellow bowl. (Keep in mind that she has watched me do this before.)
 And before long, she requested another small bowl for the “white yucky parts”.
  The other neat thing about taking apart pomegranates while they’re in water is that the seeds sink down to the bottom and the white membrane bits float to the top, making sorting the two very easy.
 After she’d realized this, Grae worked on removing the white bits with her slotted spoon for quite some time, but eventually retired the spoon and went straight to using her hands.
 And in the end, not only did we have a very happy {and speckled} little lady, but we also had a big bowl of pomegranate seeds just waiting to be eaten up. ☺
 But onto the recipe. Here’s what we use to make our overnight mango coconut chia pudding… Your choice of milk (coconut milk is especially delicious in this recipe), pure maple syrup, chia seeds, pure vanilla, unsweetened coconut, and a mango (not pictured because it isn’t needed until morning).
 I like to make this recipe in a mason jar because it seals well and I can give the jar a little shake every now and then, but any sort of bowl or container that has a lid will do.
  Then add the coconut…
 The maple syrup…
 And the vanilla.
 Give everything a stir…
 Pop the lid on and put the jar in the fridge. If you come back to the fridge again that night, give the jar a gentle shake to prevent clumping. If not, it’s not a big deal.
 When you wake up in the morning, retrieve your mason jar of pudding. It’ll be thick and creamy by now and will resemble the insides of a passionfruit. Grab a mango too. (Though mango / coconut is one of our favourite combinations, strawberries, bananas, and blueberries pair well with the coconut too.)
 Now peel and chop up your mango into small pieces…
 And add them to the jar.
 Mix everything together well.
 Breakfast is ready!
 This morning Grae and I woke up and decided on pancakes for breakfast. We were just about to gather our ingredients as the phone rang. As I snuck in a very quick conversation with my sister-in-law, Miss G got started without me apparently… Anyone up for cornmeal-cocoa-double-salt-tomato pancakes?
 Only I would try to amp up the nutritional value of bananas… Haha! I kid. (Kinda.) The truth is, Miss G has been on a
  Here’s the ingredient lineup… Bananas (ripe, but not overripe), roasted ground flax seed, and cinnamon.
  Start off by peeling the bananas and making sure all of the white stringy things are removed.
 Chop them into coins (maybe about a half inch thick?) and set them aside.
 Next, pour some roasted ground flax seed into a container with a lid (or a zip close bag).
 Enthusiastically dump some cinnamon in too.
 Put the lid on the container and give it a little shake.

 Place the lid on the container again and shake until all of the banana coins are well coated.
 Next, place the coated banana pieces onto a parchment-lined baking sheet.
 Place the tray in the freezer for at least an hour.
 Serve them frozen to your excited toddler and watch them disappear. (Without a word of a lie, Gracen gobbled up our entire batch – and that was after a full meal!)

 ‘Tis the season for all things pumpkin, so today Grae and I decided to experiment with making a healthy, but delicious, pumpkin treat. I must say, we were definitely ‘winging it’, but our version of pumpkin spice muffins turned out great! They’re soft and moist inside, full of flavour, and perfectly sweet. Not to mention, they contain no white flour, butter/margarine, or refined sugar. Yay for that.
 Here’s our line up of ingredients… Wholewheat flour, organic old-fashioned oats, ground flax seed, walnuts, pecans, baking powder, baking soda, cinnamon, nutmeg, ginger, pure organic pumpkin puree, grapeseed oil, organic eggs, pure maple syrup, and pure vanilla.
 Of course, having a sweet little wispy haired sous chef helps too.
 Start by putting the flour into a large mixing bowl.
 Add the oats and ground flax.
 Be sure to cram as many oats into your mouth as possible when no one’s looking.
 Next up, add the baking powder, baking soda, and spices.
 Give everything a good stir.
 In a separate bowl, pour in the pureed pumpkin.
 Add the maple syrup and vanilla…
 The grapeseed oil…
 And the eggs.
 Then give everything a good mix.
 Next, add the dry mixture into the wet one.
 Mix until just combined.
 Then add the nuts…
 And gently fold them into the batter.
 Prepare a muffin tin by lining it with silicone baking cups or a light layer of grapeseed oil.
 Fill the muffin cups almost to the top, but not quite, then pop them in the oven.
 Take them out once the tops are cracked and a toothpick comes out clean.
 Let them cool for a couple of minutes and serve to your very excited and very silly little munchkin.
 Here’s our line up of ingredients… Old-fashioned oats, pumpkin seeds, raisins, ‘just apples’ applesauce (we just used the store bought stuff this time around, but homemade would of course be better), ripe bananas, cinnamon, and organic coconut oil and vanilla (which somehow didn’t make it into the photo…)
 To start, my mini sous chef peeled our bananas and popped them into the food processor.
 Then she added a capful of pure vanilla…
 A generous amount of applesauce…
 Some cinnamon…
 And a dollop of coconut oil.
 Then we blended everything up until it was mostly smooth, with just a few little chunks.
 With our wet mixture transferred into a large mixing bowl, Grae added some organic old-fashioned oats…
 Some raw pumpkin seeds…
 And some raisins…
 And gave everything a good stir.
 The result was oats that were completely coated in the banana/applesauce mixture, but not ‘wet’ or batter-y (if that makes any sense).
 We then dropped large spoonfuls of the mixture onto a parchment-lined baking sheet, using the back of the spoon to shape them into little mounds, and popped them into the oven.
 Fifteen minutes later, out came these soft, moist little oatmeal mounds. Now… Do they taste like a real cookie? No. Do they taste like a healthy bowl of cinnamon oatmeal compacted into a portable little serving? Yes! And the best part is that they’re not at all crumbly. To the point where I let Grae snack on these while in the Ergo on our recent house hunting adventures because I knew they wouldn’t crumble all over our potential landlords’ floors… Win!
 Here are the ingredients for our go to dough, adapted from the lovely
  First, sprinkle the yeast over the warm water and set it aside.
 Next, add the flour…
 And the salt to the bowl of your electric mixer. (This could be done by hand too, of course.)
 Put the paddle attachment on your machine…
 And give the dry ingredients a quick mix.
 Next, measure out the olive oil…
 And slowly pour it into the bowl while mixing.
 Next, give the yeast and water a quick stir…
 And with the mixer on, slowly add the yeast water to the flour/salt/oil mixture. Mix on low until the dough starts to come together in a sticky mass.
 Prepare a separate large mixing bowl by drizzling it with olive oil.
 Use your hands to pull the edges of the dough downwards and shape it into a ball. Place your dough in the bowl and gently toss it to coat it in olive oil.
 Now cover your bowl tightly with plastic wrap. It can be put in the fridge and stored for 3 or 4 days, or it can be used later on in the day. If we’re making pizza the same night, we just leave ours on the counter.
  Now, for my favourite… A very simple roasted veggie pizza. Chop up a bunch of vegetables of your choice (these are my favourites), drizzle them with a little bit of olive oil, and put them in a 400 oven for about 10 minutes.
 While they roast, grate some cheese (we use fresh mozzarella or, like tonight, an all-natural extra sharp cheddar) and slice some fresh mushrooms.
 Take your veggies out of the oven when they’re slightly soft and just beginning to turn golden in some spots.
 With your toppings ready, it’s time to retrieve the dough you made earlier in the day. By now, it should be well over double its original size and soft and spongy to the touch.
 Prepare a baking pan by lining it with parchment paper and sprinkling on little cornmeal (this is completely optional, but it does add a nice texture).
 Using 1/2 of the dough, press it down into a thin rectangular shape. Don’t worry too much about holes – just patch them up as you go along.
 For this pizza, we often use a fresh pesto sauce, which is really yummy. Equally delicious, however, is just a drizzle of olive oil and a tiny sprinkle of sea salt.
 Next, arrange the veggies on the dough {stuffing as many of the red peppers into your mouth as possible, if you’re like Gracen}.
 Top with cheese (adding some feta into the mix is really good too!} and pop it into the oven.
 Remove when the cheese is bubbly and the crust is golden brown and let cool for a few minutes.
 Now onto the one Brad prefers… A BBQ chicken pizza. Tonight we used roasted chicken breasts cut into small chunks, raw diced orange pepper and sweet onion, and some white kernel corn (adding jalapeños is really tasty too).
 Prepare your pan and dough the same way as before, then spread a thin layer of BBQ sauce onto the uncooked crust (this is one of Miss G’s favourite jobs).
 Add the toppings…
 Cover with cheese…
 And bake ’til golden.


 Now although we could have just mixed up our chopped fruit and eaten it as fruit salad, everything is better on skewers, right? Not to mention, making them was the best part – just look at that proud little face. Plus, they’d be great finger snacks for a play date or party… Or just as dessert for a mama and a babe. ☺