Mama.Papa.Bubba. -
Menu
Skip to content
  • SHOP
  • preemie
  • baby
  • play
  • craft
  • learn
  • cook
  • DIY
  • kuwait
  • vancouver
  • contact
  • about

Tag Archives: simple play

Mini Racer Wall Ramps

5 / 21 / 185 / 22 / 18

Mini Racer Wall Ramps | Mama Papa Bubba

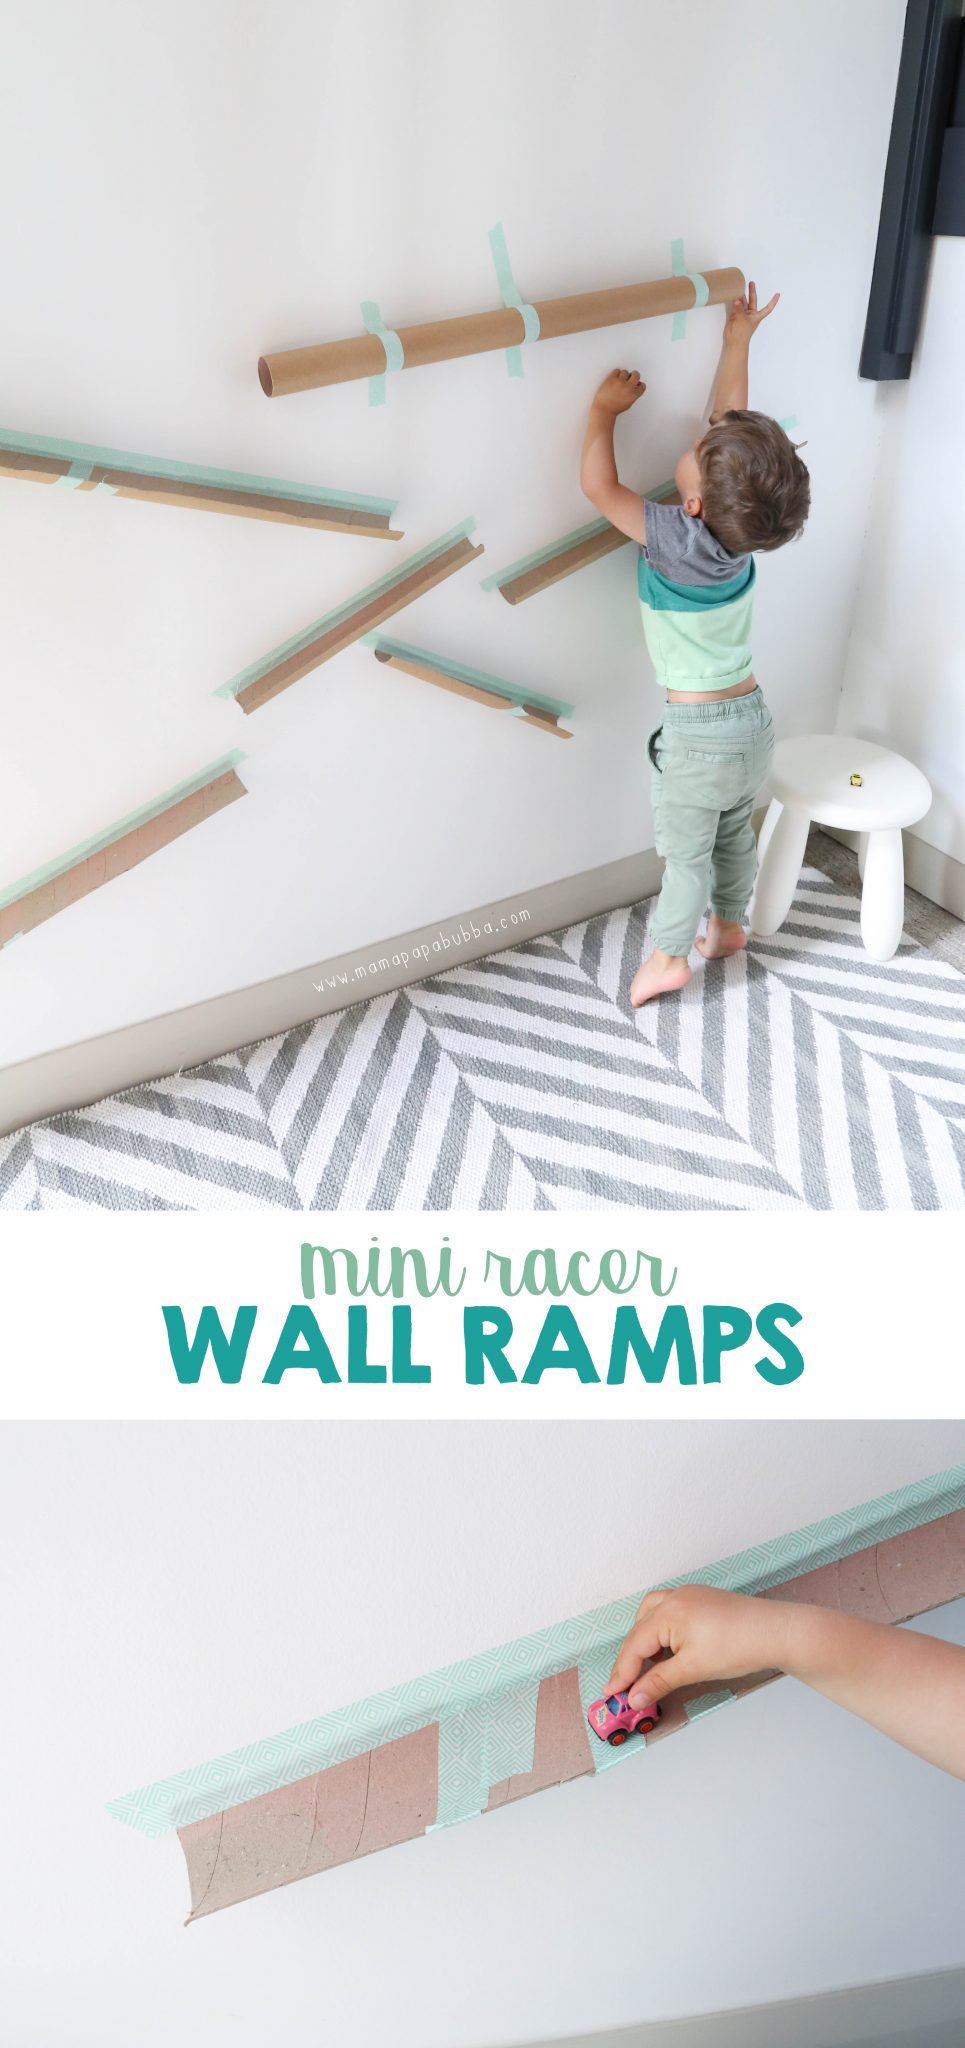
This boy and his cars.  He just loves them.  Throw in a ramp and he’s pleased as punch, so imagine how thrilled he was about these mini racer wall ramps we put up on our landing today! {SOO thrilled.}

IMG 3759{this post contains affiliate links}

It’s incredibly easy, but here’s what we used to create our mini racer wall ramps:

  • several mini racers (anyone else remember these from their childhood?)
  • several cardboard tubes (we repurposed most of ours from our car ramp sensory bin)
  • a roll of painter’s tape (though we used this decorative Scotch masking tape)
  • a pair of scissors

IMG 3762

Now because most all of our paper rolls were the ones we used for our car ramp sensory bin, we didn’t have to cut ours in half lengthwise, but if you do have to do that part, it does take a little bit of effort… Sharp, longer scissors are key in  my opinion.  With your paper tubes cut, it’s as easy as running a long piece of tape down one edge and sticking it to the wall at an angle.

IMG 3761

There’s really no right or wrong way to do this…  You can have the ramps work together or separately – up to you.  I decided to start at the top and got Sam to stand near the wall to judge how high we could go with the first ramp.  I thought it would be fun to make the ramps work together if possible, so with each addition, I got him to send one of his mini racers down and then positioned the next ramp so it would catch the car once it launched off the first.

IMG 3764

Once we had all of the previously cut ramps up, I asked Sam what he’d like to do with our one new paper roll –  cut it and make two new ramps or keep it as is and make one tunnel and he was absolutely certain that one tunnel was the way to go, so we hung it as is.

IMG 3767

And then we were off!

IMG 3768

He’d simply place a mini racer, wheels down, at the top of the tunnel or one of the ramps and then watch it go.

IMG 3766

The transition from one ramp to the next didn’t always work out perfectly, but he didn’t mind one bit.  If a car got stuck sideways or wheels up, he’d go help it and then step back to continue watching it race down.

IMG 3779

Part way through we added a basket to catch the cars that were flying off of the last ramp and crashing into our window, which added a fun element.

IMG 3777

I don’t know how long this will stay up on our wall for, but it’s not going anywhere anytime soon.

Mini Racer Wall Ramps | Mama.Papa.Bubba. Blog

Are you following us on social media?

Find us on: Facebook  |  Instagram  |  Pinterest  |  Twitter

We’d love to have you!

1 Comment

{Simple Fun} Sink Play

7 / 16 / 131 / 19 / 14

Simple Fun Sink Play | Mama Papa Bubba

I forgot how trying and time consuming this whole Kuwait documentation process is… We’re currently in the throws of police clearances, medical tests,  notarizations, and phone calls, which isn’t all that fun.  Add in a very busy, wanting-to-be-on-the-go toddler, and it’s that much more difficult.   Today, between Embassy calls and trips to the police station and medical lab, I pulled out one of my favourite tried and true ways to keep Miss G happily engaged while we got a few things done – a sink full of water.  It’s a super simple invitation to play and is a hit every single time.  Today it involved a couple of drops of blue/green food colouring, a couple of rocks, some glass gems, and a bowl of plastic creepy crawlies.  That’s it.  We set it up together, she pulled her little Ikea stool up to the bathroom sink, and the play began.

IMG 0262

The best part is that it’s not at all limited to a bug swamp.  In fact, the possibilities are endless!  Here are a few of our favourite sink play ideas…

1.  Baby bath – Grab a plastic doll, a wash cloth and/or sponge, some watered down shampoo or bubble bath,and a small towel and the baby doll will be cleaner than ever.  For extra fun, add in a toothbrush and hairbrush for when bath time is done.

2. Ocean – Add a couple of drops of blue food colouring to the water, then add some rocks, seashells, driftwood pieces and plastic ocean creatures.  Instant fun!

3. Floating building station – Place several pool noodle pieces (sliced about an inch thick) in the sink and let your little one experiment with building floating structures – towers, pyramids, ‘trains’ – anything goes!

♥

For extra fun, like us on Facebook here and find us on Instagram here. 

3 Comments

iPhoneography // Simple Rice Tray Play

6 / 9 / 139 / 12 / 13

Simple Rice Tray Play | Mama Papa Bubba

This morning I had a little bit of housework to do and Miss G suggested that she’d play with some freshly coloured rice I’d made while I got my clean on.  It’d been a quite a while since she’d last opted to play with a rice bin or tray, so I was happy to hear that she was still excited about such a simple sensory activity.  While I put the rice into small containers, she picked out items she wanted to use while playing with it.  She gathered up a divided plate,  heart-shaped ice cube tray,  cup, scoop, bowl, and funnel and we laid everything down on a large blanket in the living room.

Photo copy 2

She got to playing right away and immediately mixed the different colours in the bowl while using the funnel.  Watching the individual colours mix into speckled sea of rainbow colours is always so much fun (and so is crazy bed head ☺).

Photo copy

There was a lot of mixing, dumping, and pouring, but the favourite of the morning was definitely this little scoop paired with the funnel.  She quickly learned that using the two together was a great way to fill the little heart-shaped ice moulds and we later on we even experimented with extending our funnel using a bubble tea straw.

After she was through playing, we scooped up the rice, added it to the bin of coloured rice we keep in the solarium, and shook the remaining grains off of the blanket outside.  Easy, simple fun.

To see how we make our coloured rice, click here.

♥

For extra fun, like us on Facebook here and find us on Instagram here. 

2 Comments

Simple Outdoor Fun: Painting Sidewalk Chalk Shapes With Water

5 / 5 / 136 / 2 / 13

Painting Sidewalk Chalk Shapes With Water | Mama Papa BubbaWhile we’ve done plenty of regular mess-free painting on our sidewalks and fence, today Gracen asked if I’d draw her something to paint.  While maybe not as open-ended as I’d usually aim for, I do find that sometimes she prefers having a jumping off point, so I drew an assortment of shapes on the ground using sidewalk chalk.  The activity was actually perfect for her new found interest of colouring in the lines, and when the water dried, it left our cement pad covered in beautiful, watercolour-esque shapes.  So simple, but she enjoyed so much that she’s already asked to do it again.

♥ 

For extra fun, like us on Facebook here and find us on Instagram here.


2 Comments

Bubble Wrap Exploration

4 / 16 / 134 / 19 / 13

Bubble Wrap Exploration | Mama Papa BubbaSometimes, or better yet, many times, it’s the simple things.  This afternoon, my freshly napped bubba woke up to discover a new package by our door.  She excitedly asked to open it, not caring about which actual item may be inside, but rather which packing material was surrounding the item (both bubble wrap and packing peanuts are huge in our house).  To her satisfaction, she found a fresh new sheet of bubble wrap inside, just waiting to be enjoyed.

IMG 8090After a good long time poking at it with her little fingers, I asked, “Are there any other ways we could pop the bubbles?”  This is what she came up with…

Elbows and blocksFirst came stomping on it with her feet, then she moved to digging her elbows into it and stabbing it with a wooden block…

Bead and TwistingNext she tried rolling beads on it (which actually worked fabulously when a good amount of pressure was applied) and twisting it forcefully.

IMG 8102Lastly was placing a borrowed book (sorry library!) on top of the bubble wrap and standing on it.  The good news is that this didn’t work very well at all, so it was short-lived.  

This much fun from a piece of bubble wrap is a wonderful thing.  ☺

♥ 

For extra fun, like us on Facebook here and find us on Instagram here. 


1 Comment

Indoor Balloon Badminton

4 / 7 / 134 / 10 / 13

Indoor Balloon BadmintonThis may very well be the easiest activity to throw together ever, but Gracen thoroughly enjoyed it.  All you need is a couple of paper plates (ours are made of styrofoam, which I absolutely despise, but they, along with many other party supplies, were in the cupboard when we moved into this house, so I don’t feel quite as badly about using them), 2 large popsicle sticks, some masking tape, and a balloon.  To create simple racquets, all you have to do is tape popsicle stick handles onto the bottom sides of the plates… Then you’re ready to play!  Partner pass, keep it up, and distance contests are all fun.

IMG 7731This is a perfect activity for a rainy day and great for helping your toddler burn off some energy if getting outside isn’t an option.  The other perk is that it is relatively quiet (especially when played independently), so it could make a good quiet activity for an older sibling whose little brother or sister is napping.

♥

For extra fun, like us on Facebook here and find us on Instagram here. 

1 Comment

Impromptu Drum Circle

2 / 17 / 139 / 1 / 13

Household Object Drum Circle

Today as I was organizing the mess of mason jars in our hallway catchall closet, my curious Miss G spied some old wine gift tubes in the bottom.  Naturally, she yanked them out and began drumming on them.

IMG 5665

Before long, we’d yanked out all kinds of pots, containers, and bowls out and created an impromptu drum circle for the budding musician in our family.

IMG 5669

Maracas, rhythm sticks, wooden spoons, a xylophone, and background music were added in along the way too.

IMG 5667

Perhaps not the most neighbour-friendly activity if you live in a small apartment or have basement tenants below you (ours weren’t home), but great fun for a rainy day.

Here’s our little musician jamming out…

♥

For extra fun, like us on Facebook here and find us on Instagram here. 

3 Comments

Painter’s Tape Jump Boxes

11 / 27 / 1212 / 1 / 12

Painter s Tape Jump BoxesWhile we had our painter’s tape out for our indoor roadway, we also lined our hallway with this… A little series of jump boxes.  Grae adores the jump mats they have at our Strong Start program, so she’s very pleased to be able to jump her way down our hallway now too.

IMG 2955IMG 2940IMG 2950♥

To keep up with all the Mama.Papa.Bubba. fun, like us on Facebook here and find us on Instagram here.

2 Comments

Simple Play: Pillow Pass

11 / 17 / 1211 / 18 / 12

This is the SIMPLEST little game ever, but Miss G loves it.  And we’re talking loves it so much that she squeals and shrieks the entire time we play and shouts “More pillow pass, Mama!” whenever she thinks the game is going to end.

IMG 2440IMG 2442IMG 2444IMG 2446Basically, all we do is toss a pillow back and forth.  Seriously, that’s it. A pillow is easier to catch than a ball, it’s as soft as can be (even when you get whacked in the head repeatedly), and apparently throwing a pillow around is  hilarious.  

♥

2 Comments

Pomegranate Play

11 / 7 / 1211 / 8 / 12

Pomegranate Play for Toddlers

It’s no secret that I pretty much love Jackie of Happy Hooligans and all of her awesome play ideas.  So last week, when she posted “Guess what we ripped into and investigated at lunch today! Yum!” along with a photo of a pomegranate on her Facebook page,  the first thing that came to mind was ‘Why have I never thought of that?’  I’ve always been a huge fan of pomegranates (I still remember what a treat it was to curl up on our black leather couch as a little girl with a giant bowl, a dark towel, and half a pomegranate) and Gracen loves them too, but I’ve never thought to let her play with one before eating it… Silly me! Knowing how much fun she had with our recent pumpkin seed sorting tray (which can be done with almost any squash, by the way), I knew she’d love it. 

IMG 1904IMG 1907IMG 1909IMG 1914To set up a simple pomegranate play station for her, I sliced the pomegranate in half, cut a cross about an inch deep on the flat surface of one of the halves, and popped it in a big bowl of cool water for her.  (Removing the seeds of a pomegranate in water is by far the best way to do it.  Keeping the fruit submerged in water seems to loosen everything up a little, plus it prevents nasty pomegranate stains from occurring. )

IMG 1911I also set out a little tray of “tools” which included a small bowl, a teaspoon, and a large slotted spoon.

IMG 1915IMG 1916IMG 1920Without any direction or modelling, I asked her, “Do you want to play?”  She of course let out an immediate “YES!” and jumped right in.

IMG 1929Right away, she began pulling apart the peel and pulp, digging out the seeds (which are actually called ‘arils’, but who says that?) by scraping her finger along the membranes, and adding them to the small yellow bowl. (Keep in mind that she has watched me do this before.)

IMG 1921IMG 1935And before long, she requested another small bowl for the “white yucky parts”. 

IMG 1940The other neat thing about taking apart pomegranates while they’re in water is that the seeds sink down to the bottom and the white membrane bits float to the top, making sorting the two very easy.

IMG 1941After she’d realized this, Grae worked on removing the white bits with her slotted spoon for quite some time, but eventually retired the spoon and went straight to using her hands.

Gracen absolutely loved this very simple sorting activity and it kept her happily engaged for about 40 to 45 minutes before it was time for dinner.

IMG 1934And in the end, not only did we have a very happy {and speckled} little lady, but we also had a big bowl of pomegranate seeds just waiting to be eaten up. ☺

♥

 
8 Comments

Water Pouring Station

10 / 26 / 121 / 19 / 14

Water Pouring Station

After our most recent tea party with a pot filled with “tea”, I realized that I haven’t really given Gracen many opportunities to practice her pouring skills (with the exception of cooking and sensory bin/bath tub play, I guess).  So tonight, just before I began making dinner, I set up a little water pouring station for her.  All it took was a towel on the floor, a plastic serving tray, some measuring cups/jars/pitchers, and some coloured water. Gracen was thrilled, of course.

IMG 1030

IMG 1032

IMG 1034

IMG 1035

IMG 1036

IMG 1039

IMG 1040

IMG 1043

IMG 1046

IMG 1048

She transferred water from one container to another, watching the colours change and muddle for the better part of an hour, which was the perfect amount of time for me to prep dinner, clean the kitchen and wash a big load of dishes. Doesn’t get much better than that. Afterwards, clean up was a breeze.  The towel went into the wash, the dishes got rinsed, and that was that… Another ‘Mama needs to make dinner’ activity to add to my {mental} list. ☺

♥

If you don’t feel comfortable letting your little one handle glass jars and measuring cups, you could always replace them with plastic ones instead.  Switching out the water for dry goods like lentils, beans, and popping corn would be fun too!


10 Comments

Egg Carton Button Sorting

9 / 28 / 129 / 29 / 13

Egg Carton Button Sorting

Matching is HUGE in our house right now.  Coordinating is simply not good enough for Miss G anymore.  Everything. must. match.  To the point where she will pick a treat (organic fruit leather) with a blue package while grocery shopping because she is wearing blue pants, cutting her carrots requires an orange knife, and wearing white socks isn’t happening if there is no other white in the outfit.  So when I came across an empty egg carton during my usual nap time house cleaning, I decided to use it to put together a little matching game rather than recycling it.

IMG 0032

I had everything else I needed on hand…  Acrylic paints in primary colours, plus white and black, a paintbrush, an old rag, and some water.

IMG 0033

IMG 0035

I simply painted each egg spot by swirling the paint up from the base to the top edge.

IMG 0037

I made sure to include the basic rainbow colours, plus black, white, and grey, and of course aqua because, well… it’s the best colour ever.

IMG 0039

Afterwards, I gave the inside of the lid a quick coat of white paint.

IMG 0043

Now if I’m being honest, Gracen awoke from her nap before the paint was fully dry and she was so excited to play her new game that we took it to the bathroom and used the blowdryer on it.

When it was fully dry, I poured a bunch of buttons in the lid, removed the clear ones, and asked, “Do you want to play?”

IMG 0048

With a prompt “Yes!” and zero direction, she got busy matching the buttons to the colours painted in the cups.

IMG 0049

Grae loves playing and the nice thing about this little game is that when she’s finished, she just closes it up and everything is contained and ready for next time.

♥

8 Comments

DIY Velcro Building Sticks

9 / 9 / 126 / 11 / 14

IMG 9497

The three of us were sitting down together today and I yanked out these two supplies for a little activity I’ve had in mind for a long while now.

IMG 9498

I originally saw these velcro building sticks at Tot Treasures and loved the simplicity of them.

IMG 9500

With our sticky velcro dots attached to each side and firmly pressed down, we were ready to try them out.

IMG 9502

We begun attaching them to one another and quickly realized that they would be 10 times more fun with velcro dots on both sides of the sticks (more dots on our list for next shopping trip!), but Grae didn’t seem to mind.

IMG 9504

Her favourite? Making ‘snakes’ and ‘zigzags’.

♥

5 Comments

Simple Fun: Colour Sorting Game

8 / 28 / 121 / 5 / 14

Simple Colour Sorting Activity with a Melissa & Doug Box | Mama.Papa.Bubba.

This morning Miss G found a little wooden Melissa & Doug box {that used to house her alphabet magnets}, brought it to me, and asked, “Play game?”  Ummmm… Okay.  I was certainly not going to turn away that sweet little face, so I had to think on my toes.

IMG 8999

The two compartments of course lead to a sorting activity of some sort, and the first thing that popped into my head was colours.

IMG 9000

I grabbed two pieces of coloured paper, cut them {very roughly} to fit inside the compartments, and asked Grae if she wanted to help me find little things in pinks and yellows.

IMG 9001

Of course she was more than game, so we went around the house collecting things and deciding whether or not they were too big. This is what we came up with.

IMG 9004

Grae needed no explanation.  I simply said, “Do you want to play?” and off she went.

IMG 9006

I did realize part way into our collecting that the activity wouldn’t last long, but we had already started and it’s not like it was a huge time investment, so we continued along our way.  I wasnt timing, but the game probably lasted all of 60 seconds from start to finish.  The good news is that Grae seemed to enjoy herself and was happy to take everything out, mix it up, and play again and again.

Next time, if we wanted to get more ‘bang for our buck’, we could easily use two more similar colours (aqua and blue, grey and black, or something similar) or try sorting based on something different all together like circles and squares, wood and plastic, or tall and short.


Here’s a little video of Grae hard at play multiple rounds in:

♥


Leave a comment

Simple Play: Stacking O’s on Skewers

8 / 19 / 121 / 5 / 14

Stacking O's on Skewers | Mama.Papa.Bubba.When I stumbled across this blog the other day and saw this activity,  I knew I wanted to try it with Miss G.  Already having all of the required materials on hand, we gave it a go this afternoon.

IMG 8584

While the original idea partners o-shaped cereal with play dough and uncooked spaghetti, I replaced the play dough with half of an apple and the spaghetti with bamboo skewers (you’ll see why in just a minute).

IMG 8585

To get started, we put our apple, cut side down, on a large plate and poked the bamboo skewers into it at different angles.  Gracen helped me with this part and it was actually very doable for her.  This was part of the reason I used skewers instead of spaghetti.  Being that spaghetti is so thin and fragile, I knew it wouldn’t last through set up, let alone play, with my enthusiastic little lady.

IMG 8586

With our “porcupine” ready to go, I gave Miss G a small bowl of o-shaped cereal, and let the threading and stacking begin.

IMG 8591

Gracen really got into this activity and was truly having a blast stacking O’s on skewers.

IMG 8593

This best part is that not only is it great fine motor practice, but this activity is also a great counting and concentration activity too.

IMG 8594

Of course, little ones don’t realize all that.  They just think they’re playing a game and having fun.

IMG 8596

Grae was actually so into the activity that she wasn’t really interested in eating her o’s, which I thought for sure she would be.

IMG 8599

The perk to using an apple (or any other edible anchor) is that if/when the eating stage happens, you don’t have to worry about your little one eating o’s encrusted with play dough.

IMG 8604

Part way through, Grae realized that the o’s were sliding down the skewers and started saying, “Wheeee!” each time she’d send one down their bamboo slide.  Too funny.

Here’s a video of Gracen hard at play…

♥
For more fun not found on the blog, join us on Facebook or follow us on Instagram.
2 Comments

Posts navigation

1 2 Next Page

find us here

  • Facebook
  • Instagram
  • Pinterest
  • Twitter
  • Email

looking for something?

want our posts to your inbox?

popular posts

  • BC Summer Family Fun
    BC Summer Family Fun
  • Make Your Own Surprise Boxes
    Make Your Own Surprise Boxes
  • High School or Homeschool?
    High School or Homeschool?
  • Daily Reflection Journal for Kids and Tweens
    Daily Reflection Journal for Kids and Tweens
  • 3D Paper Bag Snowflakes
    3D Paper Bag Snowflakes
  • Things to Listen to While Road Tripping with Kids
    Things to Listen to While Road Tripping with Kids
  • Dear Dad Printable Book
    Dear Dad Printable Book
  • The Best Tips for Taking Road Trips With Kids (& a GIVEAWAY!)
    The Best Tips for Taking Road Trips With Kids (& a GIVEAWAY!)
  • Easy DIY Outdoor Skating Rink
    Easy DIY Outdoor Skating Rink
  • Small Shop Gift Guide
    Small Shop Gift Guide

archives

Site made with ♥ by Angie Makes
Angie Makes Feminine WordPress Themes