Mama.Papa.Bubba. -
Menu
Skip to content
  • SHOP
  • preemie
  • baby
  • play
  • craft
  • learn
  • cook
  • DIY
  • kuwait
  • vancouver
  • contact
  • about

Tag Archives: indoor fun

Handprint Spiders & Golf Ball Painted Webs

10 / 23 / 129 / 17 / 13

Today Gracen and I did one of our favourite things… We had a little mama and babe crafternoon.  A Halloween crafternoon to be exact!

Handprint Spider  Golf Ball Painted Web

This is by no means a new idea, and it’s nothing fancy, but it is something I’ve always enjoyed doing with my kindergarten students.  It’s fun, messy, and personalized with wee little handprints.  Perfect for Halloween cards for grandparents, teachers, or a special friend. Here’s a quick run down of how Gracen created this little masterpiece.

IMG 0856

First, start off by drawing a large asterisk on a piece of black construction paper or card stock (we use a hand over hand technique for jobs like this).

IMG 0857

Next, connect the tips of the asterisk with concave lines in order to create a web shape.

IMG 0858

Then, cut out the web. (This is tricky for little hands.  Gracen tried, but our poster board is was so thick that it was next to impossible for her… This may be more of an adult helper sort of job.)

IMG 0861

Place a small roll of tape in the centre of your web.

IMG 0863

Tape the web down in the centre of a box lid, baking pan, or plastic  paper tray.

IMG 0865

Next, put some white paint in a small bowl or container and plop a {very scuffed} golf ball, bouncy ball, or large marble inside. (While I find golf balls work best because they’re big and heavy, marbles and bouncy balls make a more solid, web-like lines.)

IMG 0866

Shake and swirl the container so that the golf ball is well coated with paint.

IMG 0868

Next, gently tip your golf ball out of the container and onto the web.

IMG 0871

Swirl and roll the paint-coated ball over the black paper web by tipping the tray back and forth.

IMG 0875

When it’s sufficiently spider web-y, remove the paper from the tray and set it aside to dry.

IMG 0876

Now for the spider…  Gather up some brightly coloured paper, black paint, and a foam brush.

IMG 0877

Using a foam brush, paint a good, thick layer of black paint on your little one’s palm and fingers (not the thumb).

IMG 0880

Help your little one press their hand on the paper a couple of times to create two spider bodies and half of the needed legs.  Allow the prints to dry for a couple of minutes while you wash hands.

IMG 0881

Next, rotate the page so that the fingers are pointed downwards.

IMG 0882

This time around, paint just the four fingers of your little one’s hand. (I like to use the opposite hand for this part so that the fingers are angled the same way, but that’s just the crazy in me. ☺)

IMG 0884

Stamp them on the other side of the palm print in order to complete the spider’s body.

IMG 0886
IMG 0890
When the paint is dry, attach some googly eyes to the spider’s body using white craft glue.
IMG 0895
Then, cut the spiders out, leaving a small border of coloured paper around the edges.
IMG 0901
Attach the spider to the web with glue or tape, or if you want the spider to have a little wiggle to it, glue a small pompom in between the web and spider.  And voila… All done!
And if handprints are still too tricky for your little one, here’s what we did last year using a footprint instead:
IMG 0898
♥
11 Comments

Heart Stamping with Paper Rolls

10 / 17 / 1210 / 17 / 13

For one reason or another, I began saving toilet paper rolls a while back. (Don’t ask me why, because I don’t remember. Probably something Pinterest related?) So with a collection of 10 or more paper rolls just sitting around, I decided it was time to do something with them.  I don’t know how I came up with the idea for this project actually…  Maybe I’ve seen it somewhere before? I don’t think so, but it’s certainly a possibility given my tendency to snoop around the internet in the wee hours of the morning.  Either way, I’m probably not the first person in the world to think of using empty toilet paper rolls to create heart-shaped stamps, but since I’ve scoured the web and I can’t find paper roll heart stamps anywhere else on the internet, maybe I’m the first to post about it?

(Disclaimer: While I wouldn’t have my students bring in tp rolls to use for crafts in my classroom, I’m {semi} okay with using rolls from our house in our house.  If you’ve read the same article I read as a beginning teacher about tp rolls being covered in fece particles, you can always opt for paper towel rolls, craft paper rolls, or wrapping paper rolls instead. ☺)

IMG 0699

To get started, you’ll need two things: paper tubes and some rubber bands.

IMG 0700

First, flatten your paper tube and press down along the two creases.

IMG 0701

Next, invert one of the creases in order to begin creating a heart shape.

IMG 0703

Play with the shape of the heart by squeezing the tube until you’re happy with it.

IMG 0704

In order to help the heart keep its shape, wrap an elastic band around the tube once or twice.

IMG 0705

Make one heart stamp for each colour of paint you intend to use.

IMG 0709

Lastly, pour out a few dollops of paint (we used crafter’s acrylic) and place one stamp in each paint puddle.

IMG 0719

IMG 0715

Then set your wee one loose!

IMG 0723

We started on the easel, and ended up on the floor using the stamps to make some homemade wrapping paper, but the stamps would also be perfect for making beautiful homemade cards or some art to hang in your little one’s room.

♥

19 Comments

Autumn Nature Shelf

10 / 9 / 1210 / 9 / 12

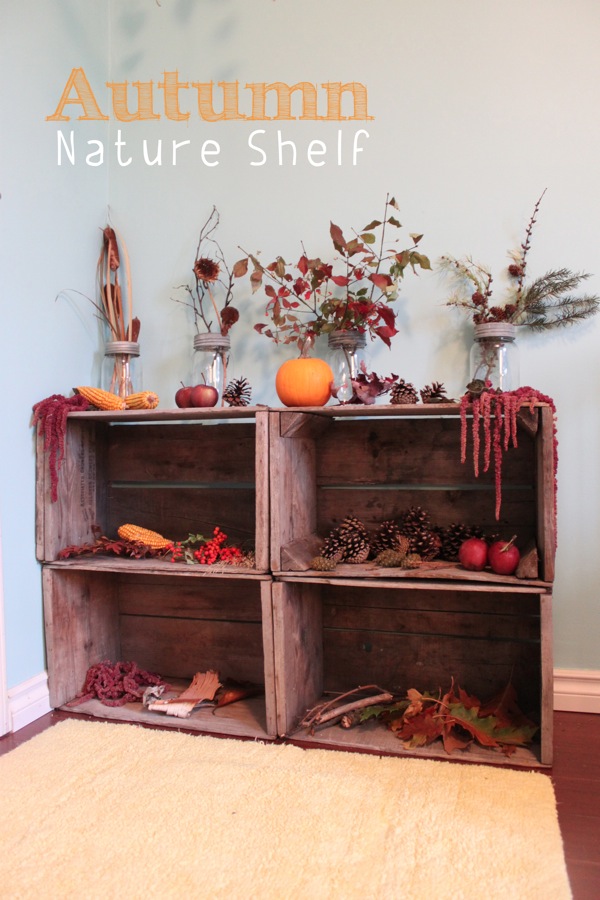
Autumn Nature ShelfOver the course of the last week, Gracen has been very into collecting “autumn sings (things)”.  At first, I thought we’d use the items to make a couple of art projects and a sensory bin (which we did), but the collection grew so quickly and became so diverse that I decided a special area to display and admire her beautiful nature items was needed.

IMG 0349So this morning, we started out by taking down Grae’s beloved {pretend play} frozen yogurt shop and making room for a new nature display.  At first, I thought we’d use the same little table we had used for the shop, but just as I was thinking it would be nice to have something more like a long skinny coffee table, these vintage apple crates came to mind (they are actually the very boxes Grandma Charlotte’s family received apples in when she was a little girl!) They couldn’t have fit the space better and not only does their rustic charm suit a nature table perfectly, but when stacked on their sides, they provide extra storage space by turning into shelves.

IMG 0354Grae and I started emptying our bags and filling up the shelves (being the little organizer she is, she of course wanted all similar items together, so I was very lucky to be granted permission to split up the apples/corn/pinecones into a couple of different areas).  As she started to try and stand her tree branches upright along the wall, I realized that Great Great Grandma Amy’s vintage mason jars would display them beautifully.

IMG 0378IMG 0377IMG 0379Our items came from a variety of spots… Most of the leaves, branches, and twigs were found while walking around visiting parks in our neighbourhood in Vancouver.  The baby pumpkin and dried corn were found on our most recent trip to Davison Orchards. The pinecones were picked in Grandma Charlotte and Poppop’s front yard, and the dried flowers and berry bunches were found in the back.  Grandma Charlotte and Grae retrieved the cat tails and birch bark while out on a walk, and the new apples were snagged from a big box in GC and Poppop’s garage. ☺

IMG 0374When we were all done emptying and arranging, the end result was a cute little autumn-inspired corner in G’s room where she is free to explore nature at any time.

IMG 0363IMG 0366So far, she seems to enjoy rearranging her items and reading in front of the shelf most.

Knowing our little nature lover, I’m thinking this collection will continue to grow as the season progresses.  And we just may have to start fresh and create a new one come winter…

♥

I know not everyone would feel comfortable having glass jars and/or inedible berries within their little one(s) reach.  Please only do what you are comfortable with.

10 Comments

Painting with Cookie Cutters

10 / 4 / 1210 / 7 / 12

At one of Gracen’s recent Strong Start classes, Teacher Sonika had a painting station set up that used cookie cutters in place of paintbrushes or fingers.  Gracen really enjoyed dipping the different shaped cookie cutters into the paints and then onto her paper, so today we decided to try the same activity at home.  

IMG 0280Grae chose to use our alphabet cutters, so to have a manageable number of cutters to work with, we picked out just the letters in her name.  We lined the tray of her beautiful easel (a special Christmas present from her Uncle Gary) with foil, mixed up some paint in colours of her choosing, and pulled down some paper for her to stamp.

IMG 0282IMG 0285

IMG 0287She knew exactly what do to, and got to work dipping and stamping her letters right away.

IMG 0292She worked on the bottom half of her art piece for a while, then requested a chair so she could stamp the top half of her paper too.

IMG 0294This is her masterpiece once declared finished.

IMG 0297The other bonus? Clean up was a breeze. I filled a sink full of warm, soapy water, Grae walked each cutter to the kitchen and plopped them in, I crumpled up the foil, and we left the painting on the easel to dry.    

♥

9 Comments

Ballet Tuesdays

10 / 2 / 1211 / 13 / 13

IMG 0180

IMG 0184

IMG 0185

IMG 0186

IMG 0191

Will I ever get used to the cuteness that is Tuesday ballet afternoons?  Ummmm…probably not.  Especially when the cute is 12 tutu-clad little ladies dancing around a studio with long ribbons in hand.  Because our class is a parent participation class, us mamas gallop, stretch, plié, and sing alongside our little ones, making it very tricky to take photos of the class itself, but I always make sure to take a couple before and after.  Grae’s so used to it now that she actually stops before going into the community centre, positions herself against the wall, and says, “Picture time, Mama!”

 ♥

1 Comment

Egg Carton Button Sorting

9 / 28 / 129 / 29 / 13

Egg Carton Button Sorting

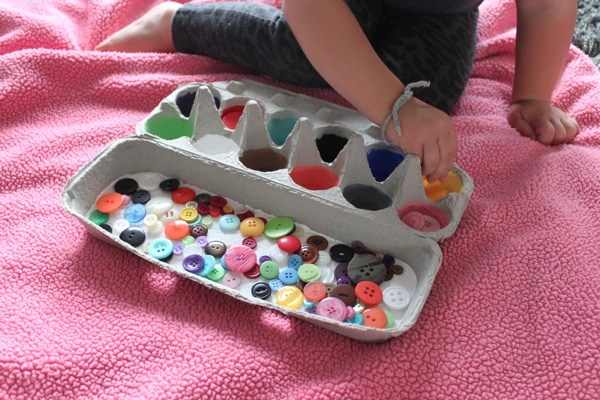
Matching is HUGE in our house right now.  Coordinating is simply not good enough for Miss G anymore.  Everything. must. match.  To the point where she will pick a treat (organic fruit leather) with a blue package while grocery shopping because she is wearing blue pants, cutting her carrots requires an orange knife, and wearing white socks isn’t happening if there is no other white in the outfit.  So when I came across an empty egg carton during my usual nap time house cleaning, I decided to use it to put together a little matching game rather than recycling it.

IMG 0032

I had everything else I needed on hand…  Acrylic paints in primary colours, plus white and black, a paintbrush, an old rag, and some water.

IMG 0033

IMG 0035

I simply painted each egg spot by swirling the paint up from the base to the top edge.

IMG 0037

I made sure to include the basic rainbow colours, plus black, white, and grey, and of course aqua because, well… it’s the best colour ever.

IMG 0039

Afterwards, I gave the inside of the lid a quick coat of white paint.

IMG 0043

Now if I’m being honest, Gracen awoke from her nap before the paint was fully dry and she was so excited to play her new game that we took it to the bathroom and used the blowdryer on it.

When it was fully dry, I poured a bunch of buttons in the lid, removed the clear ones, and asked, “Do you want to play?”

IMG 0048

With a prompt “Yes!” and zero direction, she got busy matching the buttons to the colours painted in the cups.

IMG 0049

Grae loves playing and the nice thing about this little game is that when she’s finished, she just closes it up and everything is contained and ready for next time.

♥

8 Comments

Play Dough Frozen Yogurt Shop

9 / 21 / 1212 / 10 / 13

Play Dough Frozen Yogurt Shop

I’ve had this little idea in mind ever since Gracen received her ice cream sand toys back at the beginning of summer, and today was a perfect day to make it happen… With it being cool and dreary here in Vancouver, spending the afternoon on a wet beach making sand cones didn’t sound overly appealing…  Making yummy-smelling play dough ones in the warmth of our house, however, certainly did.  Not to mention the fact that Grae fell in love with playing ‘the ice cream game’ at our community centre’s playground recently, so opening an ice cream shop (which Grae quickly decided should be a frozen yogurt shop instead) it was.

IMG 9845

With our best ever no cook scented play dough made and a few things collected from around the house, our shop was ready for business.

IMG 9848

Our play dough went into some empty yogurt containers we had on hand…

IMG 9849

We made candy sprinkles by chopping up some colourful plastic straws we had leftover from Miss G’s birthday party…

IMG 9850

Colourful buttons became Smarties…

IMG 9852

And some silicone baking cups and the plastic cones from Grae’s Melissa & Doug set became our cups and cones.

IMG 9853

We also collected  some scoops and spoons for eating and serving our frozen treats, some coins and a money jar, and fabric bunting {also from the birthday party} to spruce up the shop. ☺

IMG 9855

Together, we wrote made a quick sign for our shop.  I asked Grae how much one of her frozen yogurt treats cost, and without skipping a beat, she said “Two!”  So two dollars it was…

Cone Making

IMG 9860

IMG 9862

With her shop set up and ready to go, it was down to business welcoming her customers (me!), making delicious-looking play dough treats, and collecting money in exchange.

IMG 9878

Not a fan of cones?  Not a problem – a bowl for you!

IMG 9883

Cheers to rainy days and frozen treats!

Ice Cream Making

IMG 9896

The frozen yogurt fun went on all afternoon…

IMG 9913And after what felt my 53rd order, Papa eventually came home and relieved me of my customer duties (thank goodness – I don’t know if my belly could have handled another candy-covered cone).

Here’s a little video of our frozen yogurt shop owner in action…
 We finally closed the shop tonight just before bedtime (despite pleas from the very reluctant shop keeper) and you can bet I’ll have a play dough cone in hand long before I have a chance to make a proper breakfast tomorrow morning…
And I’m okay with that.
♥
8 Comments

Homemade Rain Sticks

9 / 19 / 129 / 1 / 13

Homemade Rain Sticks

After stumbling upon this post from The Imagination Tree a little while ago, I knew we had to try making rain sticks of our own.  We had a few really heavy duty cardboard tubes already on hand (two from rolled art paper and one from our Stuck on You parcel – review to come soon!) and since we’ve recently been collecting and making instruments for Gracen’s collection, it was the perfect project.

IMG 9780

To get started, we collected a bunch of things from around the house…  An assortment of pantry goods (beans, rice, and popcorn seeds to be exact), a hammer and some small nails, these duct tape sheets Grae picked out on our most recent States trip,  some fluorescent dot stickers for decorating, and the cardboard tubes of course.  (We also got out a Sharpie, a pair of scissors, and a small tin can out part way through the project.)

IMG 9788

Here’s a better look at just how sturdy our tubes were.  Like mentioned on Imagination Tree, ordinary paper towel and toilet paper rolls are not thick enough and won’t work for this project. Basically, you want your tube to be sturdy enough to withstand nails being pounded into it, and sturdy enough to hold the nails in afterwards.

IMG 9781

IMG 9796

Although this next part was a little too tricky for Grae to do on her own, she sure enjoyed helping. Using flat-headed nails that were almost as long as the diameter of the tube, we pounded them into the cardboard roll at random intervals. What worked best for us was hammering the nails in together using a hand-on-hand technique or having Grae hammer nails that I’d already put halfway through.

IMG 9789

Here’s what the inside of our tube looked like once we’d finished with the hammering job.  Of course, the more nails you add, the slower the beans or seeds will move through the tube, meaning a longer ‘rainfall’.

IMG 9799

IMG 9801

Next, we traced the end of our tube onto the backside of a duct tape sheet together two times and cut the circles out.

IMG 9802

IMG 9803

Then, using a small tin can, we traced and cut out two larger circles too.

IMG 9804

In order to seal off the end of the tube without having our seeds stick to the duct tape, we placed the smaller circle in the centre of larger circle (sticky sides together).

IMG 9806

Then carefully placed and sealed the larger duct tape circle over one end of the tube.

IMG 9811

Next, my little helper chose her filling (popcorn seeds) and added a few handfuls to the tube.  (She wanted the tube to stand on its own without falling over and was having no luck, so she quickly went and retrieved this mason jar from the kitchen… Of course, being her mama, I thought this was quite brilliant.)

IMG 9812

With our seeds added, we created another double-layered duct tape circle and sealed off the second side.

IMG 9813

At this point, you could really decorate the outside of the rain stick with anything, provided you ensure the nails are covered and cannot be removed by curious little fingers.  We decided to use our duct tape sheets since they secure the nails and look pretty all at once.  The bonus was that they were also the perfect width to fit the length our small tubes, so all we had to do was cut them in half to avoid wrapping around the tube more than once.

IMG 9814

I positioned the tube onto the duct tape paper and Miss G gave it a good roll.

IMG 9815

And there you have it – a fluorescent pink and leopard print duct tape rain stick!

IMG 9817

Of course, nothing in this house is complete without being plastered with stickers, so on went a bunch of fluorescent dots.

IMG 9821

Here’s our finished collection.

♥

2 Comments

Homemade Puffy Paint

9 / 11 / 129 / 27 / 13

7 times out of 10, if you ask Gracen what she’d like to do, she’ll answer “Bike ride!” or “Park!” Guaranteed, the other 3 times you’ll get a very enthusiastic “Paint!”  So that’s just what we did today.  With G on my lap, we browsed my Toddler Activities Pinterest board looking for a fun and new painting method to try.  There were many options – wellie boot painting, muffin tin painting, fizzy sidewalk painting, salad spinner painting, bubble painting, and more – but the pin she selected?  This homemade puffy paint recipe.

IMG 9509

Though we stuck to the recipe fairly closely, we used a slightly different method to make it.  Here’s what we gathered to get started…  Water, salt, self-raising flour, food colouring, a zip-close bag, an ice cube tray, and some paint brushes.

IMG 9512

I of course had the help of this monkey too. (I asked her to do something funny and this was her immediate reaction… Good to have a solid go-to funny face on deck for moments just like these.)

Puffy paint

Though you really don’t need it, we used a mason jar to hold our bag upright and open for us (a cup would work just as well) so that Grae could add ingredients without having to hold the bag open at the same time.  First, she added the salt and flour to the bag.

IMG 9516

Then we zipped it closed and she gave it a good shake.

IMG 9519
Next, we added the water…
IMG 9524
Zipped it closed again {making sure all of the air was out first}, and she smushed everything together until it formed a goopy paste (this was her favourite part).
IMG 9530
Next, we cut the corner off of the bag.
IMG 9531
With just a tiny bit of help, Grae squeezed the mixture out of the bag and into our ice cube tray.
IMG 9536
IMG 9538
Then she added several drops of food colouring to each compartment.
IMG 9540
Using our paintbrushes, we stirred the colouring into the paste.
IMG 9542
IMG 9545
Then it was time to paint!
IMG 9547
Although most posts about homemade puffy paint instruct you to microwave your artwork, we rarely use ours and I really didn’t want Grae sitting in front of the microwave peering in while each of her pieces ‘baked’.  Instead, we popped ours into the oven for a few minutes on the lowest setting, and it seemed to work just as well (putting them in the sun to dry would probably work too and may give the paint more of an opportunity to rise also).
IMG 9552
The result? Fully dry, yet slightly squishy paint blobs that can easily be hung or added to a art portfolio without crumbling apart.
Want to try for yourself?  Here’s our recipe…
Homemade Puffy Paint
  • 2 1/2 tablespoons of self-raising flour
  • 2 1/2  tablespoons of salt
  • 3 tablespoons of water (you can add more or less depending on your desired consistency, just be sure to not make it too thin, otherwise it won’t ‘puff’ well)
  • food colouring
  • 1 zip-close bag
  • 1 muffin tin or ice cube tray
Place the flour and salt into the bag, zip closed, and shake well.  Add the water, zip close, and smush around until the mixture forms a smooth paste.  Cut the tip off of one corner of the bag and squeeze the paste into your muffin tin or ice cube tray.  Add food colouring and blend.  Create your puffy paint masterpiece making sure to lay the paint on thick.  Bake your artwork in a 150 degree oven for 2 to 4 minutes.
Have fun!
Leave a comment

Raised Salt Art

9 / 3 / 129 / 5 / 12

After pinning this post by One Perfect Day on my Toddler Activities board a few days back, I knew Grae and I had to try it very soon.  

IMG 9292So today, Grae and I gathered up our materials… White glue, table salt, food colouring diluted with water, black card stock, and an old baking pan.

IMG 9297The first step was creating a design out of glue.  After a quick demonstration, Grae went to town creating squiggles, zigzags, and loops.

IMG 9298Here’s her masterpiece.

IMG 9301Working quickly, Grae generously cover the entire design in salt.

IMG 9305When the glue had been fully covered, we carefully shook off the excess salt into a little bowl to save for later.

IMG 9308Next, Gracen used an old medicine dropper to blob drops of the food colouring/water mixture onto the salt.  Although the results looked cool, I quickly realized two things.  First, the glue/salt lines had to be much thicker in order absorb more of the colour mixture, and second, more of the paper had to be covered in glue/salt in order to up the chances of the dripped colour actually hitting it.

IMG 9311IMG 9313IMG 9314We tried again, this time with Grae and I creating the glue pattern together so I could add pressure to the bottle and ensure the glue lines were good and thick.  The immediate finished product looked better, but once dry, it looked much like the first attempt…  Faded, clumpy, and flaky.

Though this project. like most, is definitely about the process rather than the project, we tried one more time with another two changes put into play. First, we allowed the glue to dry completely before adding any colour to it, and second, we used the food colouring as is, straight out of the bottle. 

IMG 9328Not only did the finished product remain bright and intact even once dry, but the process was way more fun too.  Letting the glue dry first allowed the colour drops to move much further along the salt lines… And it was indeed magical!

If you want to try making a raised salt masterpiece with your own toddler, here’s what I’d recommend…

1. Select a thick piece of cardboard or card stock as your background (regular paper is too flimsy and the salt design will crumble when bent) and place it on a large baking pan.

2. Together, create thick glue designs that cover as much of the page as possible.

3. Have your toddler very generously sprinkle salt over the entire page.  Shake the salt around to ensure good coverage, then empty the extra salt into a bowl for your next picture.

4. Set aside and let the glue dry fully.

5. Using food colouring straight from the bottle, have your toddler squeeze drops of colouring onto the salt lines.  Watch closely as the colour runs along the salt.

6.  Let dry again.

♥

1 Comment

Simple Fun: Colour Sorting Game

8 / 28 / 121 / 5 / 14

Simple Colour Sorting Activity with a Melissa & Doug Box | Mama.Papa.Bubba.

This morning Miss G found a little wooden Melissa & Doug box {that used to house her alphabet magnets}, brought it to me, and asked, “Play game?”  Ummmm… Okay.  I was certainly not going to turn away that sweet little face, so I had to think on my toes.

IMG 8999

The two compartments of course lead to a sorting activity of some sort, and the first thing that popped into my head was colours.

IMG 9000

I grabbed two pieces of coloured paper, cut them {very roughly} to fit inside the compartments, and asked Grae if she wanted to help me find little things in pinks and yellows.

IMG 9001

Of course she was more than game, so we went around the house collecting things and deciding whether or not they were too big. This is what we came up with.

IMG 9004

Grae needed no explanation.  I simply said, “Do you want to play?” and off she went.

IMG 9006

I did realize part way into our collecting that the activity wouldn’t last long, but we had already started and it’s not like it was a huge time investment, so we continued along our way.  I wasnt timing, but the game probably lasted all of 60 seconds from start to finish.  The good news is that Grae seemed to enjoy herself and was happy to take everything out, mix it up, and play again and again.

Next time, if we wanted to get more ‘bang for our buck’, we could easily use two more similar colours (aqua and blue, grey and black, or something similar) or try sorting based on something different all together like circles and squares, wood and plastic, or tall and short.


Here’s a little video of Grae hard at play multiple rounds in:

♥


Leave a comment

Sensory Jars for Toddlers

8 / 20 / 128 / 21 / 12

Sensory JarsWhile Miss G and I have put together and enjoyed all kinds of sensory bins, we’ve never actually made sensory jars or bottles of any sort.  Although I wasn’t sure that Grae would like them as much her usual sensory bins due to their more ‘hands off’ nature, I decided we’d whip up a few today and give them a try.

Sensory Jar MaterialsIn order to make the most of them, I knew I wanted Gracen to be involved in the putting the sensory jars together.  I gathered up a bunch of materials while she napped and set them out as a little surprise for when she woke (we also ended up using some shampoo on a whim during the activity).  Since I had the time and the paint on hand, I chose to give our jar lids a quick coat of silver spray, but it isn’t necessary.

IMG 8622IMG 8623When Grae woke up, she was excited to started.  She pretty much led the way, and I just made sure we had some water and one of the thicker liquids (baby oil, cooking oil, or bubble bath) in each jar.  One thing was for certain – there needed to be glitter in every jar.  No exceptions there.  The other thing I found interesting was that Miss G automatically colour coordinated the glitter with the coloured water (hmmm… wonder where she gets these things from??)

This part of the activity was really fun.  It reminded me of when I was little and mixing up potions and concoctions in the kitchen seemed like the best thing in the whole world. (It kind of still felt like that… Maybe some things never change?)

Here are Grae’s creations:

Layers(The blue one is the exact same combination as this one, but with blue water and glitter.)

Layers 2Layers 3

IMG 8634When Grae declared her jars done, I ran a thick strip of hot glue around the inside of each of the lids, then quickly screwed them on as tight as I could. Once they’d cooled, I tried my darndest to unscrew one of the lids, and couldn’t, so I decided they were good to go.
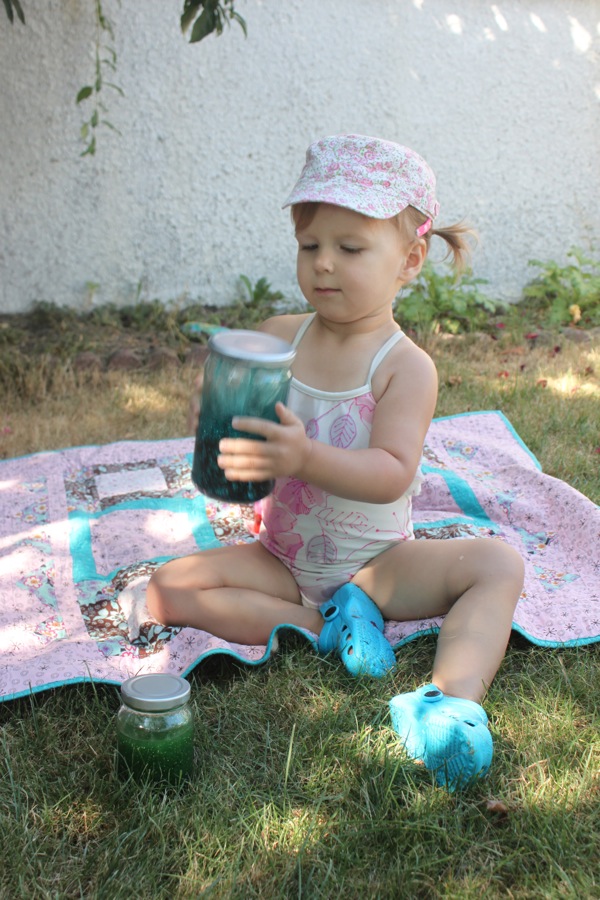
IMG 8651We were headed out into the backyard to splash in the pool, so along the sensory jars came.  Gracen really liked shaking them up and watching “the sparkles dance”.  

IMG 8637Here’s a look at the jars just after shaking them.  Photos don’t do them justice, but they’re quite mesmerizing actually… calming even, so I can see why parents who use time outs would find these to be a helpful time out ‘tool’.
While sensory jars may not bring about as much play as sensory bins do (for Miss G at least), they’re a great addition to our collection of sensory goodies and will be finding a Grae-friendly spot in our house as soon as she’s had a few good days with them in her bedroom.

♥

Two things to remember:
Like Mama.Papa.Bubba’s Facebook page here.
Leave a comment saying “Enter me” (or something similar) on this post to be in the running for one of two Stuck on You gift cards.

7 Comments

Simple Play: Stacking O’s on Skewers

8 / 19 / 121 / 5 / 14

Stacking O's on Skewers | Mama.Papa.Bubba.When I stumbled across this blog the other day and saw this activity,  I knew I wanted to try it with Miss G.  Already having all of the required materials on hand, we gave it a go this afternoon.

IMG 8584

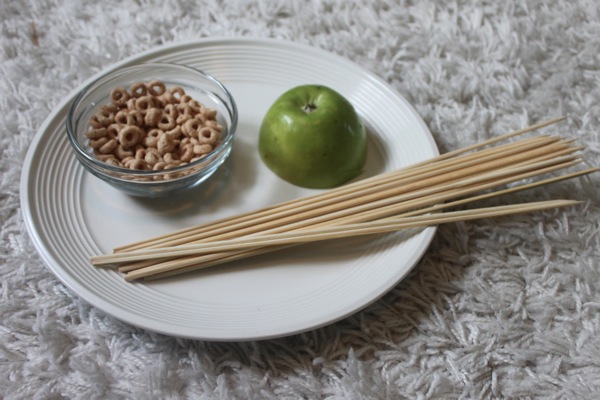
While the original idea partners o-shaped cereal with play dough and uncooked spaghetti, I replaced the play dough with half of an apple and the spaghetti with bamboo skewers (you’ll see why in just a minute).

IMG 8585

To get started, we put our apple, cut side down, on a large plate and poked the bamboo skewers into it at different angles.  Gracen helped me with this part and it was actually very doable for her.  This was part of the reason I used skewers instead of spaghetti.  Being that spaghetti is so thin and fragile, I knew it wouldn’t last through set up, let alone play, with my enthusiastic little lady.

IMG 8586

With our “porcupine” ready to go, I gave Miss G a small bowl of o-shaped cereal, and let the threading and stacking begin.

IMG 8591

Gracen really got into this activity and was truly having a blast stacking O’s on skewers.

IMG 8593

This best part is that not only is it great fine motor practice, but this activity is also a great counting and concentration activity too.

IMG 8594

Of course, little ones don’t realize all that.  They just think they’re playing a game and having fun.

IMG 8596

Grae was actually so into the activity that she wasn’t really interested in eating her o’s, which I thought for sure she would be.

IMG 8599

The perk to using an apple (or any other edible anchor) is that if/when the eating stage happens, you don’t have to worry about your little one eating o’s encrusted with play dough.

IMG 8604

Part way through, Grae realized that the o’s were sliding down the skewers and started saying, “Wheeee!” each time she’d send one down their bamboo slide.  Too funny.

Here’s a video of Gracen hard at play…

♥
For more fun not found on the blog, join us on Facebook or follow us on Instagram.
2 Comments

I Love You… This Much!

8 / 16 / 1210 / 26 / 13

Earlier in the week, Miss G and I put together an adorable little Pinterest-inspired card for her Gido’s (grandpa’s) birthday.  (Gido if you’re reading this right now, you shouldn’t be!  Back to preparing/enjoying your bike trip!!!) The original post comes from A Day in the Life, and although we stuck to the basic plan, we made a few little changes along the way too. Here’s our version…

IMG 8411

First up – materials… A couple of pieces of card stock, some crayons, a pencil, a black Sharpie, a glue stick, and some scissors.

IMG 8412

To get started, we traced Grae’s hand onto the card stock in pencil (her favourite part – the girl loves having her hand traced).

IMG 8413

Then I folded the card stock in half, and cut out the hand, giving us two identical copies. We did try to ‘team cut’ the hand shape, but it was pretty tricky, so Grae became the recycling collector/depositor for this part instead.

IMG 8416

Next, using our black marker and the hand-over-hand technique, we printed “I love you…’ on the front of the left hand.

IMG 8419

Then it was time to decorate both hands.  Everything is better with colourful baby squiggles, is it not?

IMG 8420

Next, we cut two strips of our white card stock, glued them together to form one extra-long strip, and wrote “this much!”, plus a personalized message, along the length before Grae added her special touches to it.

IMG 8423

With the decorating complete, we folded up the strip accordion-style…

IMG 8425

And attached each side to the palms of the hands using our glue stick.

IMG 8426

Here’s the finished result.

♥

8 Comments

DIY Felt Board {and an Ice Cream Colour Matching Game}

8 / 3 / 123 / 22 / 14

When we were on vacation,  all of the old-school toys Grandma Charlotte has saved from her boys’ childhood got me thinking about favourites from my own childhood. While it’s not really a toy, one thing I LOVED  growing up was the felt boards teachers would use during carpet times in elementary school.  You just knew that if you sat down to listen to a story and the teacher reached for her felt board and a bag of felt pieces, it was going to be a good one.

This then got me thinking about all of the cool things Miss G and I could do with a felt board of our own.  From matching games, to sorting activities, to building funny faces, and learning about shapes and colours… The options are endless really.

Now, we probably could have bought a pre-made felt board and coordinating pieces, but what fun is that?! Especially when making one of your own is so easy. The best part is that this entire project can be done over the course of a nap time if your little one sleeps for at least an hour.

IMG 7893

We picked up this square poster frame from IKEA, grabbed a package of felt from the craft store (you can also buy it on a roll from fabric stores), and gathered up a glue gun (I later changed my mind and used Tacky Glue but I think either would work), a pencil, and some scissors.

IMG 7894

To get started, I took the cardboard backing out of the picture frame, lined it up with the corner edges of the felt piece, and traced the other two sides onto the felt in pencil.

IMG 7895

Next, I cut the felt square out.  (Make sure you’re using really sharp scissors here. Your sanity and straight line with thank you.)

IMG 7896

Next, because I chose to use white felt, I took the paper insert that came inside the frame, flipped it over, and glued it onto the cardboard insert to create a white backing for my felt. (You can use your glue gun or Tacky Glue here, but you could just as easily use white glue or a glue stick too.) See the difference? Much better with a little help from the insert.

IMG 7897

Next up, I carefully gave my felt piece a quick iron. You don’t have to do this, but I found it made it much easier to mount the felt onto the cardboard when the large creases had been removed.  Just be sure to use a low heat and keep your iron moving if you do this step.  Then, mount your felt onto the cardboard using thin glue strips in order to avoid ripples and bumps in the felt. Also because felt does have some give and can stretch over time, it’s a good idea to glue the middle as well as the edges (I did the edges and a giant ‘x’ across the centre). Once you’ve got your felt piece placed on the glue, smooth it down from the centre outwards to ensure a good stick.

IMG 7899

When your glue has had a chance to dry, place your cardboard backing into the frame and secure it.

IMG 7900

Voila! Felt board complete.

IMG 7901

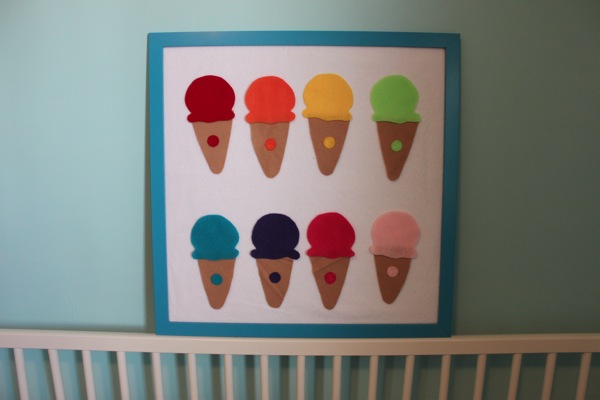
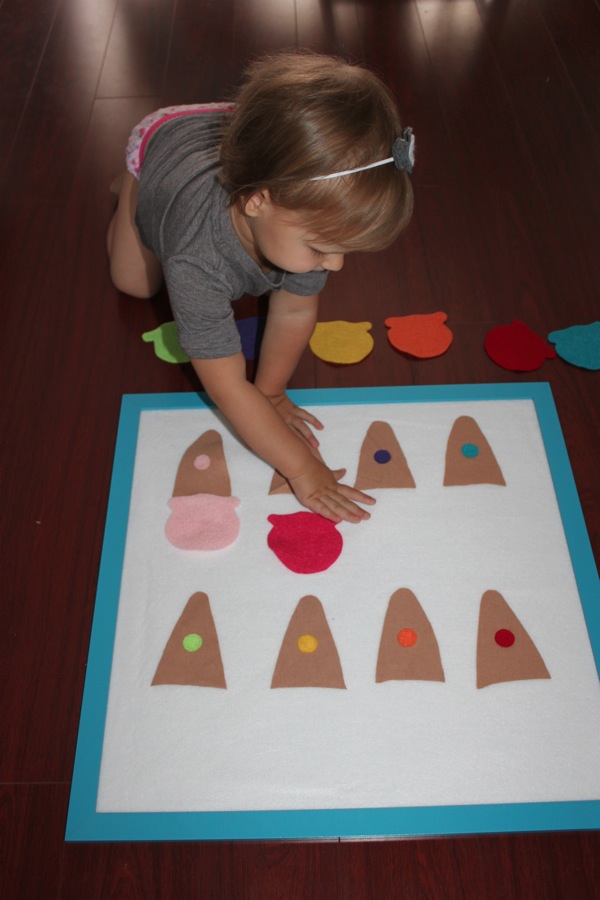
With Miss G still sleeping and a little time still on my hands, I decided it would be really fun to have a game of some sort ready to go for when she woke up. I had no idea what I would make, but it needed to be something quick and easy.  Thank goodness for Pinterest!  I searched “felt board ideas” and got all of these great results.  Scrolling through, I was immediately drawn to an ice cream cone colour matching game that I knew would be quick to cut out and super engaging for my little lady who loves matching games and announcing the colours she sees around her.

IMG 7904

I just cut out my first cone and ice cream scoop freehand and then used the pieces as a guide for my others, but upon visiting childcareland.com later, I saw that she has a printable template available also.

IMG 7905

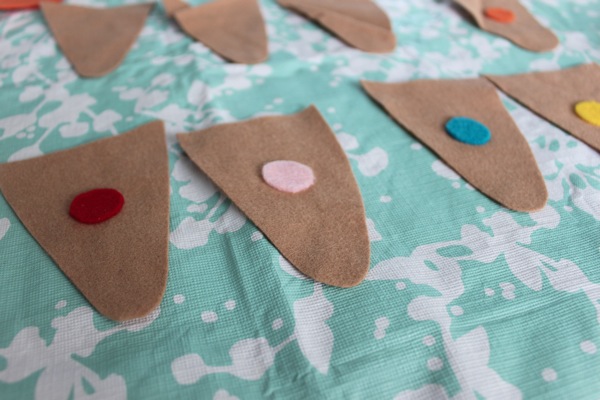
I cut my circles out using a coin as a guide and glued them onto the cones using a little dot of Tacky Glue. And that was it. After a few minutes drying time, the pieces were ready to be put to use.

IMG 7906

I love this felt board set because it can be used when talking about colours, it can be used as a matching game, it can used to learn about rainbow order, and it can be used just for fun (think 8 scoop ice cream cones!)

IMG 7908

Here’s the finished product.

IMG 7911

Miss G was thrilled to wake up to this little surprise and matched the scoops to the cones again and again, naming the colours as she went along.

Can’t wait to make some other pieces for her soon.

UPDATE:  Check out our new and improved DIY felt board tutorial!

♥

For more fun not found on the blog, join us on Facebook or follow us on Instagram.

15 Comments

Posts navigation

Previous Page 1 2 3 4 5 6 7 Next Page

find us here

  • Facebook
  • Instagram
  • Pinterest
  • Twitter
  • Email

looking for something?

want our posts to your inbox?

popular posts

  • BC Summer Family Fun
    BC Summer Family Fun
  • Make Your Own Surprise Boxes
    Make Your Own Surprise Boxes
  • High School or Homeschool?
    High School or Homeschool?
  • Daily Reflection Journal for Kids and Tweens
    Daily Reflection Journal for Kids and Tweens
  • 3D Paper Bag Snowflakes
    3D Paper Bag Snowflakes
  • Things to Listen to While Road Tripping with Kids
    Things to Listen to While Road Tripping with Kids
  • Dear Dad Printable Book
    Dear Dad Printable Book
  • The Best Tips for Taking Road Trips With Kids (& a GIVEAWAY!)
    The Best Tips for Taking Road Trips With Kids (& a GIVEAWAY!)
  • Easy DIY Outdoor Skating Rink
    Easy DIY Outdoor Skating Rink
  • Small Shop Gift Guide
    Small Shop Gift Guide

archives

Site made with ♥ by Angie Makes
Angie Makes Feminine WordPress Themes