No joke – I think I’ve had ‘layered apple caramel dip’ in my idea book for a full 3 years now… It’s on a random page of fall ideas and says ‘layered caramel apple dip – like 7 layer bean dip but sweet – for apples’ – hah! I’ve wanted to make it for ages now, but we just finally got around to it and I’m so happy we did. Because daaaaang – is it ever delicious!
We made a plated version to enjoy immediately as well as several little pots to keep in the fridge and let me tell you – they didn’t last long! Brad and I enjoyed some as a treat while watching a show, Miss G got to take one in her lunch one day, and the others? I’m not sure, but they disappeared.
The best part? I was really hoping to include a caramel outside of my usual date ‘caramel’, and I was able to make a delicious version using coconut milk, pure maple syrup, and coconut sugar. Definitely a still a treat in my books, but no dairy, no butter, and no white sugar. We also used a non-dairy cream cheese for a fully vegan recipe.
Welp, the first official day of fall is nearly here and I’m doing my best to embrace it despite the fact that the arrival of fall means we’re that much closer to another loonnnnng winter in our small town. A loonnnng winter in our small town that nearly did me in last year. Now if it were to stay fall for a few months and we got to soak in that crisp fall air mixed with little bursts of sun, the beautiful autumn colours, and sweater weather for a while before transitioning into the snow, freezing cold, parkas, and permanently feeling like a block of ice, I’d totally be down for that. Come on Mother Nature, work with me here! {Pleeeaaase.}
I usually switch up our play dough and play dough kits each season despite the fact that our go-to homemade play dough can last even longer than that {our black, sparkly play dough that was part of our tinker play dough activity is still going strong!}, so this week Sam and I whipped up the most delicious smelling autumn spice play dough.
It’s just our basic no-cook play dough recipe {made without food colouring or flavour packets} with a few of our favourite fall spices added to it, and let me tell you – it smells divine! {We chose to use cinnamon, nutmeg, and cloves, but if we would have had allspice on hand, I would have added that too!}
To make it, we measure out our dry ingredients plus our vegetable oil and glycerine into a large bowl.
Then we whisk it up really well.
Next, I add the boiling water and immediately mix it {quite vigorously} to get the texture as uniform as possible. As soon as it’s cool enough to handle, I get my hands in there, bring it all together in a ball…
And then dump it out onto a clean, dry countertop.
The one question I always get asked about our play dough is how we get such a smooth texture, and it’s all about the kneading! I knead our play dough for probably a solid 2 or 3 minutes, or until it’s pretty much cool. I know that there’s a proper way to knead doughs, but when it comes to our play dough recipe, I start with it all in a mass close to me…
Then I push it away from me while using a decent amount of pressure to flatten it right out. Then I pull it back and repeat. (Many, many times.) I find that this method works well when the dough is still a little sticky {our recipe tends to feel a little wet until completely cool} and it really works to get rid of any little lumps an bumps that might be hiding in the dough. By the time it’s completely cool, the dough should be smooth as can be and should no longer be sticky.
Can you tell how smooth it is?
I’m pretty sure we’ve made some version of this play dough every fall since Miss G was one or two years old, and I love pairing it with natural loose parts. We often go out on a nature walk and collect conkers, acorns, pinecones, and pretty leaves to pair it with, but another favourite over the years has been whole spices and that’s what we decided to go with this time around.
Sam and I popped by our local bulk store and picked up some cinnamon sticks, cardamom pods, whole allspice, whole nutmeg, some anise stars, and some whole cloves – all of which smell amazing and have interesting shapes and textures. Then I popped everything into one of my favourite divided trays {I got this one in Kuwait at City Star in Egaila} and set it out on the table with a couple of placemats for the kids to discover after school.
I love having some sort of invitation to play or create out on the table in the afternoons… It’s always something that is open-ended and requires very little / no adult help, which means that they can just dive in and play or create independently, which I think is good for all of us, but especially Grae.
After a long day at school, I really find that she just needs some time to unwind and decompress… Some time when there’s nothing expected of her and nothing she has to do on a timeline – and creating or reading seem to be two really good options for her.
I often pick a chilled out, calming playlist on Spotify and play that too, which really sets the mood for some low-key, focused play.
Of course with play dough and loose parts, there’s really no end goal. Miss G usually works on some sort of careful creation…
While sam loves to burry and poke and dig and hide.
Both of which are equally valuable, important ways to play.
Here’s our autumn spice play dough recipe…
Autumn Spice Play Dough
1 cup of all-purpose flour
1/4 cup of table salt
1 tablespoon of cream of tartar
1 teaspoon of cinnamon
1 teaspoon of nutmeg
1 teaspoon of ground cloves
2 tablespoons of vegetable oil
1 tablespoon of glycerine
3/4 cup of boiling water (measured in a dry measuring cup – this is important as wet and dry measures aren’t the same)
Place all of the ingredients, save the boiling water, in a bowl and whisk well. Measure the water using your dry measuring set and add it to the bowl. Give the mixture a quick mix with a wooden spoon, banging off it off every once and a while. At this point, the mixture may seem too wet and sticky to make good play dough… Do not fret! Once the dough has cooled just a little, use your hands to carefully bring it into and ball and then dump it out onto the countertop and knead really well. You’ll know you’re done when the dough is fully cooled, soft and squishy, and no longer sticky
This post is sponsored by Back to Earth, my very favourite place for all things health, wellness, and personal / home care. I’d venture to say that the majority of all of the products in our home – from cleaners to shampoos and conditioners to soaps to candles and sunscreens – are all from Back to Earth. And it’s been that way for years. {Even when space was at a premium and we were bringing many of our personal care and cooking items in our luggage to the Middle East, I made room for a year’s supply of my Back to Earth favourites!} There are so many things I love about their products, but what I love most is that a) the company is based right here in the Okangan, and b) that the founder, Kiley, who has completed several certified herbalist and aromatherapy educational programs herself, works with a team of naturopaths, biochemists, herbalists, and aromatherapists to ensure that her carefully crafted products are as pure and natural as possible. Plus I love that the products truly work. {Because what good is a natural, locally crafted product if it doesn’t do the job it was intended to do, right?}
Well, I hate to say it, but summer’s officially over. We’ve been back in school for nearly two weeks now
and though I miss the slow mornings, carefree days, and having both of my kiddos at home with me, I will say that the transition hasn’t been horrible. Miss G was fairly excited about going back to school and because we didn’t stray too far from our usual bedtimes and routines during the summer, that part hasn’t been a struggle either thankfully. Now that being said, we definitely stayed outside too long, ate dinner too late, and rushed through our usual bedtime routine too often, so it’s been nice to get back into a solid rhythm of slower, more routine bedtimes.
Sam’s bedtime routine is pretty much the same as Miss G’s was when she was a toddler because it’s worked both for our kiddos and our family as a whole… And why change a good thing, right?
Now, before I share how our evenings go down with this little sweetheart of ours, I will say that our kids are early-to-bed kiddos and always have been. I was that new mama who read and researched every last thing while pregnant with Miss G and the one thing I came across again and again on the topic of sleep was how beneficial early bedtimes are for little ones – so we went with it. At this point, Sam {who is 2.75 years old} is usually in bed around 6:30 or 6:45 p.m. and Miss G {who is newly 8} is in her room at the same time but has a full hour to read before going to bed. Of course bedtimes that early don’t work for all families, but we love them because a) they allow our early risers to get a full 11 or 12 hours of sleep and b) because they give Brad and I some time on our own at night {which is especially important since that’s when I work}.
So. Here’s how a typical night goes at our house…
First up, dinner. Dinner happens around 5:00 / 5:15 in our house and we all sit down together for a family meal pretty much every night.
Now, if you’ve ever seen Sam eat, you know that most nights it’s a complete and utter disaster, so he heads straight into the tub afterwards. {We’re talking stripped down at the table and carried directly to the tub.} And even if it’s not a messy night, he still has a warm, chilled out bath simply because he enjoys it and it’s part of our evening routine.
Our bath time essentials?
Several small vehicles and more recently, this air pressure water sprayer that was a favourite this summer {hello, DIY car wash}…
Our easy homemade coconut oat bath milk bath that is naturally cleansing, moisturizing, and soothing {this is all we use on nights when his bath is for the routine of it and he’s not actually dirty}.
And this Moon Baby Shampoo & Body Wash from Back to Earth whenever his hair or body needs to be washed. It’s free of all the usual yuckies (SLS, parabens, sulphates, cocamide-DEA, formaldehyde, and perfume) and full of good stuff, like organic oils, aloe vera juice, pure liquid castile soap, and calming kiddo/baby safe organic essential oils and smells like clean babies!
By about 5:45 or 6:00 p.m., it’s out of the tub and over to our bedroom where we get ready for bedtime.
We keep all of our bedtime essentials in one of these little carry caddies in a cupboard in our room, so everything’s in one place and super easy for her to find.
Alright, so once Sam’s out of the tub, here’s how it all goes down…
First up, Back to Earth’s Sweet Pea Herbal Balm on the tush. We’ve used this stuff since Miss G was a baby and we just love it. It’s this amazing combination of local beeswax, pure extra virgin olive oil, and Canadian Kisameet Glacial Clay, infused organic calendula, arnica, lavender, chamomile, and comfrey flowers, vitamin E, and pure lavender essential oil and it works for EVERYTHING. Both of our kiddos have super sensitive skin and this stuff is our go-to for bug bites, rashes, dry patches, owies, and preventing bum rashes over night.
Next up, diaper. We’ve always used disposables at night, simply because they can handle being worn for 12 hours at a time without leaking and I’ve mostly made peace with that choice {though in a perfect world, we’d never have to use disposable diapers at all}.
Next up, a small amount of Magnificent Magnesium Salve rubbed into his back. We began using magnesium on-and-off when I first started to get serious about getting our little non-sleeper to sleep, but it’s become part of our regular bedtime routine since moving to Vernon. There are so many factors at play that it’s hard to determine what’s at the root of our sleep success, but Sam’s definitely become a better sleeper over the course of the past year and a bit, so I’m not messing with what we’ve been doing. I always get loads of questions about our magnesium salve and while I’m far from an expert, my understanding is that magnesium is an essential mineral and something many people don’t get enough of {the body doesn’t produce magnesium – it’s something we have to get from outside sources}. One of its many roles is aiding in restful sleep {by maintaining healthy GABA levels – a neurotransmitter that promotes sleep} and many people notice a marked difference in the quality of their sleep when they use a transdermal magnesium (magnesium applied to the skin).
Now two quick things to note about the Magnificent Magnesium Salve… First up, while it’s not an actual Back to Earth product, the fact that Back to Earth carries it means that Kiley {Back to Earth’s founder} has given it her personal stamp of approval – huge given her standards and dedication to producing the purest, most natural products. Secondly, this particular magnesium salve does contain a very small amount of rosemary essential oil, which is something I generally avoid using on / around the kids due to it’s 1,8-cineole chemotype, but I personally make an exception for this one product. I love it because it’s super moisturizing compared the usual magnesium oil sprays and rollers that I find can be quite drying and even stingy sometimes (though Back to Earth carries those options if you prefer). This one contains coconut oil, cocoa butter, shea butter, sweet almond oil, beeswax, aloe vera, and vitamin E, plus the most amazing smelling combination of essential oils – rosemary, marjoram, black pepper, and vanilla.
While Sam’s still laying on his tummy, I run our Memories roller across the back of his neck and gently rub it in. True story? At some point during our sleep journey I went into the Back to Earth store in Lavington {basically in total zombie mode because Sam hadn’t slept well in months} and said, ‘My child doesn’t sleep… HELLLP.’ This little Memories roller was the second thing recommended to me {after the magnesium} and is easily my favourite part of our bedtime routine now. You know how certain smells are so connected to particular times / things? Well to me, Memories is the smell of bedtime. It’s a pre-diluted combination of lavender, rosewood, frankincense, ylang, patchouli, vanilla, vetiver, sandalwood, roman chamomile, sweet marjoram, blue tansy, and spruce, and dang – beyond it’s benefits, it’s got the most delightful, relaxing scent. The blend was actually designed to address symptoms of ADD / ADHD, and it’s amazing for promoting better concentration, less excitability, and less anxiety / nervousness too. {I regularly use it at night when I’m trying to cram a full day’s worth of computer work into 3 hours and I truly find that it helps me buckle down and stay focused.}
After putting Sam’s jammies on, we do vitamin D drops, and most nights – a quick nursing session, depending on if he wants to. We’re definitely near the end of our breastfeeding journey, but he nurses for a short time first thing in the morning and just before bed most days and we’re both perfectly happy with that at the moment.
Next – teeth! Thankfully he outgrew his aversion to having his teeth brushed and our days of pinning him down and prying his mouth open while he screams are long gone… Nowadays I floss first, he has a minute to floss, I brush, and then he has a turn to brush. If nothing else, he goes to sleep with very clean teeth. :D
I’m not particularly invested in a certain kid’s toothpaste at the moment, but I do really love these reusable flossers we ordered for the kids a year or so ago. Prior to that, we had been using those little disposable flossers you can buy in big packs because they made flossing their tiny teeth so much easier, but I felt sick about all of the plastic we were throwing away. My brother and I had these reusable contraptions growing up and while they weren’t super easy to find, I’m so happy I got my hands on a couple. You just swap out the floss and you’re good to go.
Alright… Now for the most important part of our bedtime routine… Stories! {See Sam’s all time favourites here. Spoiler alert: they’re all about things that go.}
Because Brad and I tag team our evening routine, Sam reads one story with me upstairs and then heads downstairs to his bedroom to read one or two more with his Papa.
Not always, but oftentimes I’ll have his diffuser going while we’re getting him ready for bed, and then I’ll turn it off before he’s actually down for the night. I know that many people let their diffusers run all night, but I’m on the cautious side when it comes to kids and essential oils and there’s research that has shown that diffusing for long periods of time doesn’t actually add extra benefits, so most often I just run it for a short period before bedtime.
My go-to for both kiddos at bedtime? Back to Earth’s Lil Cherubs Synergy Oil Blend. It’s a combination of lavender, rosewood, geranium, lemon, bergamot, and chamomile and I find it to be such a calming, feel good blend. A little goes a long way, which I love, and I usually just add a few drops to a diffuser full of water. My other go-to, especially during cold and flu season, is straight up cedarwood essential oil as it not only has natural sedative properties, but is also known to reduce coughs and provide respiratory support – all while being kiddo safe {when used properly, of course.}
Next up, Sam has a drink of water, turns his Gro Clock to the sleep mode {we’ve used this clock with success with both kiddos}, turns on his air purifier {which doubles as white noise while he sleeps}, and turns off the light.
Brad then sings him a few songs, tucks him in tightly with his Loulou Lollipop Finery muslin quilts {these blankets are the coziest, most wonderful things}, and by 6:30{ish}, he’s in his crib for the night.
And that’s it… We close the door, turn on the monitor, and he falls asleep on his own and stays asleep until 6 or 6:30 the next morning usually. {Which is huge for our little preemie nugget who basically had to be held in order to sleep from the time he came home from the NICU to the time he was 14 months old.} It seems like a lot when you write it down step-by-step, but it really doesn’t take all that long and I think it does set Sam up for a restful night’s sleep.
Back to Earth products are available in select stores across Canada (see which ones here) and can also be ordered online and shipped anywhere across the country (see shipping info here). And if you’re on their website and you’re not sure what other products to also try, my absolute cannot-live-without items are:
The very first thing you do when gifted several pounds of zucchini? You make healthy chocolate zucchini muffins of course! The *very best* healthy chocolate zucchini muffins that are also vegan, naturally sweetened, and made with whole grains, that is. {WINNING.}
Just check these beauties out, will you? I don’t know if this photo does their size any justice, but they’re huuuuuuuge.
And begging to be turned into these insanely good chocolate zuchinni muffins by Relishing It. For real, they taste more like cake than any other muffin I’ve eaten before. Insanely good. We’re talking by far the very best healthy muffin I’ve ever tasted… To the point where I regularly pass them off as chocolate birthday cupcakes {and even our pickiest little guests gobble up TWO}.
Now here’s my public service announcement… If you’re just a regular person wanting a regular healthy muffin recipe, pop over to Laurie’s post and make them exactly as she tells you to. They’re absolutely perfect as is – no need to change anything.
Now if you’re like me and are attempting to minimize the amount of animal products your family consumes, try our version below. They’re every bit as delicious, but they don’t contain the egg or honey, which makes them healthy, whole grained, naturally sweetened, and VEGAN.
{this post contains affiliate links}
Here’s our line up of ingredients… First up, whole wheat pastry flour. Every bit worth the effort it takes to find, in my opinion. In Kuwait we used this one by Bob’s Red Mill and in Canada we use one from Nature’s Fare. Whole Foods stocks whole wheat pastry flour too and my guess is that it is decent. Next, cocoa powder, baking soda, baking powder, sea salt, and dark chocolate chips that are optional, but delicious. The wet ingredients include coconut oil, flax ‘eggs’ {which is just ground flax seeds and water}, and vanilla, and of course you’ll need the zucchini too.
The most important part of any baking session though? Little helpers. Little helpers who undoubtedly make the process longer and messier and way more fun.
Here’s how this recipe goes down… First, measure out the dry ingredients and whisk them together well.
Then in a separate bowl {we use a big glass measuring cup}, measure out the wet ingredients and give them a good whisk before adding them to the dry mixture.
Lastly, add in loads of finely grated zucchini that will pretty much just disappear during the baking process and leave you with the cake-iest, most delicious muffins ever.
Gently stir it in…
And then enlist your little ones’ help to prep the muffin tin {silicone muffin liners like these are the BEST} and divide the batter evenly between the 12 cups.
So good that we almost always make a double batch – otherwise they disappear too quickly.
The Very Best Healthy Vegan Chocolate Zucchini Muffins(adapted from this recipe on Relishing It)
2 tablespoons of ground flax seed
6 tablespoons of warm water
1 cup of whole wheat pastry flour
1/2 cup of cocoa powder
1 teaspoon of baking powder
1 teaspoon of baking soda
1/2 teaspoon of sea salt
1/2 cup of coconut oil {in its liquid state}
1/2 cup of pure maple syrup
1 teaspoon of good vanilla
1 1/2 cups of finely grated zucchini, deseeded if necessary
1/2 cup of dark chocolate chips
Preheat your oven to 350 degrees.
In a small bowl, measure out the ground flax seed and warm water. Stir to combine and set aside to thicken. {This mixture is two flax ‘eggs’.}
In a large bowl, add the flour cocoa powder, baking powder, baking soda, and sea salt. Whisk until thoroughly combined and sprinkle the dark chocolate chips on top.
In a separate smaller bowl, whisk together the liquid coconut oil, pure maple syrup, and vanilla.
Add the liquid mixture and the flax eggs into the dry mixture and gently mix until almost combined. Add the finely grated zucchini and give the mixture a few more gentle stirs. {A word on the zucchini… If you pre-grate your zucchini like we usually do, by the time you go to use it, there will most likely be some liquid that has drained off. No need to include this. Simply pick up the zucchini by the handful, allow it to drip over the bowl for a few seconds, and then add it to your mixture, tossing out any liquid that’s left in the bowl afterwards. Do not squeeze your grated zucchini dry before adding it… The moisture from the zucchini is what makes these muffins so dang good.}
Line your muffin tin with silicone muffin liners and distribute the batter evenly amongst the cups. Bake for approximately 20 – 25 minutes, or until a wooden toothpick comes out clean.
Remove the muffins from the oven and allow them to sit for several minutes before removing them from the pan and placing them on a cooling rack.
These will last for several days in an air-tight container on the counter, but because of there high veggie content, I pop them in the fridge if they’re going to be around longer than a few days.
Anyone who knows me well knows how much I love putting together fun gifts for kids. It’s my jam. There was a period in time when Miss G was a preschooler where I’m pretty sure every one of her friends got a play dough kit of some sort when their birthday rolled around, but we’ve also done LEGO kits, writing kits, art kits, car kits, baking kits, sensory play kits, craft kits, science kits, peg doll family kits, travel activity kits – wheeew. The list could go on. The kit-style kid gift is obviously my go-to. It requires no actual making of things… Simply collect items, pop them into a container of some sort, make the kit look somewhat pretty / organized, and you’re good to go. Truthfully, when we make kits as gifts, we don’t even bother wrapping them. We just add a tag with some baker’s twine and call it good.
This DIY slime kit is one of our more recent diy gifts put together for my sweet, slime-loving niece Kinslee for Christmas last year. Well, apparently it was well liked, because guess what we’re putting together for her for her upcoming birthday…. Yup – another DIY slime kit! {G’s also got one on her birthday wish list, so maybe I should just shop for two while I’m at it?}
Here’s a peek at our collection of kit items once we had done our shopping…
{this post contains affiliate links}
The first step in the collection process? Picking out a slime recipe book to include in the kit. There were a surprising number of options at our local bookstore, and while they all looked pretty good, I ended up picking The Slime Book over the others simply because I liked the fact that it didn’t advertise its recipes as ‘borax free’ like the others did. {Silly, I know… I don’t know why it bothers me, but slime recipes that are made using laundry starch, detergent, contact lens solution, etc. all work because those products contain some form of borax. Therefore, not borax free. Hmmm…}
I also really liked how it included this little shopping list in the front… Made the job of collecting things super easy!
We were able to find everything else between our local dollar store and the big box grocery store we often shop at, which I thought was pretty good. Here’s exactly what we included in the kit…
– 2 bottles of this clear glue {though this clear glue is a much better deal and what I was looking for in the first place}
– a couple of bottles of glitter {which is terrible for the environment, I know… we’ve stopped buying it for use at home, but I’d love to find a more earth-friendly version for situations like these… any suggestions?
We also included loads of fun add-ins, some of which were from the list at the front of the book and some of which were inspired by flipping through the slime recipes themselves:
The containers aren’t necessary, but I do think it makes it easier for slime kit recipient to manage all of the loose parts and it certainly makes the finished kit look more put together.
With everything ready to go, we placed everything neatly in a white bin we’d picked out…
And that was it.
To finish it off, we slid the book into the back and attached a big old-school mail tag that said ‘Kinslee’s SLIME KIT’ onto one of the bin’s handles, and our DIY slime kit gift was done!
Sometimes the very simplest things turn out to be the biggest hits, don’t they? Take these insanely easy paper tunnels for example… A totally random idea, thrown together on the spot, and yet Sam just loves them.
Do all little car lovers have a ‘thing’? I once nannied a little car lover who was obsessed with speed bumps. Like LOVED speed bumps. And Sam’s thing? Tunnels.
I don’t know what it is about them exactly, but he just freaking looovvvves tunnels. He’s constantly searching them out for his toy cars and will basically transform anything he can into a tunnel. Even if it’s your leg – hope you didn’t plan on moving any time soon {hah!}
So this afternoon when he woke from a nap talking about a tunnel for his purple concrete mixer, this little paper tunnel idea popped into my mind and it couldn’t be easier.
{this post contains affiliate links}
Basically you need two things – washi tape and card stock {I love this stuff from Ikea – it’s super sturdy and the colours are gorgeous}. Oh, and a hard surface of some sort. All I did was cut some of the card stock in half and kept some whole, then folded little tabs on each side, and washi taped them to our coffee table to form little rainbow tunnels.
Easiest thing EVER.
He collected up a bunch of different cars and trucks, placed them in the middle of the table, and then drove them around and through the paper tunnels one-by-one.
One thing I really love about this activity besides it being so easy is that while the paper tunnels are fairly crash proof, the fact that they’re just paper taped down onto a table encourages Sam to practice slow, controlled, gentle movements – something that doesn’t always come naturally to him.
These remain on our coffee table currently and probably will for a while, but when we’re done with them, we’ll just take them off and tuck them away until next time, probably reusing the same paper tunnels several times over.
Oh, how we love homemade popsicles in our house… Summer weather strikes we begin the ongoing cycle of whipping them up in an attempt to stock up our freezer while devouring them on the daily. And you know what? I don’t mind one bit. For the most part, they’re fairly nutritious and they’re so easy and fun to whip up with the munchkins.
The perfect addition to our favourites list? These dairy-free strawberries and cream popsicles made with fresh, locally grown strawberries. Gosh, they’re good! I don’t think I’ve ever seen anything quite like Sam slurping back his first strawberries and cream popsicle before in my life… I don’t even know how to describe it. Maybe a mixture of pure bliss and complete desperation all at once? {Hahaha!}
Now I probably wouldn’t let Grae and Sam eat these popsicles for breakfast like I do other varieties {popsicles can totally be breakfast!} because I see them as more of a treat, they are absolutely delicious and we *will* be making them all summer long, even if we have to start using typical grocery store strawberries.
With the end of the school year quickly approaching, it’s already time to start thinking about teacher appreciation gifts and this year we’ll include this ‘Thank you for being my teacher’ print-out with a purchased gift. We’ll probably mount it on coloured card stock or put it into a pretty frame of some sort, but wouldn’t it be amazing if every child in the class made one and we had it bound into a book?! Oh my heart! A full class book would make for such a beautiful, meaningful gift.
We’re officially into the last week of school and I couldn’t be more excited about it. Miss G had another absolutely fantastic teacher this year and for that, I’m incredibly grateful. In our experience, the teacher really does make {or break} the school year, and her teacher this year certainly made her {our!!} year a positive, happy one. Despite being new to the school this year, Grae made loads of friends, was happy to go to school each day, and got to take part in all kinds of really cool process-based, collaborative, and creative projects.
While we’re still working on putting together a little gift, Grae’s had this sweet little thank-you-for-being-my-teacher printable ready to go for weeks now and I just think it’s so simple and sweet.
First, let’s start with the draft. How much or how little you support your child through the process of completing the bullet-point lists and sentences will depend on their reading and writing skills, as well as how ‘kid-made’ you want the finished project to be. In my opinion, invented spelling is awesome and perfection is overrated, but either way, the one thing I would suggest is having your little one complete the project in pencil first. This way mistakes can easily be fixed and changes can be made. You know your little one best, so sit down and work on this together, or let them do it completely independently — or a little bit of both — it’s up to you!
Once you and your little one have reviewed the draft, invite them to trace their pencil lines with a black fine liner. While this step is optional, I do think it makes kid-printing pop and the overall project look super polished.
Now that the words and drawings have been traced in black fine liner, give it few minutes to set (so it dries completely dry), then allow your child to gently erase the extra pencil marks.
Lastly, invite your little one to add some colour to their project. Of course the drawing of your child and their teacher can be coloured in, but encourage them to also colour the banners, the little arrows and even the page border.
Once it’s coloured, that’s it! Your beautiful ‘Thank you for being my teacher’ poster is ready for gifting.
And if your school principal is leaving like ours is {don’t even get me started – I don’t think I’ve fully accepted it just yet}, check out this ‘Thank You for Being My Principal’ printable Miss G has also been working on.
If you know me well, you know that one of the many things I would LOVE to do one day is facilitate sensory-rich art and play classes for little ones and their parents or caregivers. It’s been a dream of mine ever since Miss G was four months old and she and I attended Kindermusik classes in a fellow expat mama’s home during our first stint in Kuwait… I just loved that the instructor was creating this awesome little community of expat mamas while doing something she loved and getting to stay home with her kiddos all at once – a dream come true, really.
I was lucky enough to get a little taste of facilitating sensory and art classes when I taught at a creative play and learning centre during our second stint in Kuwait, but what I’d really love is to have a gorgeous little studio in the backyard {I’m picturing bright white walls and loads of light pouring in through big windows} dedicated to bringing parents and their littles together through playing and creating. As much as it would be a space for parents to connect with their kids, it would be a space for parents to connect and form friendships too… There would be time for free play, books woven into our time together, and the projects would be as sensory-rich and open-ended as possible. Ugh – doesn’t it sound amazing?? {ONE DAY!!}
Until then, I’ll enjoy all of the fun play and art projects with my own kiddos and since the weather recently perked up in the Okanagan, Sam and I have been doing just that!
Below are 5 open-ended, sensory-rich art activities that he’s absolutely loved recently… In all of these, we used one or more products from Crayola’s ‘My First Crayola’ line aimed at meeting little ones in the early stages of their development. The art tools are sorted by stages rather than ages, which I love because as we all know, all kids develop and progress differently. The 3 stages are:
1) Scribble – for kiddos making their first random marks
2) Doodle – for little ones who can repeat different types of lines
3) Draw – for kids who can draw shapes and basic pictures
Now while I’d say that Sam is pretty much in Stage 2: Doodle at the moment, there are definitely Stage 1 tools he still loves using and there are even a couple of Stage 3 products he’s able to use independently. In the end, you know your child best, so go with what works for them!
This post is sponsored by My First Crayola. I’ve been a Crayola fan for pretty much my entire life… {tell me – was there anything better than opening a brand new jumbo box of crayons with the sharpener built into the back as a child?! Nope. There really wasn’t.} as always, all of the opinions in this post are my own.
Alright, ready?? Here are 5 super fun, open-ended, sensory-rich art activities to try with your little one…
Rip & Stick Sticky Collage
The materials:
Crayola construction paper {we used full-sized sheets from the huge pad we always keep on hand as well as half sheets from the Preschool Readiness Kit simply because the colours are so beautiful}
Cut out several construction paper frames, adhere them onto a large roll of clear contact paper, and then cut away the extra contact paper. Hang the frames up onto a wall or window sticky side out and include a little basket or tray of small construction paper squares and the safety scissors {if including them} nearby.
The process:
Invite your little one to rip {and or cut} the construction paper squares into small bits. Sam’s not quite ready for scissors just yet, but he was very interested in them and gave them a go. Ultimately, we went back to ripping because it’s more appropriate for his current abilities and he loved it! While it can come off as simply destructive, ripping paper actually provides a great fine motor skill workout and provides both auditory and tactile feedback – win-win!
With the paper bits ready to go, invite your little one to stick the bits up onto the frames. The contact paper is a great way for little ones to explore the concept of sticky and makes creating collage-style art a breeze.
Another perk? A contact paper collage means no glue necessary, so this is virtually a mess-free activity.
The finished project:
Isn’t this beautiful with the sunshine streaming through the window? I especially love this project because it can be left up for days and added to when the mood strikes.
Using painter’s tape, secure the watercolour paper to a flat, easily washable surface. This will not only keep it in place as your little one creates, but will also leave a beautiful white border around the edge of the piece that will make the finished project pop and look super polished. Remove the caps from the tripod markers and stampers and place them in a tray for easy use and prepare a jar with some water and the paintbrushes in it for a little later on.
The process:
Invite your little one over to draw and stamp on the large piece of watercolour paper.
The more colour the better in this case, so it’s perfect that the little shape stampers we used basically beg to be coloured in. {Just look at that concentration, will you?!}
This is also the perfect time to experiment with different types of lines… Slow ones, fast ones, straight ones, wavy ones, crazy ones – anything goes!
Alright, now for the magic! Once your little one is done colouring and drawing, tuck the markers and stampers away and bring out the water and paintbrushes.
Invite your little one to paint their picture with water and watch as they observe with wonder.
When the painting process is complete, leave the piece to dry. Later on, gently remove the painter’s tape to reveal white border.
Using masking tape or painter’s tape, secure a piece of bristol board to the underneath side of a low table {coffee tables and kid-sized tables are perfect for this}. Trim the bristol board first if needed. Set out a variety of crayons in a tray or basket under the table.
The process:
Invite your little one to draw upside down! Sam totally got a kick out of this.
While this may seem like such a simple activity, the upside down element really brings a sense of excitement to the project and requires some gross motor planning that just isn’t required when drawing or colouring in the usual manner.
Depending on your little one’s interests and abilities, he or she may experiment with different kinds of lines and formations like Sam, or he or she may compose more of a traditional picture – both of which are great. There’s no right or wrong here and the activity can be left out and added to for as long as you like.
The end result:
This is what I found under our coffee table a few days ago after more than a week of adding to it. Obviously Miss G jumped in on the fun at least once and fun was had. It may look like nothing more than scribbles, but the purpose with open-ended art is the process of course.
Foamy Painting
The materials:
a large tray with a raised edge {even a baking sheet will do}
watercolour paper
water
Crayola Fingerpaint {this stuff is super washable – even after sitting on our easily stained white table for 45+ minutes}
1 tablespoon of dish soap {while natural formulas will work, the foam made by a traditional formula seems to last longer}
1 tablespoon of cornstarch
Simply place everything into a blender and blend on high for approximately 30 – 45 seconds. Repeat for each colour, working quickly as the foamy bubbles do disappear over time.
The set-up:
Trim your watercolour paper so that it will fit on your tray or baking sheet. Whip up foamy paint, place it into a tray of some sort, and set it out with Crayola’s Jumbo Paintbrushes {I love the sensorial element these add to painting projects}.
The process:
Invite your little one to create a masterpiece using the foamy paints you made. I tend not to give Sam any instructions with projects like this one… The more open-ended the better.
Although the foamy paint will thin out with time, the beauty of pairing it with these Crayola Jumbo Paintbrushes is that their sponge-like textures totally have the ability to reactivate the bubbles. Sam discovered this on his own as I sat back and observed and he was so pleased with himself.
Allow your little one to explore the paints with his or her hands too if desired! This is as much a sensory play activity as it is an art activity and this homemade paint is super washable, so nothing to worry about there.
When done, carefully remove your little one’s piece from the work tray leaving all of the bubbly foam in place and set it somewhere to dry. If you have something that will allow it to get some airflow on the bottom too, even better! {The cooling trays you use while baking are amazing for this purpose.}
The end result:
How unique is this finished texture?! It almost reminds me of the moon’s surface.
Set your drop cloth out and secure the bristol board to it using the white border method. Place your paints into a paint tray of some sort and designate one paintbrush per colour. Trim a piece of bubble wrap so it’s the size of your bristol board or smaller.
The process:
Invite your little one to paint on the more textured side of the bubblewrap. For this project, you may want to encourage him or her to be generous with the paint as it tends to turn out better when a good amount is used.
Next, flip the bubble wrap over onto the bristol board canvas and invite your little one to {carefully} walk, dance or stomp on top of it. You want the bubble wrap to stay as flat and still as possible, so if you can hold down the edges while your little one dances and stomps, I’d recommend it.
You may also want to put on some tunes for this step – I mean, what doesn’t a little ‘Baby Shark’ make better??
Carefully lift the bubble wrap and invite your little one to do some more painting on it.
Then repeat the walking / dancing / stomping process again and again until the bristol board is covered in layers of textured, bubbly-looking paint.
And if all that stomping and dancing tires your little one out, why not let them have a little lay down on their artwork, right? {HAHA!}
The end result:
Beautiful, right? I love how the colours gently blend together in some spots while the individual bubbles are quite evident in others.
Well, that’s it. Five super open-ended art activities for little ones that are all about experiencing the process rather than creating something with a specific finished product in mind.
What do you think… Would your little one enjoy any of these?
Come August we will have been in our new house for a year, and though we’ve definitely ‘settled in’, our house is still a little stark. We still have a few key pieces to purchase, but the biggest part of part of it? There’s really nothing on the walls. I figure it will eventually come together and while I have a few different ideas for this tall bare wall on our landing {instagram wall? low profile book case?}, in the meantime we’ve been using it for all kinds of vertical projects and play. This giant sticky collage was a total hit with both kids {and that’s no small feat when they’re 5 and a half years apart!} and was added to each day for about a week and a half.
{this post contains affiliate links}
The best part is that so long as you have these three items – contact paper {CAN}, wide painter’s tape {CAN}, and scissors – you can pretty much make this project happen with random loose items from around the house. No need to buy anything new!
Now a word on contact paper… You can find this stuff at office supply shops, but many dollar stores carry it too. lt’s usually in the kitchen aisle with the other drawer liners and no slip grip rolls. For this project, we used two full rolls of the clear contact paper that Dollar Tree stocks.
Alright, so here’s the trickiest part of this activity… Getting the contact paper {CAN} up onto the wall. Not going to lie – it can be a bit frustrating at first. We’ve been doing contact paper activities since Miss G was wee and I kind of have my method down now, thankfully.
First off – don’t attempt this while you have little ones who desperately want to get to the playing part of the activity around. Still, even now, I put our contact paper up during nap time or at night when Sam is in bed. It’s just easier that way.
Second – roll your length of contact paper out on a table and fold back just a couple of inches of the paper backing along the length that you’re going to tape. This will reveal the sticky side {which of course you’re going to want facing outwards on your wall}.
Third – while still at the table, run a length of painter’s tape along that edge, adhering half of the tape’s width to the contact paper and leaving the other half to adhere to your wall.
Fourth – stick the contact paper up onto the wall, keeping it as straight and flat as possible and then gently peel off the paper backing.
Now if you’re going to do a GIANT sticky collage wall using two strips of contact paper like we did, prep the second strip of contact paper the same way – the only difference is that the taped edge is going to be the bottom side of the collage wall. Then, holding the non-taped edge of the contact paper strip {paper backing still on of course}, place it onto the first piece of contact paper so they’re overlapped a couple of inches. I sort of pat it into place to make sure they’re stuck together well before gently tugging downwards and adhering that bottom strip of tape onto the wall. The goal is to have it as flat as possible, I never seem to get mine *perfectly* flat and it really doesn’t matter.
Last step – add painter’s tape {CAN} along each vertical side to complete your sticky canvas.
Now for the fun part… Collecting your loose parts! Basically anything goes here – no need to buy anything new unless you truly have a house free of any little junky bits / craft supplies. Most all of our stuff comes from our craft drawers, but also look in your junk drawer. Things like bits of string, twist ties, bread ties, and scraps of packaging work well! You can also cut pictures out of your weekly flyers – they’re basically like stickers when paired with a sticky collage wall and bonus: get the kiddos to cut out their favourites for some added scissor practice!
Here’s what I originally set out with our giant sticky collage:
Then with the giant sticky collage wall set up and the loose parts collected, I left it for Sam to discover after his nap. {Of course there’s really no missing something of this size!}
He stuck up a couple of little parts {talk about an awesome fine motor skill workout} and was pleased as punch about the whole thing.
We had to run off to grab Miss G from school {yup, with Sam in robot jammies}, but as soon as we returned home, it was back to the sticky wall.
He was soooo excited to show his big sis!
What I love about open-ended invitations like this one is that kids always seem to add their own spin on them given some time and space. And honestly, most of the time their ideas are better than mine! After Sam had lost interest and moved onto something else, Miss G asked to bring out our giant ball of multi-coloured yarn and I just think it was such a neat idea.
Now here’s my secret to making the interest for invitations to play or create like this one last as long as possible… Add a few new things each day or two! So in this case, I’d make sure the landing was tidy (I’ve totally noticed that my kids don’t gravitate to spaces that are scattered and a mess), then I’d add a few new things into the loose parts tray to keep interest high.
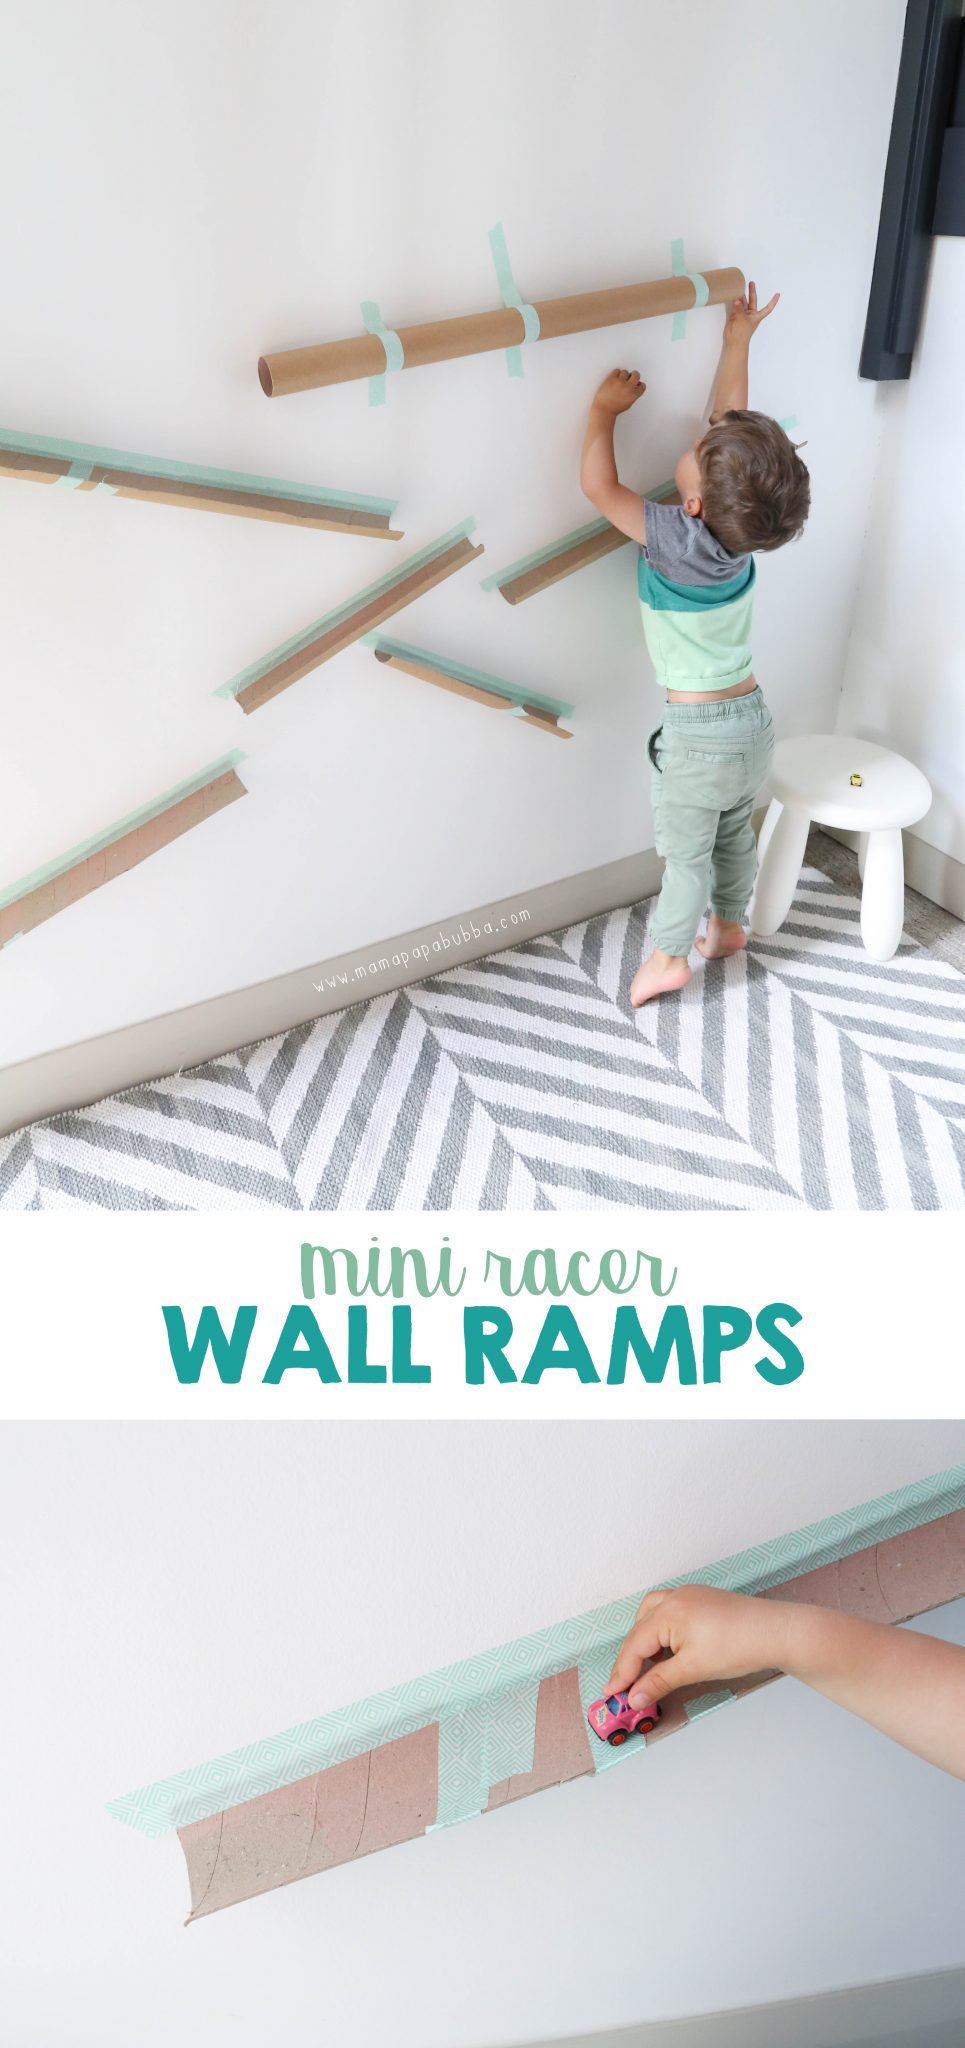
This boy and his cars. He just loves them. Throw in a ramp and he’s pleased as punch, so imagine how thrilled he was about these mini racer wall ramps we put up on our landing today! {SOO thrilled.}
{this post contains affiliate links}
It’s incredibly easy, but here’s what we used to create our mini racer wall ramps:
several mini racers (anyone else remember these from their childhood?)
several cardboard tubes (we repurposed most of ours from our car ramp sensory bin)
Now because most all of our paper rolls were the ones we used for our car ramp sensory bin, we didn’t have to cut ours in half lengthwise, but if you do have to do that part, it does take a little bit of effort… Sharp, longer scissors are key in my opinion. With your paper tubes cut, it’s as easy as running a long piece of tape down one edge and sticking it to the wall at an angle.
There’s really no right or wrong way to do this… You can have the ramps work together or separately – up to you. I decided to start at the top and got Sam to stand near the wall to judge how high we could go with the first ramp. I thought it would be fun to make the ramps work together if possible, so with each addition, I got him to send one of his mini racers down and then positioned the next ramp so it would catch the car once it launched off the first.
Once we had all of the previously cut ramps up, I asked Sam what he’d like to do with our one new paper roll – cut it and make two new ramps or keep it as is and make one tunnel and he was absolutely certain that one tunnel was the way to go, so we hung it as is.
And then we were off!
He’d simply place a mini racer, wheels down, at the top of the tunnel or one of the ramps and then watch it go.
The transition from one ramp to the next didn’t always work out perfectly, but he didn’t mind one bit. If a car got stuck sideways or wheels up, he’d go help it and then step back to continue watching it race down.
Part way through we added a basket to catch the cars that were flying off of the last ramp and crashing into our window, which added a fun element.
I don’t know how long this will stay up on our wall for, but it’s not going anywhere anytime soon.
Oh, how I love me a good sensory bin. When Miss G was a toddler, we were sensory bin QUEENS. Seriously though. We probably had a minimum of two sensory bins going on any given day. She loved them, I loved them, and they come with SO many benefits, so we just ran with it.
Well, as soon Sam started digging in our freshly planted container garden, I knew exactly what we needed to put together for him – a gardening sensory bin! A place where he’d be free to dig, fill, plant, and rake to his heart’s content.
So that’s exactly what we did.
{this post contains affiliate links}
Here’s what it included:
– potting soil (the plainest, nothing added soil the store had)
– several small pots from the seedlings we’d purchased for our garden
We also used the double bin method that I often use with Sam (my boy who can destroy an entire room in approximately 30 seconds flat). It’s not a perfect system, but it does help contain the sensory bin filler (in this case, soil) and the extra space can also be used to house materials you want nearby, but not necessarily right in the sensory bin itself. This is our go-to small sensory bin and this is my beloved jumbo sensory bin.
As I usually do when introducing an open-ended activity, I sort of just sat back and observed from the get-go.
Now he had spent the last few days helping Grae and I transplant seedlings into containers, but it was the sweetest thing to watch him carefully fill his pot with soil and then stick a flower in the centre.
Before long, Miss G joined in. I’m always more than happy to let her enjoy activities I’ve set up with Sam in mind, but I do sometimes like him to get a stab at it first – before seeing how his big sister would interact with the materials.
Now I don’t know whose idea it was, but once Grae joined in it wasn’t very long before one of our pump pressure water sprayers came into play. {Side note: I looove these for gardening with kids as I feel like they make it hard to over water or hurt the seedling with a flow that’s too strong.}
Of course once the water came into play, a whole lot of drinking and showering came along with it – hah!
Just for fun, let’s take a look at the last time I did a gardening sensory bin for Miss G, shall we? This was back in October of 2014 {so Grae was just over 4 years old} in the courtyard of our apartments in Kuwait. I took the photos for the purpose of sharing them here on the site, but never got around to it {#storyofmylife}. Her bin was similar, but included the CUTEST white picket fence and tiny wooden ladybugs. Also, those lilacs? Beautiful. {Still sad that I had to leave so many fun things behind when we moved home.}
Aw, my sweet baby girl!!
You can also see another gardening sensory bin we did when Miss G was just a year old here. My gosh – the concentration and determination in that video just kills me!
A while back I saw this amazing video clip of several brothers doing a ‘sensory walk’ in their backyard. It was different than other sensory walks I’d seen built right into kids’ outdoor play spaces – this one was done with bins filled with things like shaving foam, coloured water, flour, and water beads {you can see the clip here.} Such a neat idea if you want a temporary sensory-filled walkway, isn’t it? I filed the idea away in the back of brain after watching, but today after I’d felt like both kiddos had had plenty of sun {we totally skipped spring here in the Okanagan and moved straight into summer}, we gathered up some household items to make our own indoor no mess sensory walk.
{this post contains affiliate links}
Here’s what we used… First up, our go-to, use-for-everything Ikea trays. We love these and use them for everything from art to sensory play to picnics. Next up, a yoga mat as our base {to keep the trays from sliding around} and no-slip placemats {that are usually used to keep the trays from slipping around – essentially this stuff cut into rectangles} to help hold the sensory materials in place. For the sensory materials, we went with things of different textures that wouldn’t leave any mess behind – sponges, scrubber pads, a cool damp towel, bubblewrap, and later on a couple of LEGO bases. {Of course you can use whatever you have around the house.}
I often think that pulling together materials and prepping an activity is half the fun, so as long as it’s not an invitation I’m setting out for the kids to discover, I try to include them in the process.
Kids always have the best ideas anyways.
With our yoga mat out, our trays lined up and topped with the no-slip placemats, we began to cover the surface of each tray with one of our sensory materials.
It took no time at all and then the kids were off!
Now while I set this sensory walk up with Sam in mind, I had a feeling Grae would join in and I’m so glad she did. I just love that she still loves simple play and as a mama to a girl who’s well beyond her years in many ways, I’ll hang onto that as long as I can.
Part way through their play we found another tray, so it got added to the sensory walk with a couple of big LEGO plates on it.
{Now side note on these “LEGO” baseplates… While I’m not normally one to buy a knock off version of something, this set of baseplates was on a mega sale and my kiddos never seem to have enough bases for their creations, so I decided to give them a shot. Well. They work perfectly. And quite honestly, had I not known they weren’t actually the LEGO brand, I probably would have never guessed. Well worth it if you’re trying to build up your collection in my opinion.}
Now once it was set up, I basically just sat back and watched the kids play. They passed through again and again, walking slowly, walking quickly, walking and pausing on each tray, jumping from tray to tray….
And then Sam moved to experimenting with crawling and Miss G moved to dancing and spinning down the walk. All wonderful ways to explore different textures and the sense of touch.
Now while I’m not a physiotherapist or an OT, Sam and I do a lot of physio work together and I feel like this activity not only encouraged jumping with control in order to get from the centre of one tray to the centre of another, but also just encouraged him to move and step with control and intention {as putting weight on the edges of the trays would make them tip upwards}. Fun sensory-rich play that helps him work on some of his physio goals? YES PLEASE.
If you know me well, you know that my love of gift giving runs deep. Like REAAL deep. {Embarrassing but true? One year in university I took out an additional – *ahem* unnecessary – student line of credit and I’m pretty sure my motivation was largely not wanting to ‘skimp’ on Christmas presents that year. Sooo irresponsible and silly, but that’s how much I loved giving gifts even as a newly minted 20 year old.}
Fast forward a few years and I seem to have passed my love of gift giving on to Miss G {though no silly Christmas shopping loans in her future – hah!} Over the years we’ve put together some really fun and unique gifts for the people she loves and while none of them have been fancy or expensive, they’ve been from the heart and super sweet, which I love.
{this post contains affiliate links}
Here’s several of them – creative gifts kids can make for adults {or at least make with help}…
Hand Shaped Ring Dish – One of my most prized possessions and definitely something I’ll cherish forever. That’s Miss G’s little four year old hand turned into a ring dish and to this day it sits out on my vanity. It’s been through three moves {one of which was from the Middle East to Canada} and a power cleaning mishap {notice the scuffed fingertips and the glue on middle finger} and I still think it’s just beautiful. {This package of clay (CAN) is enough to make at least 3 hands, though you’ll probably get more out of it.}
‘I Love You’ Pillowcase – The simplest gift ever, but I’ve always wanted one for myself. I think it’s especially precious when kiddos are just first starting to print, but special no matter what. {We really like these markers (CAN) for this project.}
Creamsicle Sugar Scrub – Mmmmm… Citrus and vanilla? Yes please! Truly the easiest homemade bath product out there and while you most likely have everything you need to make it already in the house, it still feels luxurious. {This non-alcoholic vanilla (CAN) is our go-to at the moment – smells SO GOOD.}
Family Portrait Embroidery Hoop – Isn’t this the sweetest thing? Definitely kid made, but combination of the white fabric and the natural wood makes it totally hangable, even in the most put together of homes. {In addition to being the best for general kitchen use, dishtowels like these (CAN) are perfection for this project.}
Footprint Butterfly Pot Is there anything cuter than little feet? Nope. Definitely not. Fill this post with a beautiful plant or with soil and a packet of seeds and you’ve got a lovely gift. {This paint set (CAN) looks gorgeous and would be perfect for this project.}
Coconut Oat Milk Bath – Ahhhh… Skin soothing relaxation in a jar. We LOVE this stuff and use it nightly. It’s 2 ingredients and is naturally soothing, moisturizing, anti-fungal, anti-bacterial, and anti-inflammatory among other things, which makes it a perfect for treating skin irritations and eczema. {How perfect are these jars (CAN) for gifting it in?}
Homemade Beef Jerky – Anyone else have a meat lover in a meat-free home? That’s my husband’s situation, so we try to make an exception come his birthday and Father’s Day. Last year we made him this incredibly easy beef jerky and it was gone in no time at all. {These racks (CAN) are perfect for making beef jerky at home.}
Coffee Sugar Scrub – The scent of warm coffee and vanilla filling the air while having a shower? YES PLEASE. This sugar scrub is incredibly easy to make and believe it or not, it’s a great way to put used coffee grounds to good use. {I’m obsessed with these squat little jars (CAN)… Wouldn’t they be perfect for gifting sugar scrubs?}
‘I Love You’ Teacup – If there’s a reoccurring theme here, it has to be simple gifts that people will actually enjoy and use. And this little teacup is just that. How lovely would it be to be reminded that you’re loved with each sip of your evening tea? {We used these markers (CAN) for this project and I’m anxious to see how they hold up as it’s our first time using them.}
Potted Salad Garden – The perfect gift for a gardener or someone who just loves salad {me! me! me!} and it truly keeps on giving! {The style of pot we used for this project wasn’t easy to find, but check your local garden centre.}
Ombre Wooden Beaded Necklace – A kiddo-made necklace that anyone in their right mind would proudly sport while out and about! In fact, I’ll take one in each colour of the rainbow, pretty please. {This set of beads (CAN) includes assorted sizes and will make many necklaces!}
Handprint Memory Box – You know all of the sweet little notes and drawings kids give you that you just can’t bear to recycle? A little memory box like this is perfect place to keep them. {This box (CAN) is affordable and perfect!}
Handprint Baking Soda Clay Keepsakes – Another one of my favourite projects ever. Clearly I have a thing for handprints {and I absolutely love that the clay allows the little hand creases to be seen}, but wouldn’t this make such a special gift for a grandparent? {We made ours around Christmastime and went for golden glitter, but I’ve had my eye on this glitter set (CAN) for ages and would happily take a handprint keepsake in each colour.}
Family Portrait Mug – I mean how sweet is this?! A kiddo-drawn family portrait on your mug?? Plus, kid-drawn people are the very best. Miss G made this as Brad’s work mug and that little family portrait lasted for just over 3 years until we finally put it into the dishwasher not long ago. {Back then we used these special Sharpies (CAN).}
Painted Wooden Bead Necklace with DIY T-Shirt Cord – I truly adore these necklaces and the best part is that kiddos can fully customize the colours, patterns, and t-shirt cord to what they think their special adult will like best. {This bead set (CAN) is great for this project.}
Potted Flower Pens – Wouldn’t this be the best gift for a teacher or someone who works in an office?! Not only are flower pens the prettiest, but no one is going to walk off with your pen without being noticed when your collection looks like this! {We picked up our faux flowers from the dollar store.}
Fingerprinted Love Tokens – Little heart-shaped tokens with your loved ones fingerprints on them? The sweetest! We actually made this set for Miss G when she was going through a bit of a tough transition (one has Brad’s fingerprints, one has mine, and the other has hers), but wouldn’t a his make a sweet gift for a parent or grandparent? Each child or grandchild could make one heart and the recipient could keep all of the little ones he/she loves most on his/her bedside table or in his/her bag. {This is the clay we used for this project.}
Kid-Drawn Phone Case – For the tech lover! Or anyone who uses a cell phone really. I find sentimental Father’s Day gifts especially tricky for Brad, but this was something that he actually used {at least for several months before switching back to his other case} and I think the little drawing Grae did is the sweetest! {You can find all kinds of clear phone case here (CAN).}
Sweet & Spicy Sriracha Cashews – For the person who is tricky to buy for and loves spicy snacks! These are incredibly easy to make and kiddos can totally help make them. They’re delicious too! {I love baker’s twine and little tags like these (CAN) for homemade gifts.}
Hand-Drawn Tea Towels – Such a sweet and easy gift. Go in with a plan or let your little one’s imagination run wild – you really can’t go wrong here. Plus, who doesn’t need tea towels. {These towels (CAN) are my favourite because not only do they dry really well and not leave little fibres behind, but the fact that they don’t have any stretch makes them much easier to draw on.
Well that’s it… All kinds of gifts that kids can make for adults. What would you add to the list?
While Brad isn’t the type to whip up something crafty with the kids for Mother’s Day, writing for CBC Parents means that Miss G and I often get to create fun gift ideas to share on their site and of course – I directly benefit. ;)
In the past we’ve made an ‘I love you’ pillowcase (the sweetest, simplest thing) and a family portrait mug for Father’s Day, and this little ‘I love you’ teacup gift sort of combines the two.
It’s soooo easy that I’m hoping even those who consider themselves not at all crafty will give it a shot with their kiddos. The best part? {And this isn’t really usual advice from me, but} if you shop at a big box grocery store, pretty much everything you need should be there!


 {this post contains affiliate links}


 {this post contains affiliate links}


 {this post contains affiliate links}


 {this post contains affiliate links}


 {this post contains affiliate links}


 {this post contains affiliate links}


